

Ever faced a situation where you were excited about posting a cool reel on Instagram but instead got a pixelated, low-quality one?
As it turns out, most media features of Instagram suffer from this. But today we are going to talk specifically about Reels in bad quality after Upload.
Reels have been one of the most popular features of Instagram recently.
As such, uploading videos to find them end up low quality on Instagram not only ruins the mood but also the views. In this article, we will see what causes this and what are ways to fix this issue.
In the meantime, if you are having trouble with getting views on your Reels, check out this guide!
Why is my Reel quality so bad?
Quick Answer: Your Reel quality looks bad after uploading because you are uploading it using a mobile internet connection, your Instagram upload settings are on the default setting, the recorded video is in 4k or 8k quality, and the dimensions of the video are not appropriate.
You might be thinking Instagram should have top-class video and picture quality features since it is one of the biggest social media apps. But the truth is, it does not have high-quality data features for the same reason you said yourself.
It’s a social media app. Its job is to provide social interaction digitally, not holding high-resolution media.
This would go against its purpose, so no matter how long we wait. The media resolutions supported by any social media app would always be below the standards of media resolution at that time.

Another good reason for this is to prevent crashes and lags on devices running Instagram across the globe. Think about it, a 4k resolution video sounds very exciting.
But if Instagram did somehow manage to establish servers that stored and provided these videos, so many countries or places with low bandwidth, or poor network speeds would suffer. Multiple devices not capable of running high-resolution videos would start to lag and may even freeze very badly.
So now it all makes sense. But there still has to be a way to manage quality, right? Yes, there is. Let us discuss how we can retain the highest possible quality on Instagram.
Fix: Instagram Reels in bad quality after Upload
Instagram does not provide us with a direct feature to select the quality of video we would upload. So it is hard to change the quality of Reels that way, but there are some steps we can take to ensure the best possible quality for upload.
1. Ensure you upload when on Wi-Fi connection:
Instagram deteriorates video quality when it detects a struggling internet connection. Sometimes if the network cuts off in the middle, the video could even be highly pixelated. The video would suffer minimal loss if you are on a speedy and stable Wi-Fi connection.
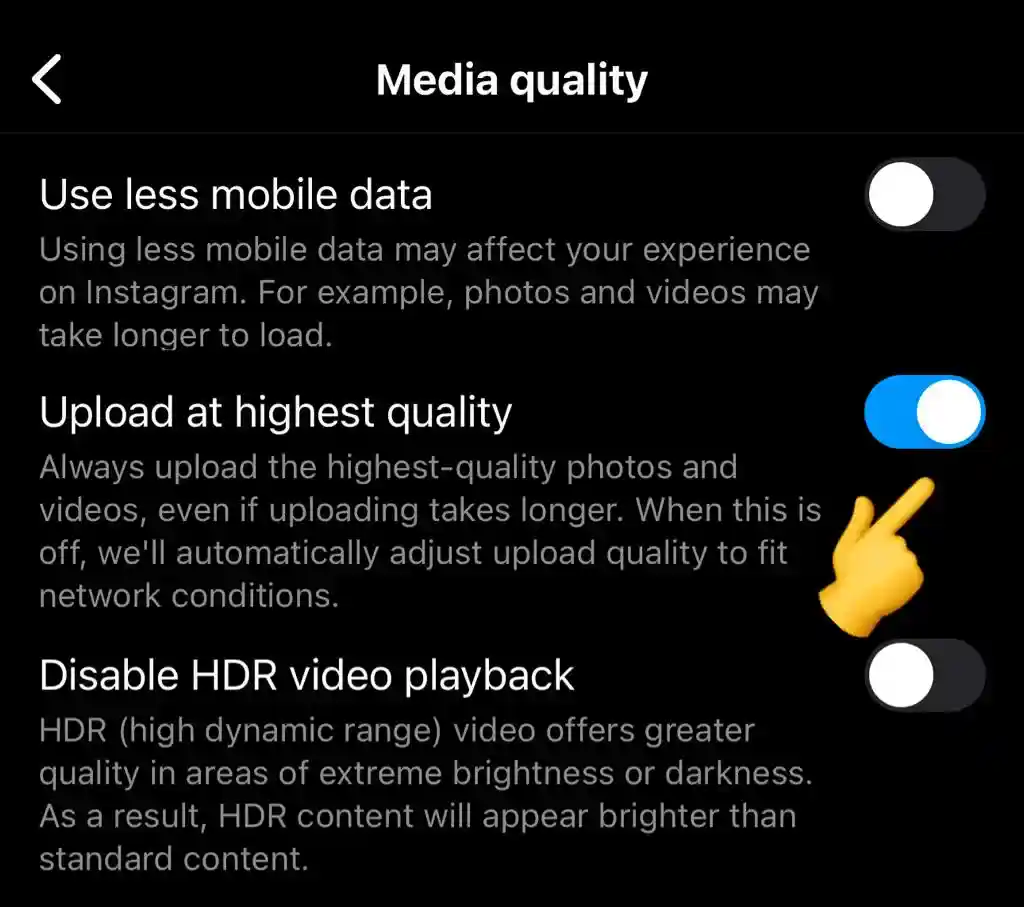
2. Make sure you have turned on ‘Upload at Highest quality’:
Yes, by default, Instagram doesn’t upload your posts or reels at the highest quality.
So, if your Reel quality decreases after upload, you need to turn on the upload at the highest quality settings.
Follow the steps below to turn on the ‘Upload at highest quality’ setting on Instagram:
- Open Instagram app
- Tap on your Profile
- Tap ‘Hamburger menu’ (Three lines) in the top right corner
- Now, choose ‘Setting and Privacy’
- Scroll down and tap on ‘Media Quality’
- In the next menu, turn on ‘Upload at highest quality’

3. Use Good cameras and the right resolutions:
If you shoot your videos through a high-quality camera or phone, the uploaded video quality would still decrease but lesser compared to the video shot with a low-end camera.
By making sure you choose the correct resolution, you would ensure Instagram messes your videos or create other similar issues. Instagram prefers 1080p resolution at max with 30 fps or fewer, with a storage size of 15 Mb.
4. Use Cloud services for uploading:
If you upload to your preferred cloud storage service, such as Gdrive or Dropbox, or Onedrive, you would not deteriorate the quality of your video. Then you can use the cloud folders to directly upload the video to Instagram.
It would be mediated directly by the fast and stable servers of the cloud storage company. Thus, your video would suffer less quality loss than it does on the regular internet speed.
5. Pay attention to the dimensions of videos being uploaded:
This would not affect the quality of the Reels video, but a wrong dimension means Instagram might crop your video in an abrupt way, leaving it partially or completely non-viewable.
SEE ALSO: (13 Reels Tricks) Instagram Reels getting No Views
Conclusion:
I hope this article helped you understand the causes of the bad video quality of Reels and how to avoid it. Be sure to check out how to add text to Instagram Reels here!
Further Reading:
How to Fix Instagram Reels effects not working (4 Ways)
How to get moving images on Reels (Instagram)
How to tag friends in Reels (Instagram)
How to delete Reels draft on Instagram

For someone who is a Medical School student, you certainly did not expect me to be here. But here I am, due to my fondness for technology, games and science. There is just something really sweet about technology that has helped in binding us together, so it is not surprising that I love to talk about it. And with the same technology, you could connect with me easily, so feel free to!


