

Different regions impose different sets of rules for a company or app to remain functional. Where in other regions Tinder doesn’t really have a minimum age requirement to use their app. Tinder asks its Japanese users to verify their age before they can set up a conversation with their match. And before you ask – No, Tinder verification can’t be faked.
We think it’s a great move. Whatever your opinion, you will be required to verify that your age is 18 years or more to use the app.
But, we have seen several users reporting that Tinder age verification needs to be fixed for them. In this post, we will discuss the possible reasons for this issue to occur, along with the methods to fix it.
Why is my Tinder Age Verification not Working
Short Answer: Your Tinder age verification is not working because your submitted ID is invalid, your ID submission was rejected, you are not 18 years old, there are issues with the Tinder services, or your app is causing the trouble.

There could be many reasons why your Tinder Japan age verification is not working. The primary reason for this issue is the submission of an invalid ID, and even if you are submitting a valid ID, you may have submitted it incorrectly.
In the next part of this post, we will talk about the ways to fix this issue.
SEE ALSO: Why are my Tinder messages not showing Up [9 Ways to Fix]
Fix: Tinder Japan Age Verification not Working
1. Ensure you are uploading a valid ID
To verify your age before using Tinder in Japan, you must upload a valid ID to verify your age. Tinder is very specific regarding the IDs that can be used for verification.
You can only use these government-issued IDs –
- 1. Japanese passport
- 2. Japanese driver’s license
- 3. Japanese health insurance card
- 4. Non-Japanese passport
Invalid IDs for Tinder verification –
- Temporary Driver’s License
- Pension Book
- Resident Card
- Student ID Cards
2. Ensure a proper photo for uploading
If your age is 18 years or more and you are still facing issues in the Tinder age verification procedure, then it is quite possible that you are not uploading a proper image of the ID.
Before you upload the photos of your ID, ensure the following –
- 1. Click an unblur photo: Take your time and capture a clear photo of your ID. Tinder will reject the ID for photo verification if it is blurred and unclear.
- 2. Do not use flash: Using flash might put a white glare on the photo. Instead, find a room with natural light and click a photo.
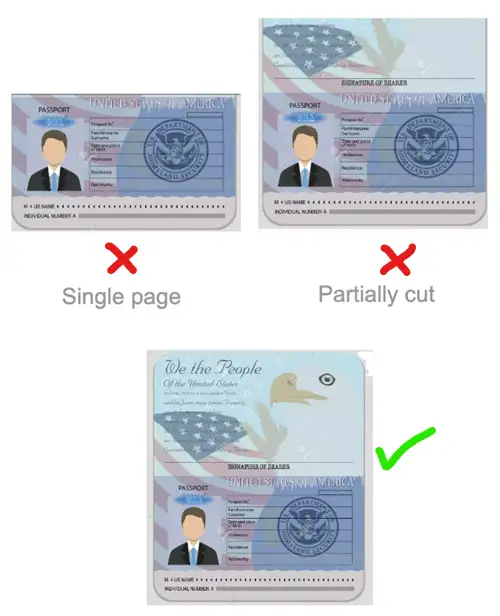
3. Ensure the entire view of the ID
An image with a partial view of the ID won’t work in the verification procedure. The guys at Tinder will quickly reject your appeal for verification.
To avoid issues like these, always upload a photo of the ID with a full view. Your photo must be visible and clear.
The scanned passport image for ID verification must include both pages for proper verification.
4. Check internet issues
Tinder’s services may only be utilized after establishing a reliable connection to the internet. If your mobile device does not have an internet connection, you will not be able to access Tinder services.
It is possible that a bad internet created issues when you tried to upload your ID.
If you are seeing an error message that says “TinderID Verification Failed,” the first thing you should do is check your internet connection. Please be sure to follow the below steps if the problem still exists even though your device is connected to the Internet.
5. Reboot your device
It might seem like a simple solution, but sometimes just restarting your device is all that’s needed to get everything back up and running smoothly. It is certainly worth a go because it has the potential to solve a variety of minor issues.
6. Contact Tinder customer support
If none of the above methods works and you still cannot get through your age verification procedure, it is time to reach Tinder customer support.
Reach out to Tinder Help/Support to solve the issue of Tinder verification.
How long does Tinder ID verification take?
After you have uploaded your information as well as your valid ID, all that is left for you to do is wait for the verification procedure to be finished.
The acceptance or rejection of the verification request will often take no more than a couple of hours. Tinder will send you a notification as soon as the verification procedure is through.
SEE ALSO:
(7 Ways) Fix Tinder notifications not working (iPhone & Android)
There Was A Problem Deleting Your Tinder Account (Solved)
FAQs
Q1-Can you lose Tinder verification?
Once the verification process on Tinder has been finished, the user’s biometric information is permanently lost, and it is impossible to retrieve that information again.
Q2- Can Tinder ban your IP?
There’s a possibility that Tinder has blacklisted your IP address. Tinder is able to identify you on the dating app by using information such as your IP address and other information about your device.
Tinder, on the other hand, does not ask for your IP address in order for you to use the site. To get around this issue, either connect to the internet over a virtual private network (VPN) or restart your router.
Final Words
Tinder is a well-known dating application that now has more than 75 million active users. However, some customers are reporting that the Tinder ID verification they are attempting to utilize is not working properly.
This problem, which appears to be impacting a large number of individuals, is the source of a great deal of aggravation. Tinder is well aware of the issue and is now hard at work on a fix. In the meanwhile, there are a few actions that consumers may do to attempt to resolve the problem on their own.
Further Reading:
Fix Tinder Fast Chat not Working (2022)

Ankit is an engineer by profession and blogger by passion. He is passionate to do all the stuff such as designing the website, doing the SEO, researching for the content, writing tech blog posts and more.


