

We can interact with our friends, family, and coworkers through the use of Facebook Messenger, which has become an essential component of our regularly scheduled communication.
On the other hand, users could occasionally experience a situation that is quite annoying: a persistent Messenger notice that simply refuses to disappear.
Because of this issue, your device may not perform as smoothly as it normally would, which may be both irritating and bothersome.
Through the course of this essay, we will investigate several different possible reasons for this issue and present methods that may be implemented to address it.
Why does Facebook Messenger notification won’t go away
Short answer: The Facebook Messenger notification persists due to server or technical issues, incompatibility, or an outdated application configuration, or because of notification settings.
- Technical Issues: Persistent Messenger notifications are often due to faults or technical glitches in the app or platform, preventing proper dismissal of alerts.
- Compatibility and Outdated App: Constant notifications may result from using an outdated or incompatible Messenger app, leading to bugs that cause notifications to linger.
- Server Issues: Disruptions in Facebook’s server ecosystem can affect the flow of notifications, causing users to experience recurring alerts due to server-related problems.
- Notification Settings: Improper configuration, accidental changes, or conflicting settings related to notifications in the Messenger app can hinder their proper management, leading to persistent alerts.

Fix: Facebook Messenger notification won’t go away
Method 1 – Verify Messenger Message Requests
It is crucial to check your message requests on a frequent basis in order to ensure that you do not miss any critical communications from individuals who are not on your friend list.
- Step 1- Start up Messenger on your mobile device.
- Step 2- Go to the upper left corner of the screen and choose the three horizontal lines.
- Step 3- From the menu, select the Message requests option.
- Step 4– View the messages that have yet to be read or mark a discussion as read by pressing and holding it and selecting Mark as read.
Check for Unread Messages: Sometimes, unread messages in other folders like ‘Message Requests’ or ‘Spam’ can cause persistent notifications. Make sure to check these folders.
Method 2 – Use Messenger to Read or Mark Messages as Read
Problems with notifications that don’t go away can be caused by Facebook Messenger’s unread messages. It is standard practice for Messenger to notify you when a new message is received. Even if you don’t open the message or designate it as read, the alert can linger.
- Step 1– Launch Messenger on your mobile device.
- Step 2– Find any messages in your chat list that have not yet been viewed and open them to read them.
- Step 3– Tapping and holding a conversation will bring up a menu where you can select “Mark as read.” From there, you can mark the chat as read.
Method 3 – Turn Facebook Messenger Notifications On and Off
Turning off and then turning back on your Facebook Messenger alerts should fix any persistent troubles you may be experiencing. In many cases, you may fix the issue by temporarily turning off the alerts and then turning them back on again.
- Step 1– Launch Facebook Messenger from your mobile device.
- Step 2- Go to the top-left corner and click on the three horizontal lines.
- Step 3– Click the cogwheel icon that appears beside your name at the top.
- Step 4– Select Notifications & sounds at the bottom of the page.
- Step 5– To disable app alerts, go to the top and find the On option. Turn it off.
- Step 6– Click OK after selecting an item from the shown menu.
- Step 7– Please re-enable the notification option after a moment.
Method 4 – Designate Archived Messenger Messages as Read
You may choose to keep some chats out of your main inbox in Facebook Messenger by archiving them. Even if the discussion is not accessible in your usual inbox, Messenger will often give you a notification to inform you when new messages come in an archived chat.
- Step 1– Start up Messenger on your mobile device.
- Step 2– Go to the top-left corner and click on the three horizontal lines.
- Step 3– From the open menu, select Archive.
- Step 4– You may read an unread chat by tapping on it.
Method 5 – Keep your Facebook Messenger up to date
In order to address a variety of difficulties, including bugs, glitches, and speed improvements, updating Facebook Messenger is a recommended and efficient approach.
- Step 1– Go to the Play Store on your mobile device.
- Step 2– Locate the Messenger.
- Step 3– To update the app, tap the Update button.
Method 6 – Clear app cache
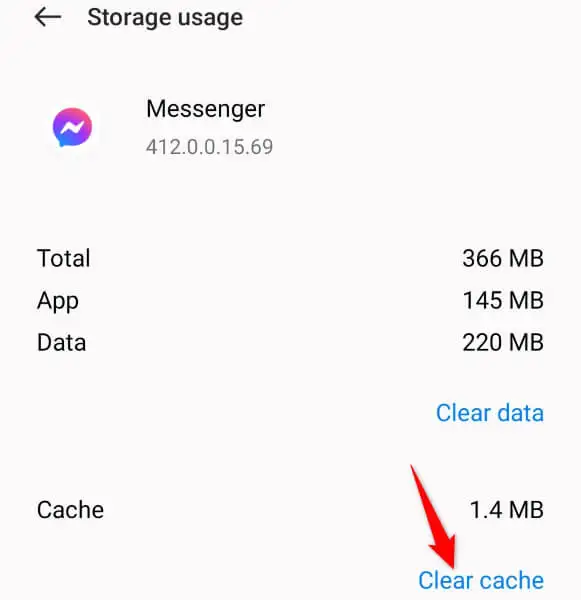
An application’s cache is the data it stores temporarily to improve its performance and load time. Persistent notification difficulties in Messenger are only one of several issues that might arise from accumulating cache files and clearing cache can also fix issues like Facebook marketplace messenger not working.
- Step 1– To access Messenger’s app information, open the app drawer on your Android phone, press and hold the icon, and then choose App details.
- Step 2– On the screen that appears, choose Storage use.
- Step 3– To delete the app’s temporary files, choose Clear cache.
- Step 4– Launch Messenger on your device.
Method 7 – Reinstall Messenger after uninstalling it
If you’re experiencing problems with Messenger, such as malfunctions, speed issues, or persistent bugs, uninstalling and reinstalling the app is a standard troubleshooting step.
- Step 1– Get in the “Settings” menu and choose “Applications.”
- Step 2– Select “Messenger” from the list of applications that have been installed.
- Step 3– Choose “Uninstall” and then agree when asked to do so.
- Step 4– Launch the Play Store on your mobile.
- Step 5– Enter “Messenger” into the search field.
- Step 6– Press the “Install” button to begin the app’s installation process.
Method 8 – Re-enter Your Facebook Account via Messenger After Logging Out
To fix a number of problems, update settings, and guarantee a better user experience, simply log out of your Facebook account and back in again.
- Step 1– Get Facebook Messenger started on your mobile device.
- Step 2– To access the settings, tap the menu icon (three horizontal lines on top left).
- Step 3– While you’re there, tap Go to the Accounts Centre to view more.
- Step 4– Find your account in the list that appears after you choose Password and security > Where you’re logged in.
- Step 5– From the list of devices, choose your phone and then choose Log out.
- Step 6– When you are ready, reload Messenger and sign in to your account again.
SEE ALSO:
- Why Am I Getting Instagram Messages On Facebook Messenger
- Fix Facebook Messenger Call Ends Immediately/After 4 Minutes
- (10 Ways) Fix Facebook Messenger App Slow

Technical writer and avid fan of cutting-edge gadgetry, Abhishek has authored works on the subject of Android & iOS. He’s a talented writer who can make almost any topic interesting while helping his viewers with tech-related guides is his passion. In his spare time, he goes camping and hiking adventures.


