

If you are someone, who forgot to renew their Apple Music subscription, but now got it renewed, don’t worry, we got you covered. Today’s article is going to be about If I rejoin Apple music will I get my music back? So let us get into it.
If I rejoin Apple music will I get my music back?
If you are wondering if you can get your Music back after renewing the subscription, so the answer is Yes, you can! You heard it right. But you need to revise a few settings. So without any time, let us see how you can do that.
How to get music back on Apple music after renewing subscription(missed payment)
Method 1: Turn on the iCloud Music library
As soon as you sign out from the Music library, the iCloud Music library stops working. So after signing in, you need to turn on the iCloud settings again, in order to access your previously saved library.
iCloud also allows you to access your music library on any Apple device provided your account is signed in, on that device. Now let us see how you can turn on the iCloud settings and access Apple music on your devices.
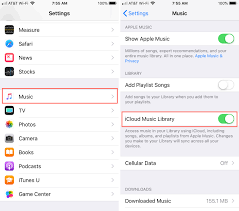
For iPhone and iPad
The Apple Music app settings are different on iPhone and iPad. These steps will guide you to get the music back on your iPhone or iPad.
- Step 1: Go to settings
Make sure your phone is on and is in a working position. Now open the settings. You will see your profile on top and other settings options below.
- Step 2: Select Music
Under the settings window, look for the required option i.e., Music. Scroll down to find the option. And after finding it, tap on it. Multiple options related to the Music on your device will appear on your screen.
- Step 3: Toggle iCloud Music library
Under the Music tab, you will find an option called iCloud Music Library. It is an option that will allow you to toggle. So toggle it and make sure it is on now. After toggling, the button must appear green. The green color indicates it to be on.
- Step 4: Wait for some time
It might take some time for your library to repopulate the music back in the app. Make sure your device is connected to a strong internet connection.
For Mac
Apple Music works differently for Mac. So let us see how you can get your music back on Mac.
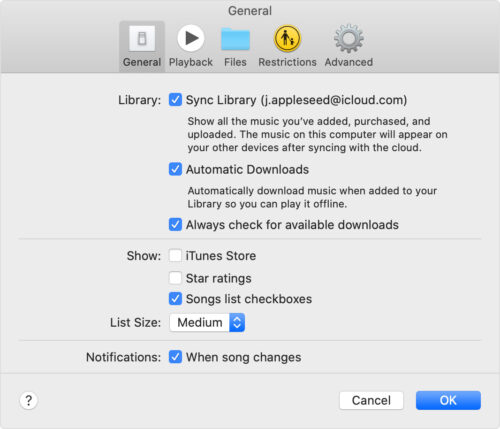
- Step 1: Open iTunes
Open iTunes or the Music app on your Mac. It is present either at the Dork or application folder on your Mac. So find it and click on it to access the app. After opening it, you will find the Music window with song lists appear on your screen.
- Step 2: Select Music
After opening iTunes, find the required option i.e., Music. It is located at the menu bar. After selecting it, many options related to Music on your Mac will display on your screen.
- Step 3: Select preferences
Under the Music tab, select preferences. Many options related to the preferences must appear on your screen.
- Step 4: Go to general
Now look for the required option i.e., General. After finding it, click on it. A different window will appear on your screen. The window must be named General Preferences. You will see the options Playback, sharing, parental and, devices other than general.
- Step 5: Select iCloud Music library
Now under the Library name, select iCloud Music Library. It will allow you to access the songs on all devices provided the same apple id. This might take a few minutes to upload your songs back. Make sure your device is connected to an internet connection.
You can edit your preferences about the views, list size, notifications, etc.
- Step 6: Click OK
Click on OK in order to save your modified setting.
Method 2: Update your app
If you have renewed your Apple Music subscription, it is advisable to update the app before using it for new features and smooth working. Follow these steps to update the Apple Music app.
- Step 1: Open iTunes or apple music app
Open iTunes or the Apple Music app on your device.
- Step 2: Go to File
Now go to file. You will see a variety of options under this tab.
- Step 3: Select Library
Under the file tab, select library.
- Step 4: Click on Update iCloud music library
Highlight the Update option present in the Library tab.
Method 3: Turn on Sync Library
After renewing the subscription, you need to sync the library with your iCloud Music Library. This will also help you retrieve your previous library. Now follow the steps to sync your library and get the music back after subscription.
For iPhone or iPad
- Step 1: Go to settings
Open your phone. Now you can open the settings by clicking on the settings app. So tap on the app present on your phone with the other apps. The settings window will appear with a list of setting options for your phone. The settings window must contain your apple id on top.
- Step 2: Select Music
Now scroll down the setting options and find Music. This option will get you one step closer to syncing your music. After finding the option, tap on it. A new window will appear on your screen names Music.
- Step 3: Turn on Sync library
Now in the Music window, look for Sync library. It must be present under the Library option. You must see a toggle beside the option. If you can’t see the toggle option, subscribe to Apple music first. Now turn on the Library sync.
The toggle switch must appear green as soon as you turn it on. The green color indicated that the setting is turned on. Now, wait for a few seconds for it to sync.

For Mac
- Step 1: Open the Apple Music App or iTunes
The apple music or iTunes is present in the dork or application folder. Click on it. A list of songs and settings will display on your screen.
- Step 2: Choose Music
Now, from the menu bar at the top of the screen, select Music.
- Step 3: Select Preferences
Under the Music tab, choose preferences. It will show the list of preferences that you can edit.
- Step 4: Go to the general tab
Now go to General. A window names General Preferences will open on your screen.
- Step 5: Turn on the Sync Library option
Now under the Library option, click on the Sync Library option. Its box will be highlighted as soon as you click on it.
- Step 6: Click OK
Now click on OK to save your modified setting. It must be present at the bottom of the General Preferences dialog box.
See also:
[Fixed] Why is apple music crashing, glitching, not working, not playing songs
[Fixed] Why does apple music say content not authorized (2021)
Hope this article helped you. You can contact the company for further issues.


