
A few weeks ago, I turned on my PC to get some work done, but my Asus monitor would just show ‘No Signal’.
I tried restarting my PC but to no avail.
The power light was orange, and the only message on the screen was ‘No Signal’.
So, I went online, and after a ton of research, I was able to find other people with the same issue.
The good news is I was also able to figure out how to get my monitor working again.
And here’s how I got it done.
What Does Asus Monitor No Signal Orange Light Mean?
Short Answer: If your Asus monitor has an orange light but no signal, it means the monitor is in power-saving mode and there’s no input detected.
This can happen for a few reasons.
If your input device isn’t powered on, you won’t see an output on your monitor.
Damaged HDMI or DisplayPort cables can also be the culprit.
Apart from cables, sometimes the connectors themselves on your monitor or input device might be damaged, preventing you from seeing anything on your monitor.
In certain situations, it could also be an issue with either your graphics card drivers or your display drivers.
Updating them should solve the problem.
And last but not least, if you’re using a PC, you might have to reset your BIOS or CMOS battery as a bootup issue might be interfering with the output on your monitor.
With all that said, here’s how you can fix your Asus monitor.
Fix: Asus Monitor No Signal Orange Light
As mentioned above, there are a few reasons why your display doesn’t get an output.

So, let’s go through the fixes one by one to see which one works for you.
Method 1- Your Monitor Needs To Be Power Cycled
Before you assume the worst, make sure the device connected to your Asus monitor is powered on.
I know it might sound too simple, but you might have simply forgotten to turn on your input device.
But, if it’s powered on and you only see an orange light on your monitor, it might be a power supply problem.
You can start by trying to power cycle the monitor.
To do this,
- Step 1- Turn off the monitor and unplug the power cable.
- Step 2- Hold down the physical power button on your monitor for about 30 seconds.
- Step 3- Release the power button and reconnect everything including the power cable to your monitor.
- Step 4- Turn on the monitor and input device.
If the issue was with the power supply, the power cycle should have fixed the issue.
However, if you still don’t see anything on your monitor, it’s most likely something else that’s causing the issue.
Method 2- Ensure Your Input Cables Aren’t Damaged
Damaged or bent HDMI or DisplayPort cables can also be the cause of such issues.
Essentially, prolonged stress on your cables might have caused damage over time, which is preventing you from seeing an output on your monitor.
Inspect the cables to see if there’s any damage to them.
Additionally, make sure you check the connectors on either end of your HDMI or DisplayPort cables to make sure the pins aren’t broken or bent.
If you think your input cable is the culprit, I’d suggest using an alternate HDMI or DisplayPort cable from another device to confirm the same.
If the alternate cable works, you might need to pick up a new input cable.
Depending on the type of connection you use, I’d suggest going for the PowerBear 4K HDMI cable or the UGREEN DisplayPort cable.
You can also purchase any cable of your choice, but make sure it’s a high-speed, high-quality cable.
And if you’re buying it online, make sure there are enough positive reviews from other customers.
Method 3- Check Your Monitor And Input Device’s Input/Output Connectors
Similar to damaged cables, damaged connectors on your monitor or device can have a similar effect.
Check the ports to make sure the pins aren’t bent or broken.
Additionally, even if there isn’t physical damage to the ports, it might still have some issues that are preventing it from working
In such cases, try using an alternate port if it’s available on your monitor to confirm the problem.
If your monitor only has one HDMI/DisplayPort, you might have to take it in for repairs before you’re able to use it.
You can reach out to either Asus or an authorized repair center to get your ports replaced.
While you can do it yourself, I wouldn’t recommend doing it unless you’re sure you can do it yourself and your device is out of warranty.
Damage to your monitor or input device’s ports only happens because of improper usage.
Once you get your ports fixed, make sure you connect and disconnect cables slowly.
Yanking them out or constantly disconnecting and reconnecting can cause them to wear out faster than they should.
Method 4- Update Your Graphics Card Drivers
This fix is for PC users.
While it isn’t necessary to update your graphics card every time a driver update is released, sometimes, older drivers can cause issues.
So, if none of the fixes above worked for you, then you’ll definitely need to check your graphics card drivers.
But, because your monitor isn’t displaying an output, you’ll have to connect your monitor directly to the motherboard to get an output.
This is because all modern CPUs come with integrated graphics allowing you to use your system without directly connecting to your GPU.
To do this,
- Step 1- Disconnect the HDMI or DisplayPort cable connecting your monitor to your graphics card.
- Step 2- Since motherboards generally have an HDMI port, connect an HDMI cable to the port as shown below.
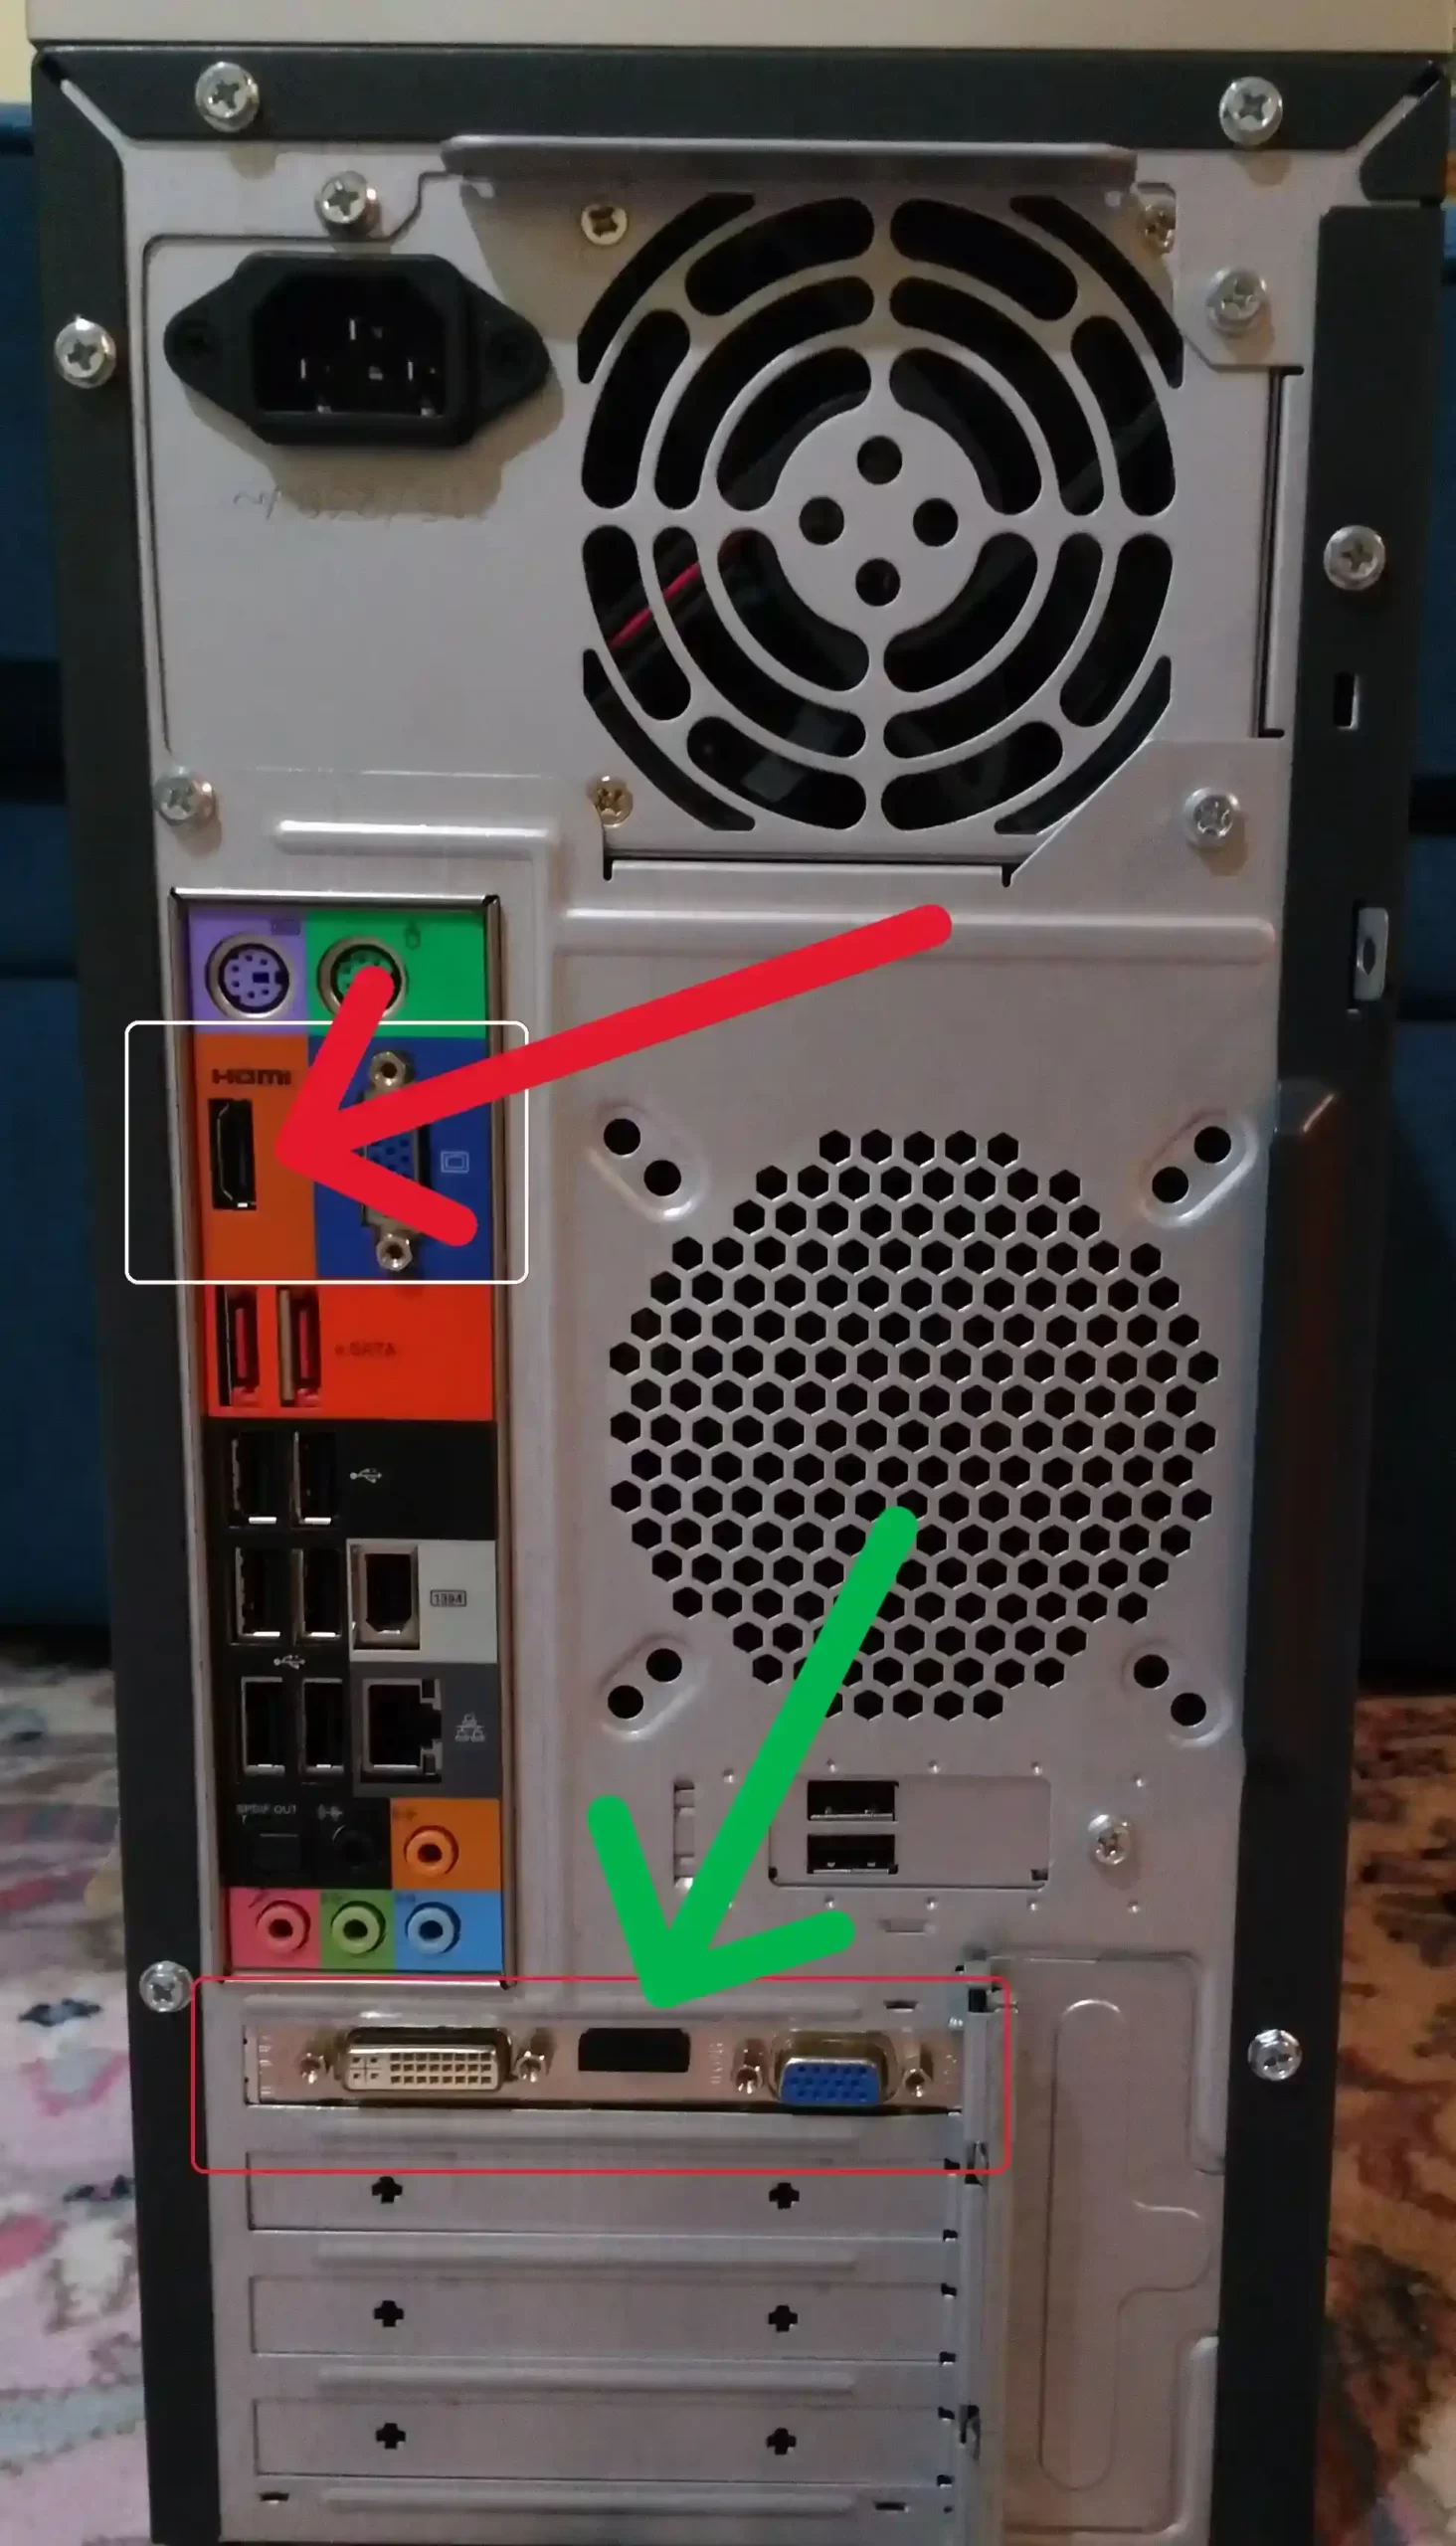
- Step 3- Boot up your system and you should have an output on your monitor.
Now, you’ll need to update your drivers based on your graphics card.
If you have an Nvidia graphics card, you can either download the latest updates from the Nvidia GeForce Experience app.
You can also manually download the drivers from Nvidia’s website if you don’t have the GeForce app installed.
For AMD users, you can use the AMD Software Installer to automatically download and install the latest drivers.
Again, if you don’t have the app, you can simply download it directly from their website.
Whether Nvidia or AMD, simply use the drop-down menus on their site to select the model of your graphics card and find the latest files to download.
Once you’ve finished the installation, shut down your PC, disconnect the monitor from the motherboard, and reconnect it to your graphics card.
Now, you should get an output on your monitor when you reboot the system.
Method 5- Update Your Monitor’s Display Drivers
Just like your graphics card, you might have to install the latest drivers for your monitor as well.
In most cases, these updates are done automatically and require no human interference.
But, if you’re someone like me and like to choose what to update and when, then this fix is for you.
For this step, you’ll need another display though.
However, instead of getting another one, you can use your TV or a friend’s monitor to get it done.
Connect your PC to your TV or secondary monitor using an HDMI or DisplayPort cable.
Make sure your monitor that isn’t working is also connected to your PC.
Once your PC boots up, right-click on the Windows logo on the taskbar and click on ‘Device Manager’.
In the window that opens, look for ‘Monitors’ and click the drop-down arrow.
Since your Asus monitor is also connected to the PC, you’ll see both monitors in this section.
Right-click the Asus monitor and select ‘Update Drivers’.
Follow the instructions on screen and when prompted, choose to download the latest drivers from the internet.
Once the latest drivers are installed, restart your PC for the changes to take effect.
Now your Asus monitor should give you a proper output.
Method 6- Reset Your PC BIOS Or CMOS Battery
This fix is a little advanced, so if you don’t feel comfortable, I’d recommend asking a friend who might be more knowledgeable or getting help from your local computer store.
Simply put the BIOS and CMOS battery work together to make sure your system knows what to do when you boot it up.
It keeps a bunch of system-related information stored to ensure all your components work fine.
However, this data can get corrupted at times, so a reset can fix the issue.
Don’t worry, this won’t delete any data from your PC.
Also, this method is tricky on older motherboards, as most newer models have a CMOS reset switch built directly into the motherboard.
So, let’s first look at the easy way.
Turn off the PC and remove the power cable.
Place the PC on its side so you can see directly into it when you take off the side panel.
Inspect the motherboard and look for a small button that says ‘CMOS Reset’ or something similar.
Simply hold down this button for about 30 to 40 seconds and release it to reset the BIOS and CMOS battery.
However, if you don’t have a physical reset button, you’ll need to manually take out the battery and reconnect it.
To do this,
- Step 1- Look for a circular battery on your motherboard. It looks similar to the battery you find on old watches and toys.
- Step 2- Unhook the bracket holding the battery in place and take it out.
- Step 3- Wait for about three to five minutes before reconnecting the battery.
- Step 4- Make sure you secure the bracket on the CMOS battery.
Now, connect your PC to power and your monitor and turn it on.
If everything went well, you should have successfully reset the CMOS battery and you should have an output on your monitor.
Method 7- Contact Asus Support
If you still can’t get your monitor to work, you’ll have to reach out to support.
There might be some internal damage to the components that are causing the display issues.
Additionally, it could also be an issue with the panel which might require either repairs or replacement.
Either way, as long as your monitor is under warranty, you shouldn’t have too much trouble getting it sorted out.
However, if your device is past its warranty, you’ll need to pay out of your pocket for repairs.
If this is the case, I’d suggest reaching out to Asus support as well as a few authorized repair centers to find out the best price.
Sending your display in for repairs also means you won’t be able to use any of your devices unless you have a secondary monitor, so keep that in mind.
See Also:
Final Words
Having been using an Asus monitor for nearly three years, I can definitely say they’re amazing.
But, as with any device they aren’t without their flaws.
The fixes I’ve outlined should most likely solve this issue without having to take it in for professional help.
So, if you’re ever stuck in a situation where your Asus monitor has an orange light with no signal, you’ll know what to do.

As a seasoned DIY tinkerer, Arvind found the simplest way to help anyone troubleshoot or set up tech without feeling overwhelmed by it. He’s an advocate for smart home technology and in his free time makes music. He’s also an avid gamer, mostly obsessed with single-player titles.


