

Want to reset your ASUS laptop but the F9 key has ceased functioning? There’s no need to fret, we are here to assist.
If you own an ASUS laptop, you will know that the F9 key is the mother key to perform a factory reset. This key comes in handy when you’ve forgotten your password and need to perform a reset.
But what if the F9 key stops functioning?
In this article, we will go over common reasons why the F9 key is not working and give you step-by-step instructions to perform a factory reset without using the F9 key.
So, without further ado, let’s get into it.
Why is factory reset ASUS laptop f9 not working
Short Answer: The F9 key may not be working due to accumulated gunk in the keys, a worn-out keyboard, outdated keyboard drivers, and hardware issues.
Let’s have a closer look at each reason, shall we?
Reason#1: Dust and Debris
Over time, tiny dust particles and debris can accumulate in your keyboard keys, obstructing their functionality. So, if you haven’t cleaned your keyboard in a while, it might be time to do so. Once your keyboard is squeaky clean, try pressing the F9 key and see if it works this time.
Reason#2: Worn-Out Keyboard
If you’ve been using your keyboard from the day life came into existence, it might have reached its expiry date. In this case, we recommend replacing your crusty-dusty keyboard with a fully functional one.
Reason#3: Outdated Keyboard Drivers
If the F9 key is not working, outdated keyboard drivers could be at play. Keyboard drivers act like a bridge between your computer’s operating system and the keyboard you use. It’s a group of files that make sure your computer can understand and use the signals from your keyboard. When the Keyboard drivers are outdated, your computer won’t know what to do with the stuff you type on the keyboard.
Reason#4: Hardware Issues
The last reason but certainly not the least is hardware-related issues. If your system’s hardware is malfunctioning, the F9 key won’t work properly.
Now that we’ve pinpointed all the possible causes of why the F9 key might not be working on your ASUS laptop, let’s proceed to discuss the step-by-step guide explaining “How to factory reset ASUS laptop Windows 7,10,11 without using the F9 key”
How to factory reset ASUS laptop Windows 7
Performing a factory reset restores your system to its original settings and helps you resolve many software issues like malware infections and slow performance.
To perform a factory reset on your ASUS laptop with Windows 7, try following these steps:
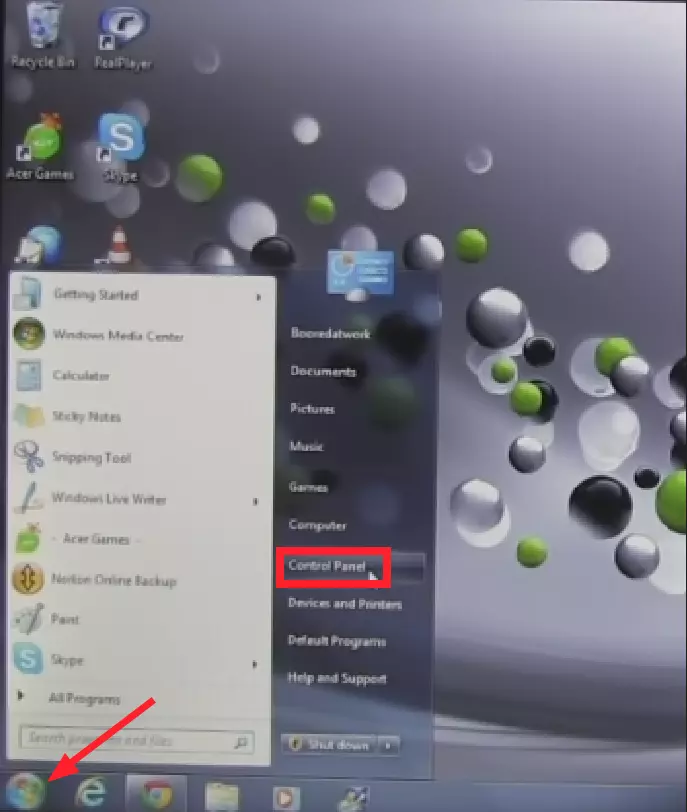
- Step 1: Press the “Windows Key” or click on the “Windows Icon” (at the bottom-left) to launch the “Start Menu”
- Step 2: Click on “Control Panel”
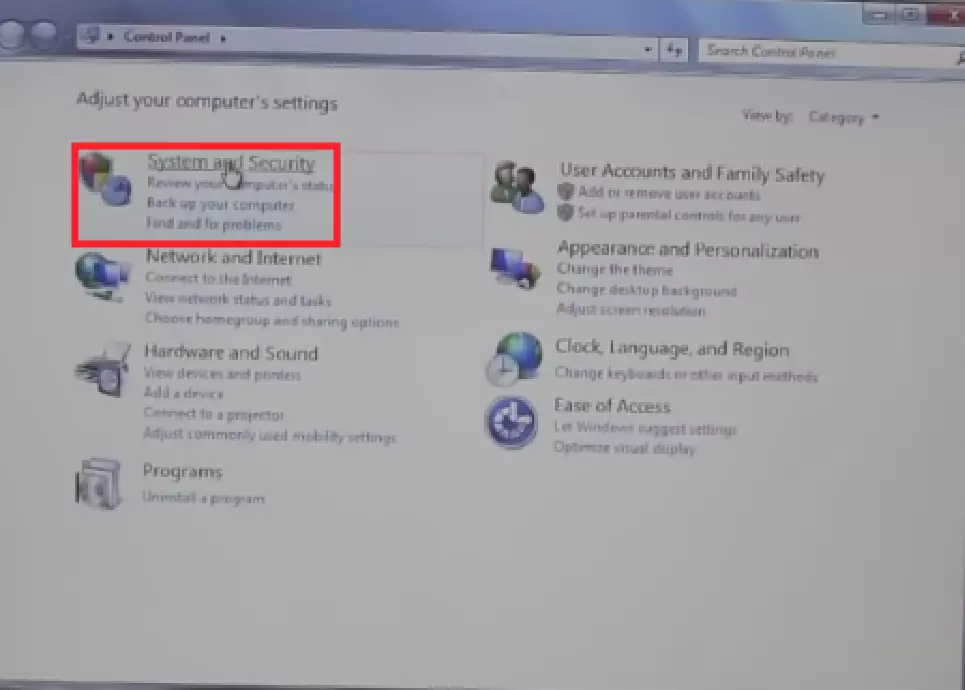
- Step 3: Go to “System and Security”
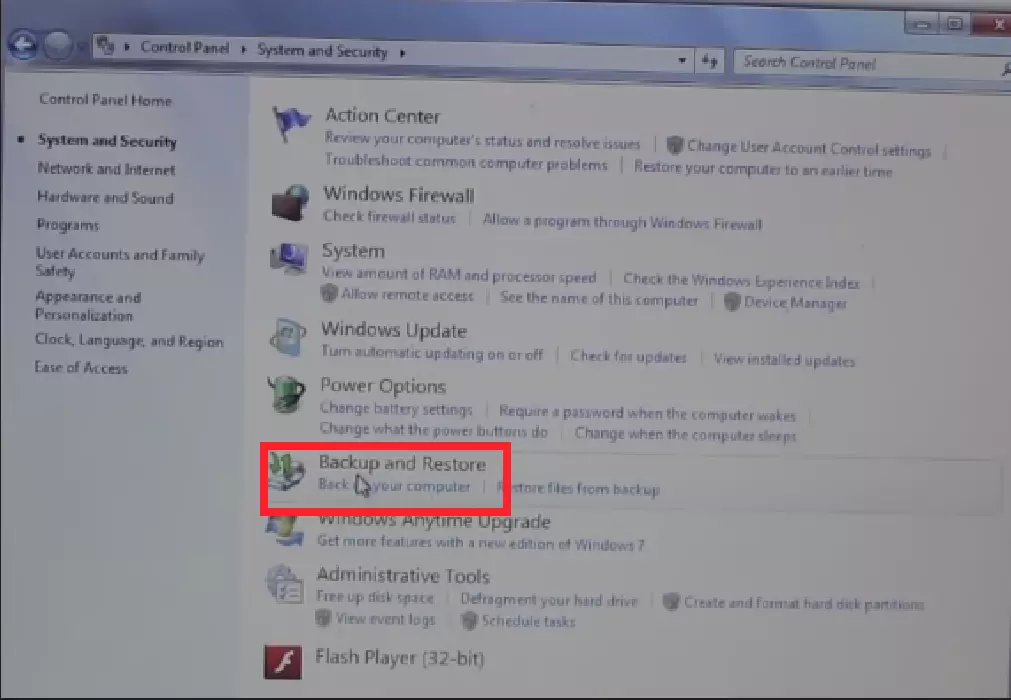
- Step 4: Click on “Backup and Restore”
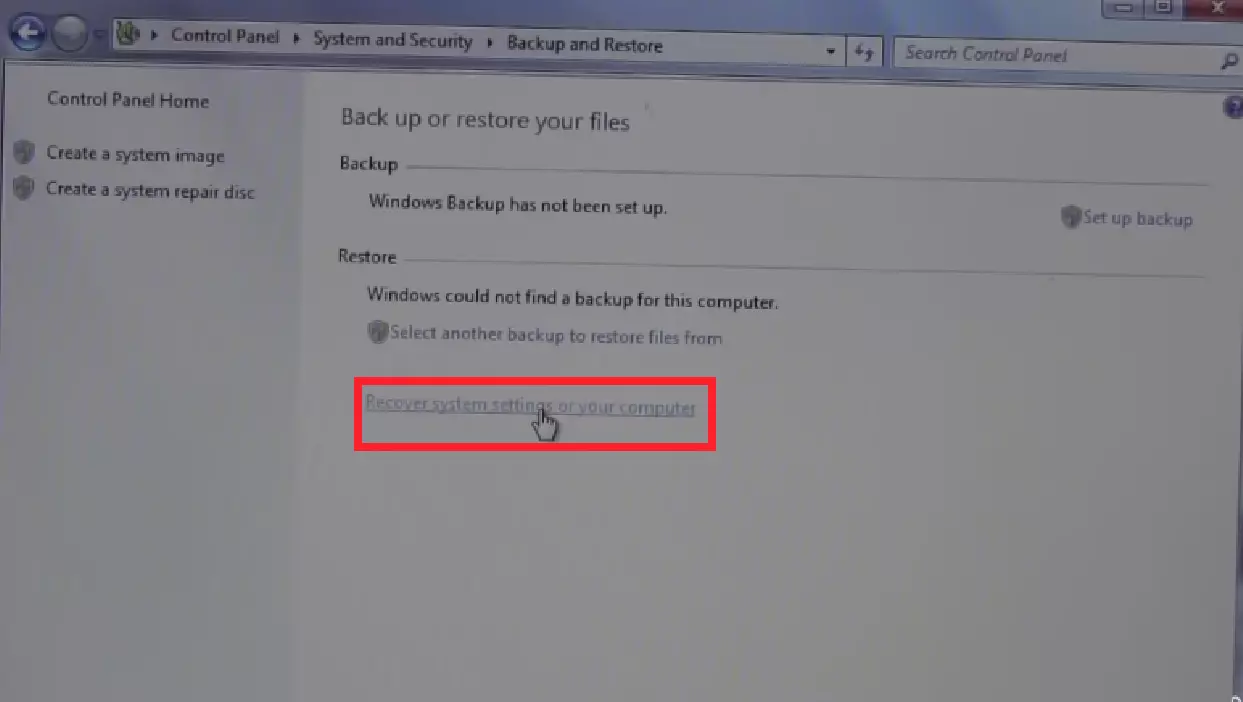
- Step 5: Click on “Recover System Settings or your Computer”
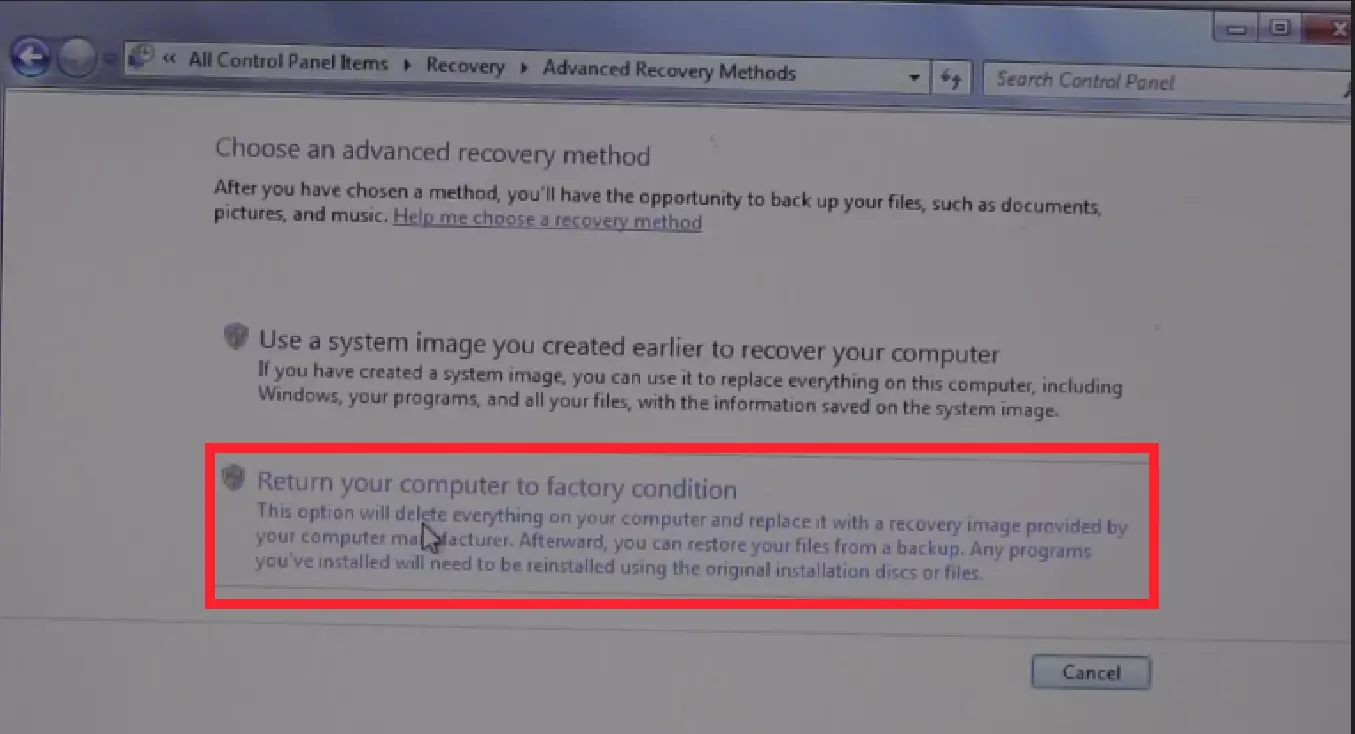
- Step 6: Then, go to “Advanced Recovery Methods”

- Step 7: Now, select “Return Your Computer to Factory Condition”
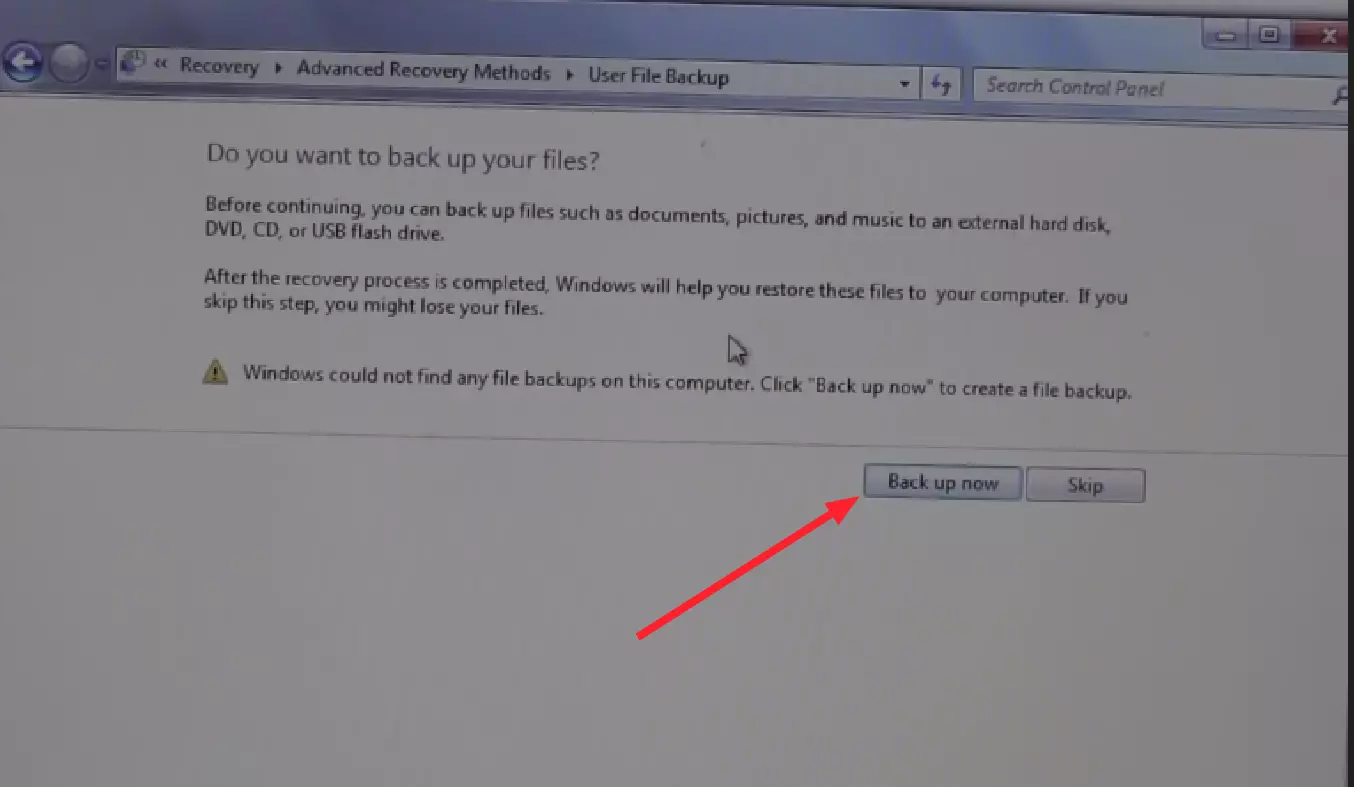
- Step 8: Make sure you backup all your files. If you’ve already done that, hit “Skip”
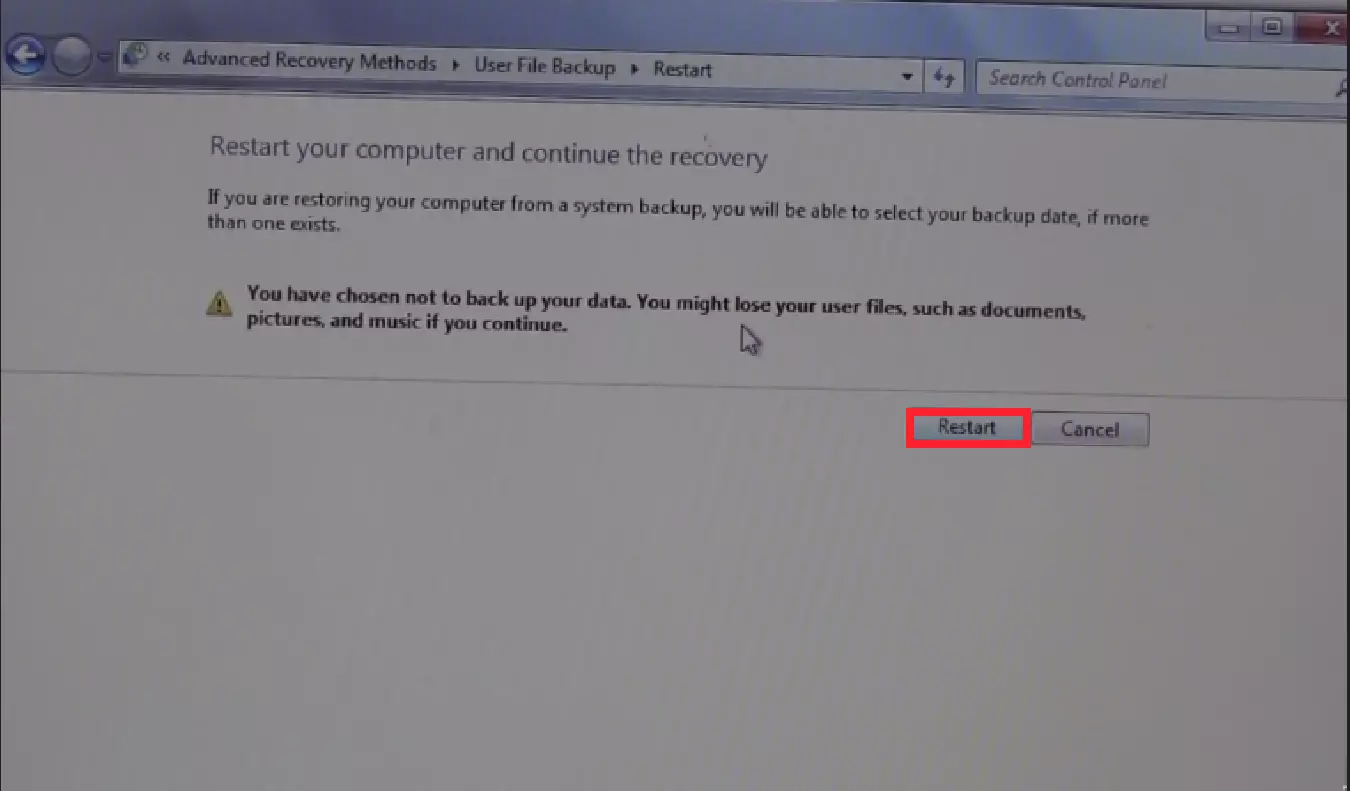
- Step 9: Lastly, hit “Restart” and wait for your laptop to restart on its own
How to factory reset ASUS laptop Windows 10,11
Presented below is a step-by-step procedure to initiate a reset process on Windows 10 and 11:
Method#1: Factory Reset Using Windows Settings
Windows 10 Operating System:
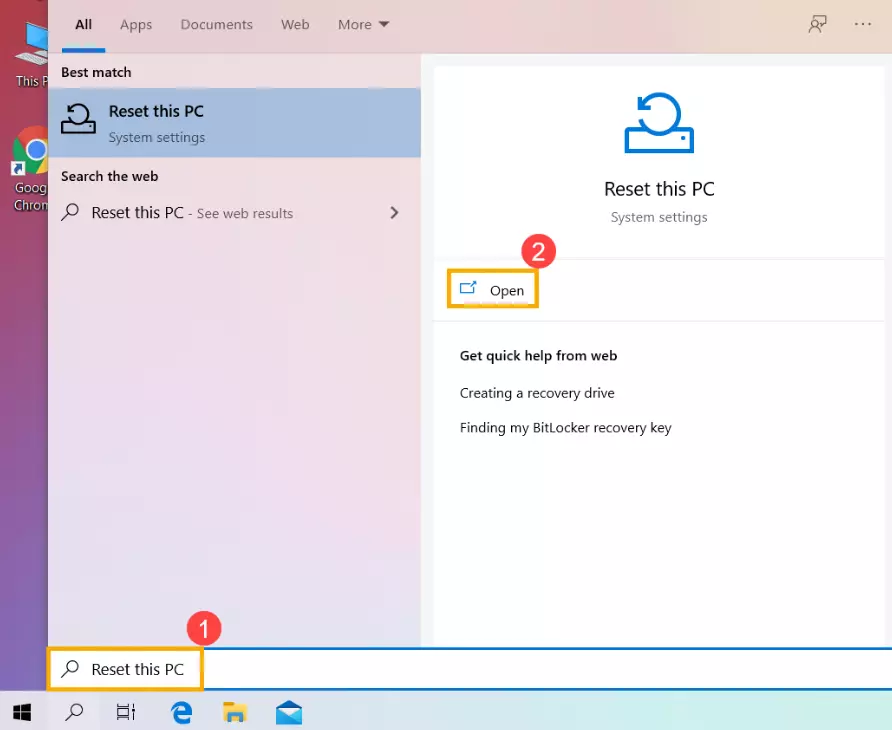
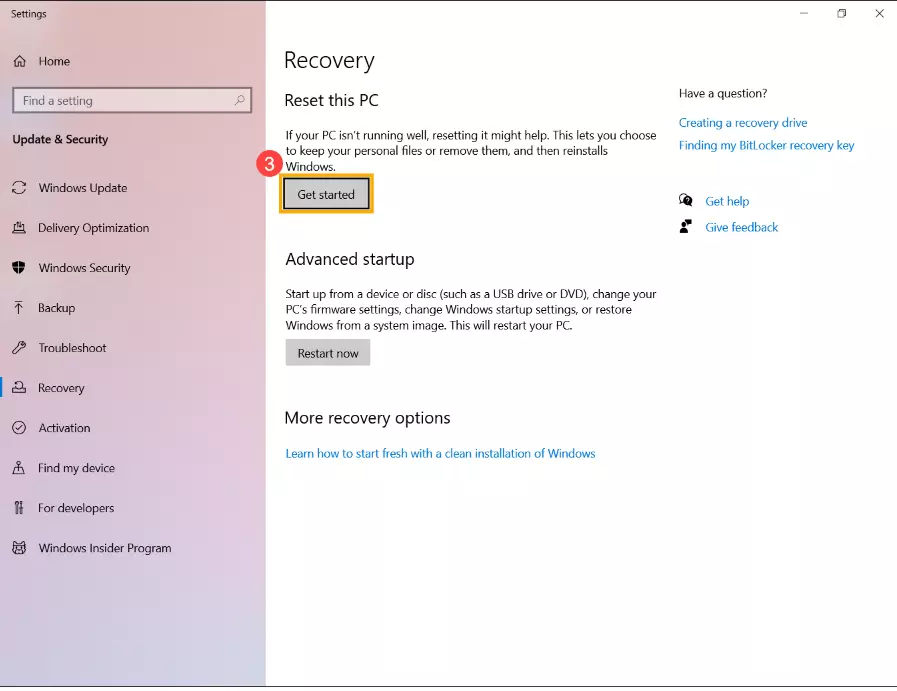
- Step 1: Type in “Reset this PC” in the search bar and click “Open”
- Step 2: Click on the “Get Started” button
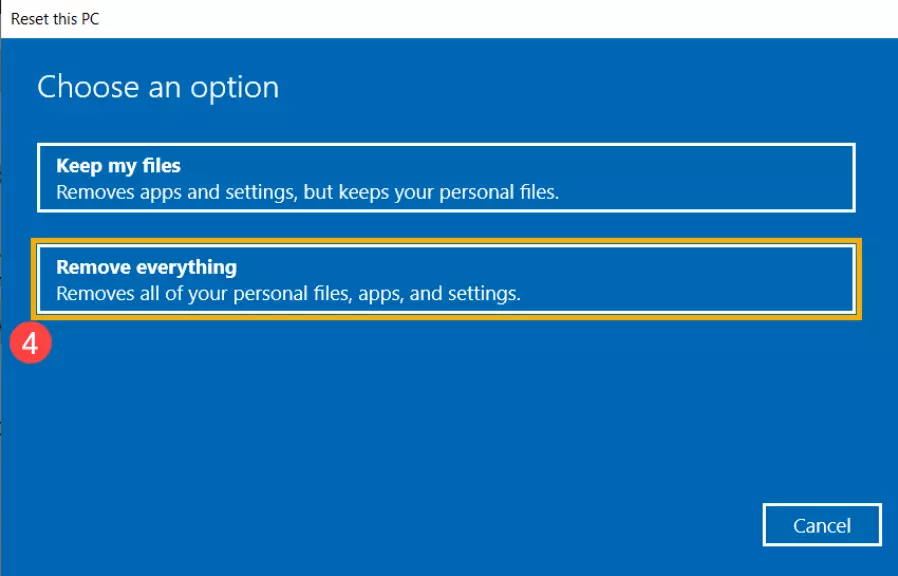
- Step 3: Choose “Remove Everything”
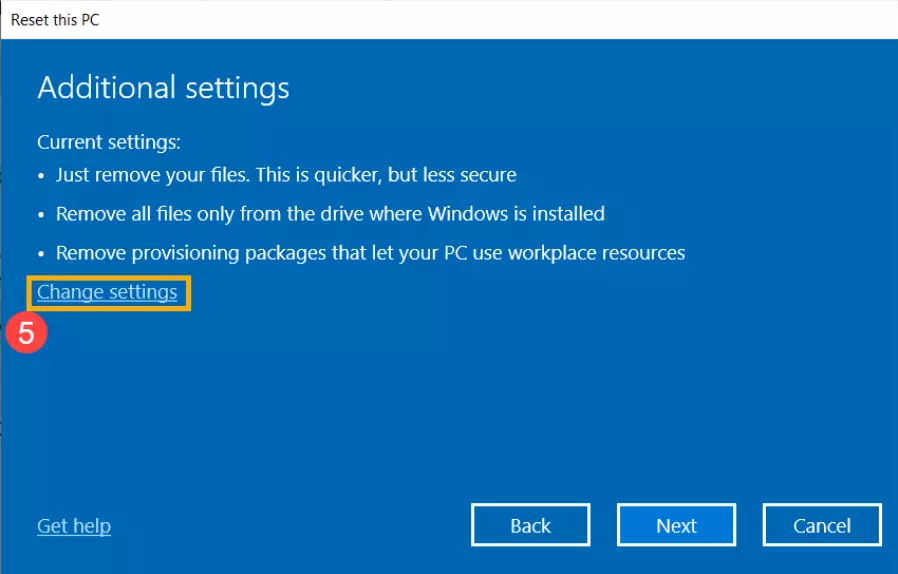
- Step 4: Next, click on “Change Settings”
- Step 5: Choose appropriate settings and hit “Confirm”

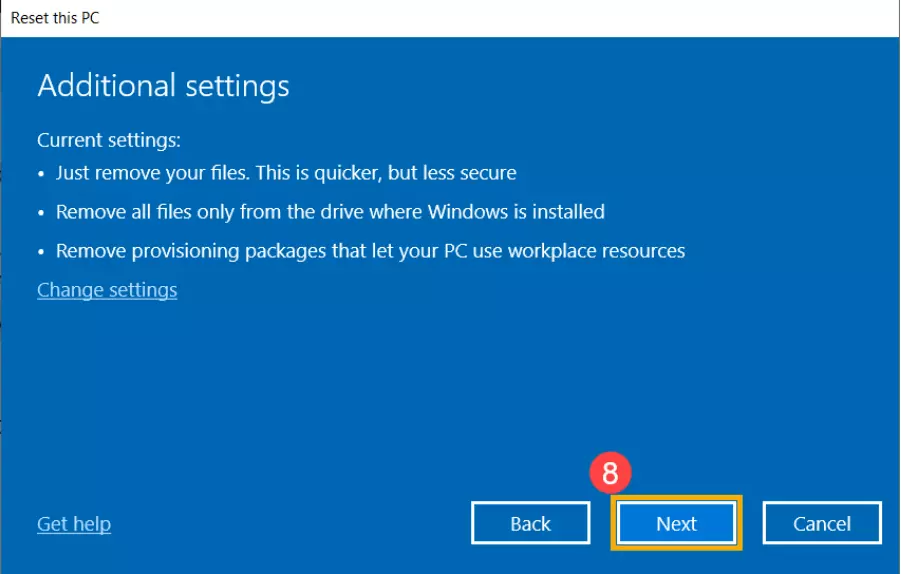
- Step 6: Hit “Next”
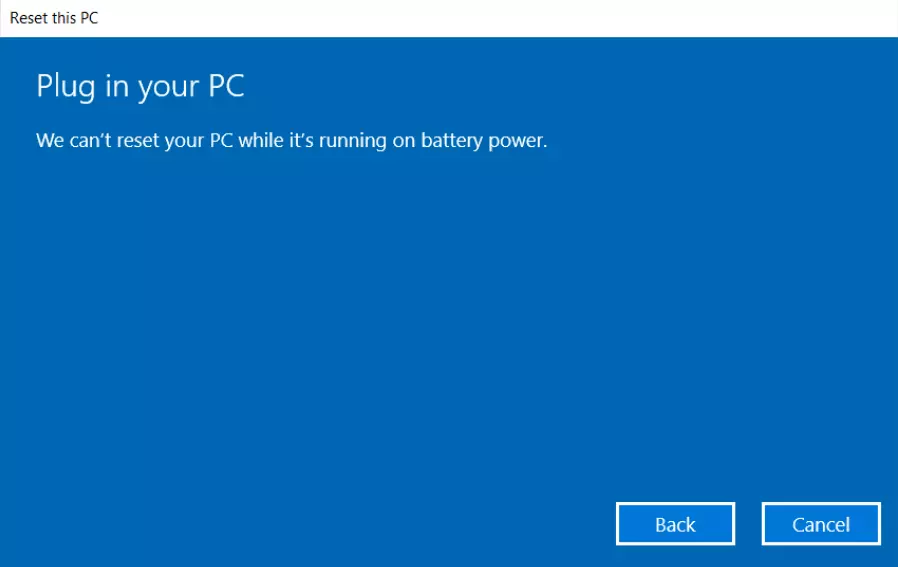
- Step 7: Make sure that the AC adapter is plugged in before performing a factory reset, otherwise, you’ll see this warning
- Step 8: Lastly, hit “Reset”, and the computer will initiate the reset process
Windows 11 Operating System:
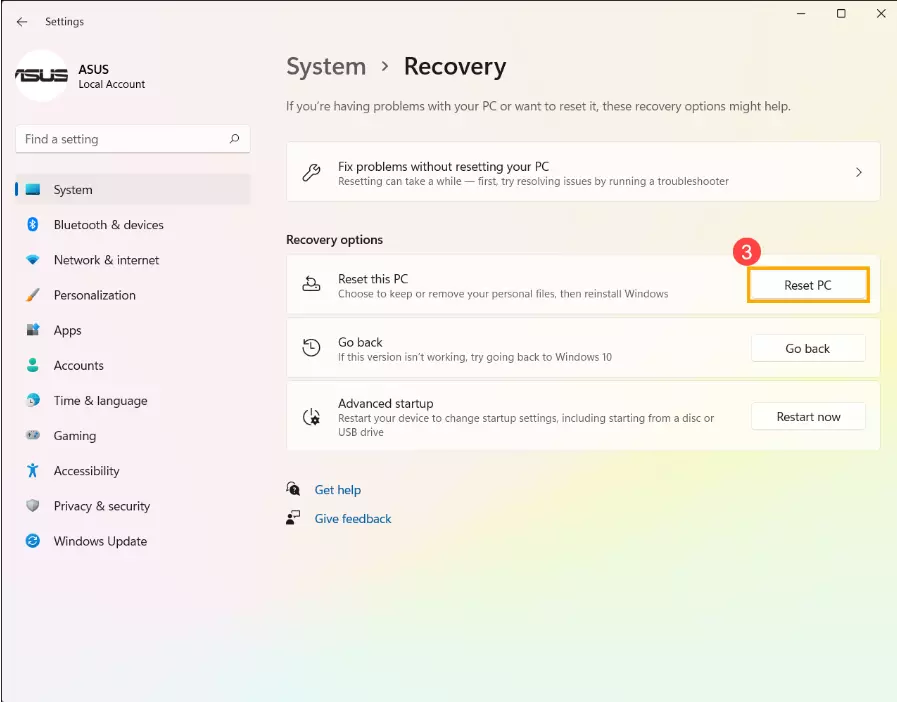
- Step 1: Type in “Reset this PC” in the search bar and click “Open”

- Step 2: Go to “System” in the left pane and click on “Reset PC”
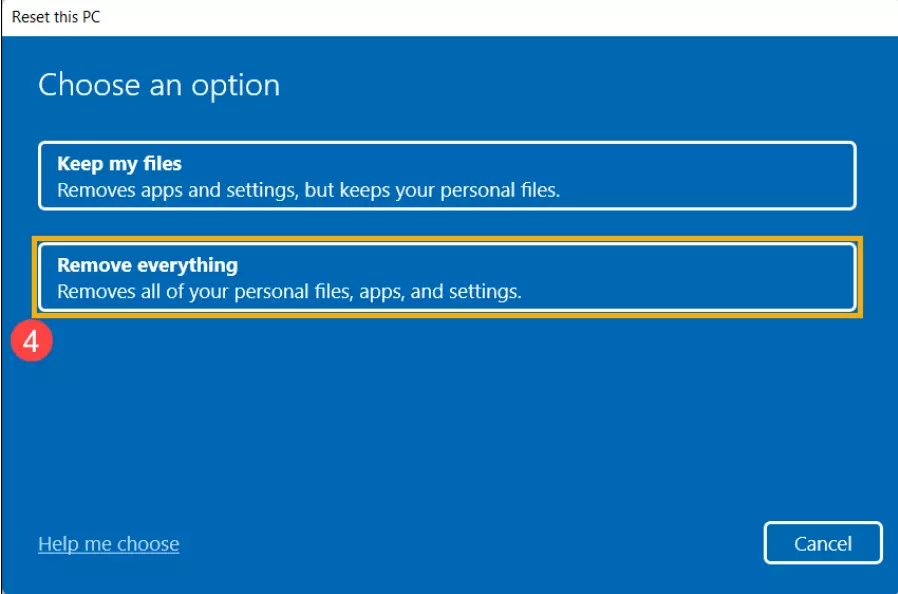
- Step 3: Choose “Remove Everything”
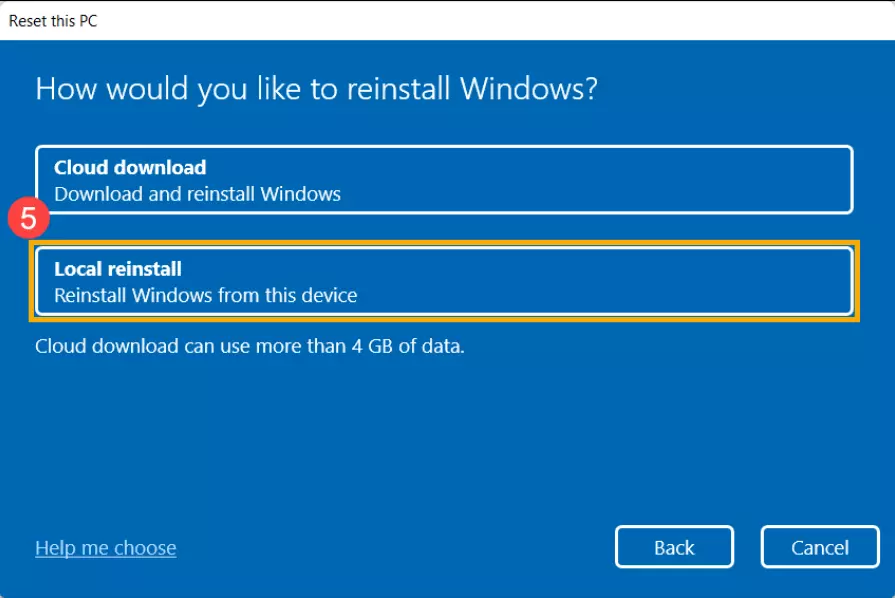
- Step 4: Next, choose “Local Reinstall”
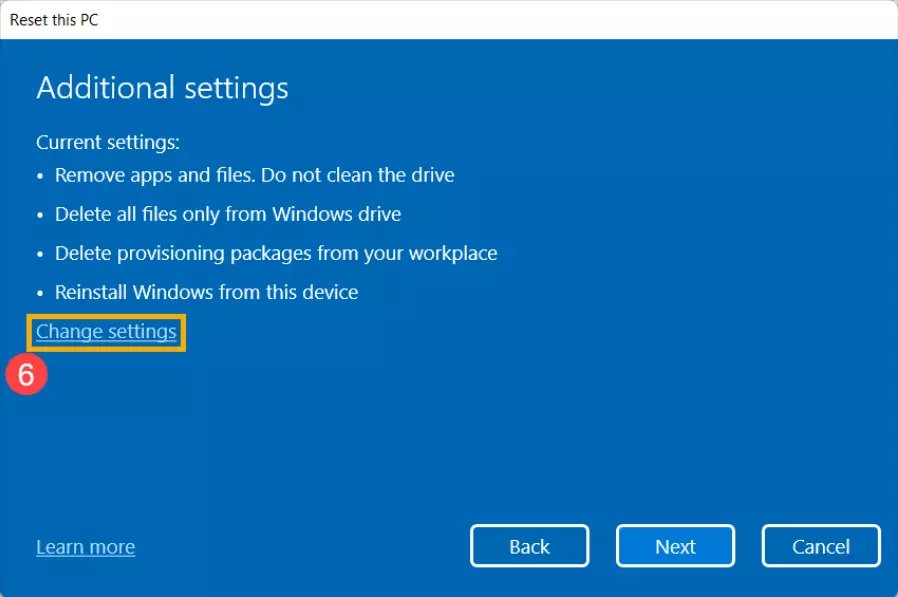
- Step 5: Then, click on “Change Settings”
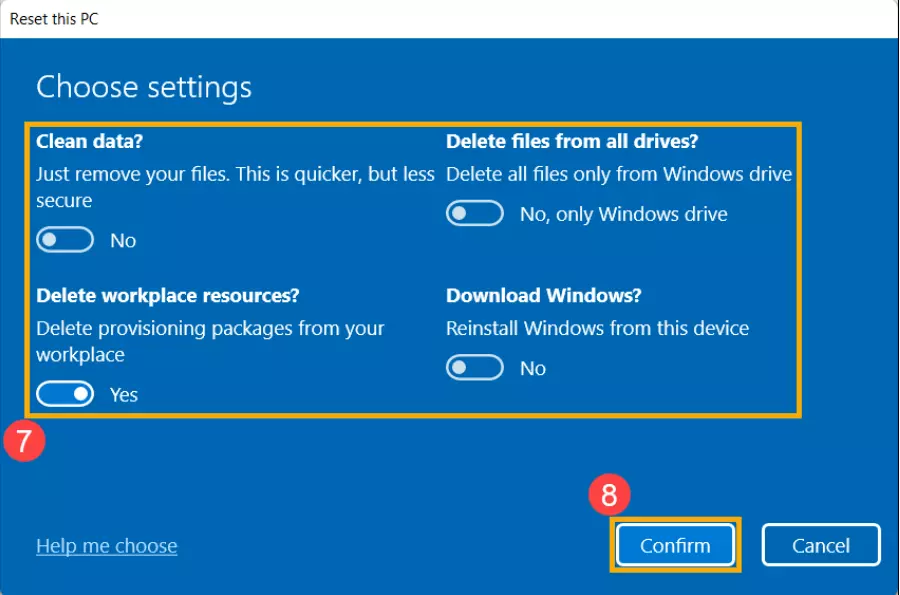
- Step 6: Choose appropriate settings and hit “Confirm”
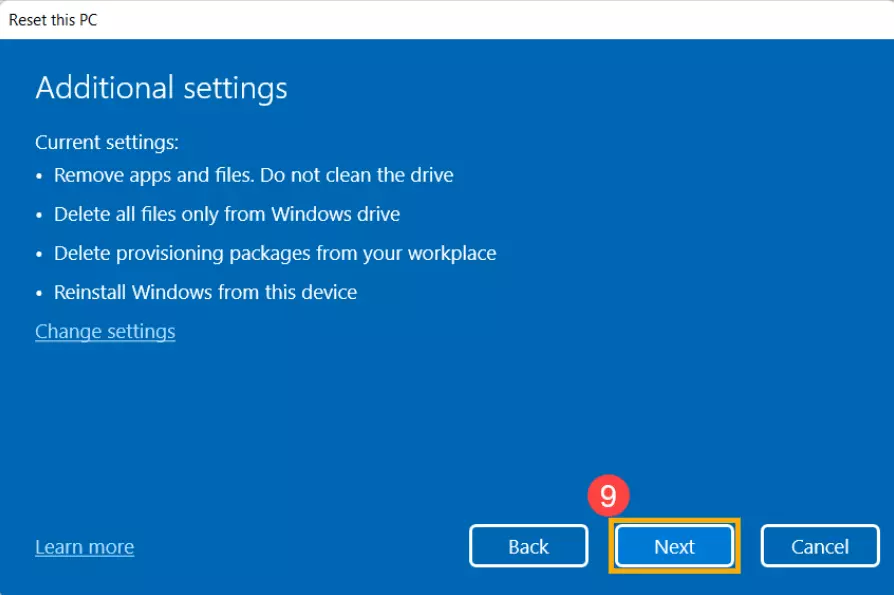
- Step 7: On the next screen, click “Next”
- Step 8: If you receive this notification, click “Next” to proceed

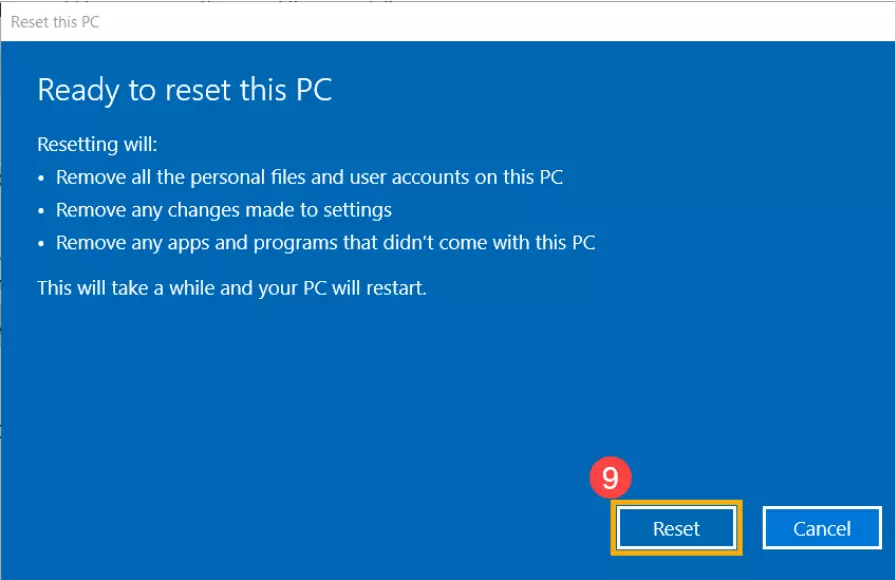
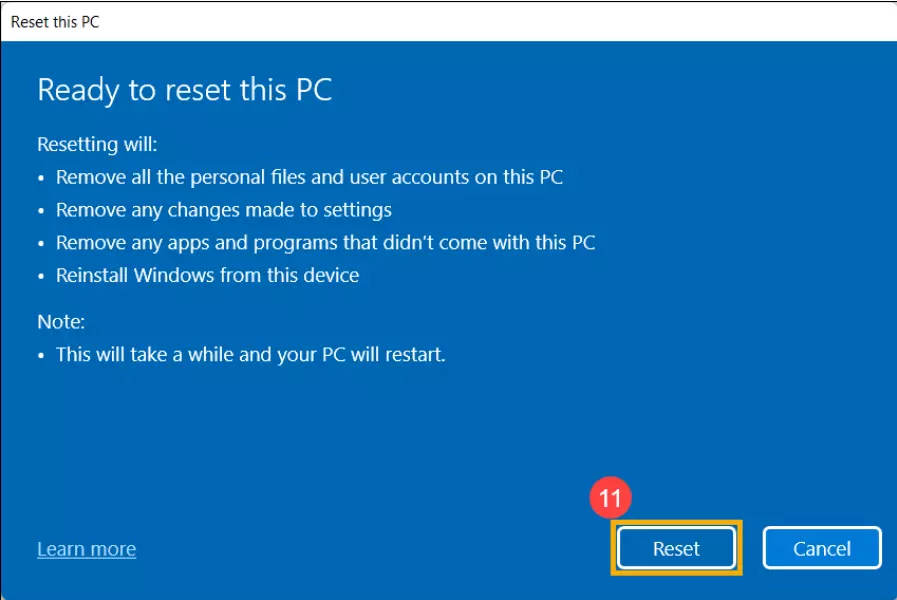
- Step 9: Finally, hit “Reset” to start the reset process. Your laptop will restart on its own once the reset is completed
NOTE: Resetting your computer takes time. Your screen may go black, and your computer may restart during this process. Keep it plugged in, and avoid forced shutdowns to prevent a failed reset.
Method#2: Factory Reset Using Windows Recovery Environment
Another great way to reset your laptop is by using Windows Recovery Environment. Here’s how:
- Step 1: Go to Recovery and click on Advanced Startup
- Step 2: Next, click on Restart Now
- Step 3: Choose Troubleshoot
- Step 4: Afterward, click on Reset PC and follow the on-screen instructions to complete
Method#3: Factory Reset Directly Using the Boot
Did you know you can reset your laptop while booting it? Here’s how:
- Step 1: Click on the Power Icon in the bottom-right corner
- Step 2: Press the Shift Key and click on Restart simultaneously
- Step 3: A window will appear, select Troubleshoot and then Reset this PC
Method#4: Factory Reset Using Installation Disc
One of the lesser-known ways to perform a factory reset on your ASUS laptop is by using an installation disc. The only prerequisite is having a disk tray. Here’s how you do this:
- Step 1: Place the Installation Disc in your laptop’s Disk Tray
- Step 2: Once down, Restart your laptop
- Step 3: While restarting, press the Esc Button
- Step 4: Select CD/DVD and hit Enter
- Step 5: Click on the OK button twice and do as the screen says to complete
Contact Support:
Should you encounter any difficulties whist performing a factory reset on your ASUS laptop, feel free to contact ASUS Support and ask for assistance.
SEE ALSO:
- Fix: ASUS Function Keys Not Working
- Plugged In Not Charging Asus Non-Removable Battery (Reasons & Solutions)
- Why Is My Laptop Keyboard Locked ASUS?
Wrapping Up:
Congratulations! You made it till the end. The F9 key may be the mother key for performing a factory reset on your ASUS laptop, but it’s not the only way to restore your system to its original state. In this article, we’ve provided step-by-step instructions for performing a factory reset without relying on the F9 key for ASUS laptops running Windows 7, 10, or 11. Hope you found this information valuable. Wishing you a great day ahead!

An experienced technical writer who specializes in simplifying technical jargon. Being a lifelong learner, she stays up-to-date with the latest trends and tools in the world of technology. When she’s not writing technical stuff, you can find her reading self-help books.


