

Black Screen while you try to boot your PC? Trusty old CTRL+ALT+DEL key combination not working as well, got you in a soup? Worry not.
Here today we shall try to focus on how to tackle this Windows Black Screen of death, without the usual CTRL+ALT+DEL key prompt. We understand that sometimes simply replacing your system is not the solution as we often have lots of personal data on our system. We will try to make sure that users get a tailor made solution to their problem.
Multiple workarounds and steps will be given to users to make sure that a solution is arrived upon. It may require some time in some few steps but if you’re ready to commit then lets begin.
Why am I getting Black Screen on my Windows 10?
A black screen at the time of startup means that the boot sequence by Windows is having difficulty to complete. This occurs primarily due to the fact that there lies inconsistencies in the registries of the PC. The registries hold several entries relating to the drivers, security accounts manager, kernel, service etc.
A corrupted entry in this registry could throw up problem in the proper start-up of the PC. While having malware or other malicious program on your PC can also bring about the same problem.
Having any part of the startup code deleted, altered or misplaced within the PC can also lead to such problems.
To solve this we shall be looking at various solutions available to us. To know more on how to get your PC out of the Black screen boot loop, continue reading more.
How to fix Window 10 Black screen?
For this part of the article we will be exploring various options available to us, each solution will be followed by step by step guide. User can follow the step by step guide to resolve the issue. Users can either head straight to one solution if they have tried others before or can opt to go through each accordingly, until the arrive at the desired result.
The guide will consist of the following procedures:
- Update Registry in Safe Mode.
- Perform a System Restore.
- Fixing Boot loop through Command Prompt.
- Fixing through Startup Repair.
- Re-install fresh Windows from a USB drive.
This will be the processes we will be going through today, that will not involve the use of the CTRL, ALT, DEL key combination. It is important that users follow each step and not miss any step along the way. Let’s begin.
1. Update Registry in Safe Mode.
If users can still access the Safe Mode on their PC, user can try to update a fresh copy of Windows registry to replace the corrupt one.
To update your PC Registry from Safe Mode, follow the given steps:

Booting into Advance Option.
- Turn “Off” your PC if it is “On”, by holding down the power button for 4-5 seconds.
- Turn it back “On”, and as soon as anything appears on the screen hold down the power button for 4-5 seconds.
- Repeat the same process 2-3 times.
- After forcefully turning the PC “Off” a couple of times, the PC will automatically load into “Automatic Repair” mode.
- Go into “Advance Repairs” under the “Automatic Repair” mode.
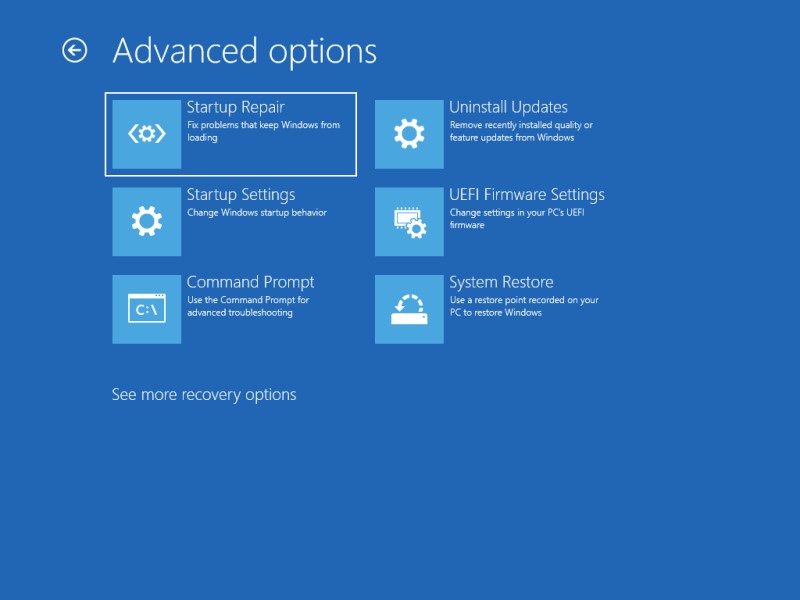
- Under Trouble Shoot click “Advance Options”.
- Once you’re under Advance Setting, head to “Startup Settings”.
- In this menu users will find a “Restart” button, press on it.
- The system will now restart and take users into the Startup Settings.
- Once loaded, users will now get “Enable Safe Mode” Settings.
- Press either “4” on the number pad or “F4” to enter safe mode.
Now that users have successfully entered safe mode, we will now update the registry.
- Press “Windows” key and “R” together.
- Type out “regedit” in the Run window and press Enter.
- Once the registry open paste this in the address bar “HKEY_LOCAL_MACHINE\SOFTWARE\Microsoft\Windows NT\CurrentVersion\Winlogon”
- On the right pane, double click on “Shell”.
- In the Value Data: panel type “explorer.exe” and press “Ok”.
- Restart your PC normally.
Having followed this steps users will have make tweaks to the registry and your PC should now start up normally. If this doesn’t help follow the next procedure.
2. Perform a System Restore.
With this procedure, we will try to restore the system back to a point where all the settings were originally in working condition. With this steps, user will try to revert back to a previously set system restore point.
To restore your PC back to an old system restore point, follow the given steps:
- Turn “Off” your PC if it is “On”, by holding down the power button for 4-5 seconds.
- Turn it back “On”, and as soon as anything appears on the screen hold down the power button for 4-5 seconds.
- Repeat the same process 2-3 times.
- After forcefully turning the PC “Off” a couple of times, the PC will automatically load into “Automatic Repair” mode.
- Select “Advance Repairs” under the “Automatic Repair” mode.
- Under Trouble Shoot click “Advance Options”.
- Once your in advance setting, head to “System Restore”.
- Choose the Windows 10 account you wish to restore from and apply password if any.
- Select the restore point, users can also check the apps that will be removed by going into “Scan into affected program”.
- Click “Next” and then “Finish”.
Once the system successfully restores to its previous state, it will undo any changes made to the registry and to the system. Any apps installed after the restore point will also be removed.
3. Fixing Boot loop through Command Prompt.
In this step we will use the command prompt option to try to fix the boot loop issue. Users will have to enter a few commands into the command prompt to make this procedure work.
To fix your black screen issue, through the Command Prompt, follow the given steps:
- Turn “Off” your PC if it is “On”, by holding down the power button for 4-5 seconds.
- Turn it back “On”, and as soon as anything appears on the screen hold down the power button for 4-5 seconds.
- Repeat the same process 2-3 times.
- After forcefully turning the PC “Off” a couple of times, the PC will automatically load into “Automatic Repair” mode.
- Select “Advance Repairs” under the “Automatic Repair” mode.
- Under Trouble Shoot click “Advance Options”.
- From here select the “Command Prompt” option.
- Users will now after to type each command one by one and press “Enter” after every command:1. BOOTREC /SCANOS2. BOOTREC /FIXMBR
3. BOOTREC /FIXBOOT
4. BOOTREC /REBUILDBCD
- Close the command prompt and now restart.
After typing the above commands in to Command Prompt, the system should try to fix the boot loop.
4. Fixing through Startup Repair.
Users can try using the inbuilt Startup Repair to repair their Startup process on their Windows PC. Windows will automatically try to repair the portions of the boot sequence that is not in working order.
To fix your black screen issue using Startup Repair, follow the given steps:
- Turn “Off” your PC if it is “On”, by holding down the power button for 4-5 seconds.
- Turn it back “On”, and as soon as anything appears on the screen hold down the power button for 4-5 seconds.
- Repeat the same process 2-3 times.
- After forcefully turning the PC “Off” a couple of times, the PC will automatically load into “Automatic Repair” mode.
- Select “Advance Repairs” under the “Automatic Repair” mode.
- Under Trouble Shoot click “Advance Options”.
- From the list select the “Startup Repair” option.
- Users will then be asked their account and enter password if any.
- Click “Continue”.
After the repair starts, the program will scan and try to repair any portion of the boot sequence that is preventing the system from having a normal bootup. If there is no problem found with the startup there will be a prompt saying “Start Repair couldn’t repair your PC”.
5. Re-install fresh Windows from a USB drive.
If all of the above method fails, users can try to install a fresh copy of windows into their PC. To do so they will need a secondary PC to download the file and a Flash drive of about at least 8 GB in size.
To fix your by installing a fresh copy of Windows 10, follow the given steps:
Preparing Boot Media for your PC
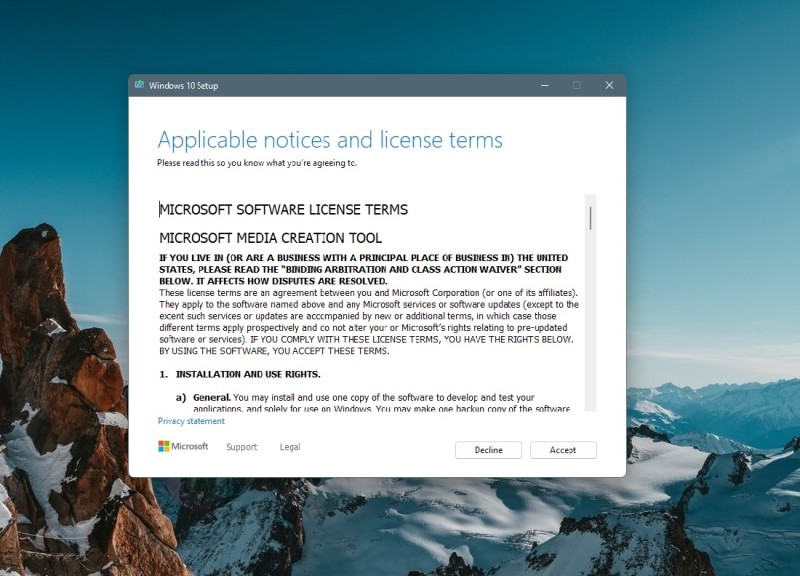
- Download the Microsoft Media Creation tool by pressing this link https://go.microsoft.com/fwlink/?LinkId=691209.
- Launch the exe file and then press “Accept”.
- The program will then load and get a few things ready.
- Next users will be asked to either “Upgrade this PC now” or “Create Installation Media”.
- Select “Create Installation Media” and plug in your empty USB drive.
- Users will then have to select their desired and appropriate “Language”, “Edition” and “Architecture” and press “Next”.
- Users will be allowed to select the USB and then files will be downloaded into the flash drive.
Now that user have successfully downloaded the necessary Windows files into the USB Drive, your PC can now install a fresh Windows copy from the USB file.
To install Windows on your PC from your USB drive, follow the given steps:
- Plug in your USB drive into your PC’s USB port.
- Turn “On” your PC and go into Bootloader page by either pressing Esc, F10 or F12 depending on your PC.
- Go into the “Boot” section and select your USB Drive.
- This should start the “Windows Setup”.
- Follow the onscreen instruction and install it into the existing Windows folder.
- After installing your PC should restart and finish the user Setup.
After completing the steps, your PC will have a new fresh copy of Windows installed into the system. This will however mean that all your installed files on the Windows Driver will get erased. However, all other data on your other drive partitions will still remain intact.
Final Words.
Having the windows black screen while loading can be a confusing dilemma for users. This is particularly frustrating when you stand to lose personal data from your PC. By following the steps given not only will users be able to resurrect their PC, but also retain their personal data on all other drive partitions except for the drive with the Windows drive and on the Desktop. We hope that this guide will help you get your PC back in working order with the least amount of hassle.

A perennial tech-head with a knack for words, sneakers and fast cars. Likes to be in the know, of anything upcoming and cutting edge. Will probably sit down and talk to anyone over a cup of coffee. The coffee has to be good.


