
Are you not able to access your Uber payments?
Are you having trouble with your Uber wallet?
Problems may arise if Uber is unable to store your payment information or if your bank is uncooperative at the moment.
There might be a few different solutions to get your payment methods working again, depending on the underlying cause.
Check out this page to learn more about the problem and your available solutions.![]()
Why is my Uber Wallet not working
Short Answer: Uber Wallet is not working because funds are insufficient in your wallet, your account has been flagged, there are issue with Uber servers, or there could be an app glitch.
You tried to request a trip, but Uber said you couldn’t use the wallet at the moment. Alternatively, when you open the Uber app and choose “Uber Wallet,” it should indicate that you may use the wallet and other payment options.
The message “Payment Method Not Available” indicates that no valid payment information is currently associated with your account.
Maybe you tried a few different approaches, but nothing worked.
This is a major issue since your Uber account will be disabled until you add a valid payment method. As such, this is of the highest significance.
In this post, you will find a guide to fix the issue with some simple troubleshooting method.
Fix: Uber Wallet not working
1. Ensure funds in Uber Wallet
For obvious reasons, the Uber Wallet will only work for you if you have sufficient funds that can be used for the payment.
If you are a frequent traveler, it is possible that your Uber Wallet might have run out of funds. And the issue can be fixed very easily just by adding funds to your Uber Wallet.
There are many options to add funds in Uber Wallet, and you can use your debit or credit card to add money to your Uber Wallet.
2. Check if the added card is valid
If you have already set up a payment method in your Uber profile, it will be used the next time you check in.
Not having to go through your wallet for your one card with a chip is a huge time saver.
In other cases, however, the card may no longer be valid since it has beyond its expiration date. Be sure to verify that your bank or credit card has not yet reached its expiration date.
If it has already expired, you won’t be able to add it as a payment option.
If you have a problem with a card on file with Uber or if it mysteriously disappears from your profile, just log in and follow these steps to make the necessary changes.
-
Step 1: Go to “Payment Methods”
Go to the “Payment Methods” section of your profile after logging in to check everything is set up properly.
-
Step 2: Check all card details
To the right, you’ll see a list of any and all credit cards you’ve added to your Uber profile for use as payment.
-
Step 3: Click “Edit”
If you want to edit your card information, fix the problematic card, by simply clicking on “Edit” next to it.
-
Step 4: Change the card’s information
Once you click that, a box will go up where you may change the card’s information, such as the number and expiration date.
The slightest typo in any of these fields might cause your payment method to be declined, so accuracy is crucial.
If you have received any notifications concerning suspicious or unauthorized use of this card, you should check your inbox immediately.
Your bank will always notify you if there are any unusual transactions on your account.
3. Check if Auto-refill for Uber Wallet
If you have been using the auto-refill option, you must check the feature is enabled in your app. The feature might have been disabled for some reason or set to its default settings, i.e., disabled when you installed Uber on a new device or reinstalled after clearing the cache.
You should try it once if you haven’t used Uber Wallet’s auto-refill feature. The funds are automatically added to your wallet through your card.
Follow the methods provided below –
- Step 1: To access your Uber Wallet and view your Uber Cash balance, first open the Uber app on your smartphone.
- Step 2: In the bottom right corner of the app, you will see an icon labeled “Account.” Tap on this icon to proceed.
- Step 3: Once you have accessed your account settings, you will see several options listed. Look for the option labeled “Wallet” and tap on it to view your current Uber Cash balance.
- Step 4: To set up Auto-Refill for your Uber Wallet, tap on the “Add funds” button located below your Uber Cash balance.
- Step 5: On the next screen, you will see the option to enable Auto-Refill for your Uber Wallet. Tap on the “Auto-Refill” button to proceed.
- Step 6: You will now see a list of pre-set amounts that you can choose to add to your Uber Cash balance each time it drops below $10. Select the amount that you prefer by tapping on it.
- Step 7: If you want to turn off Auto-Refill at any time, toggle the button next to “Auto-Refill” to the “off” position.
- Step 8: Once you have chosen your Auto-Refill settings, tap on the “Update” button to save your changes. Your Uber Wallet will now automatically refill with the chosen amount each time your balance drops below $10, as long as Auto-Refill is enabled.
4. Check the login details
If you have more than one Uber accounts running on your phone, you should check if you are checking the Uber Wallet in the right account.
It is possible that the account you are currently using on Uber isn’t the one that has a sufficient amount of Uber cash in it. So, check the account once.
And if you are sure that the account currently in use is the same one having funds in Uber Wallet, you should try logging out from the account and re-login using the same correct account details.
5. Reinstall Uber
If none of these work, you may uninstall the Uber app from your phone, restart your device, and then reinstall the app. If there was an issue with the previous step, deleting the app might make things work.
To delete the Uber app, you are required to a long press until the other apps begin to jiggle before they can be deleted.
If you see a pop-up, you should now tap the X on the Uber app and select the ‘Uninstall’ option. In some devices, you might not get the ‘X’ icon.
Now, visit the app store to reinstall Uber.
You shouldn’t have any problems accessing your Uber wallet after reinstalling the app.
6. Update your Uber app
It is recommended that you update Uber if a new version is available. It might be beneficial to update the app if there are software difficulties preventing you from adding a payment card method.
Apps may be updated through the respective app stores.
Going to the app store and selecting “Profile” to make an update will get you there. Select “Purchases” at this time. Here, scroll down until you reach a link for Uber. If an update appears, choose it now.
Any problems that were in the program before would have been resolved by the developers.
7. Contact Uber support
If you still have issues with making payments after updating the app, the situation may be more dire than you realize.
Get in touch with Uber’s support team if you’re still having trouble after trying the above solutions. They would be quicker in assisting you if you provide them with more details.
How do I access my Uber wallet
You’ve likely tried adding a payment option to Uber previously and been unsuccessful. You are not the only one out there so don’t worry.
Many ask how. This is because it isn’t a payment option when you go to check out. In most cases, it means that you just cannot succeed. Nonetheless, as you’ll see below, there is a workaround.
Step 1: Access the Uber website
The first thing you need to do is access the Uber website or mobile app.
Just load up the Uber app on your phone or head to uber.com/start.
Step 2: Type in the email address
Launch the Uber app and sign in with your account email.
In the top left of your display, you’ll see a menu button.
Step 3: Go to your Wallet
The “Uber Wallet” option is accessible via the “Menu” button. Input “I don’t have a payment method attached” and continue.
Step 4: Fill up your SSN
Now fill up your Social Security Number (SSN). You would need to enter the last four digits of your Social Security Number there in the app.
Step 5: Connect to a payment option
After that, a “Link a payment method” button will appear. Tap the button.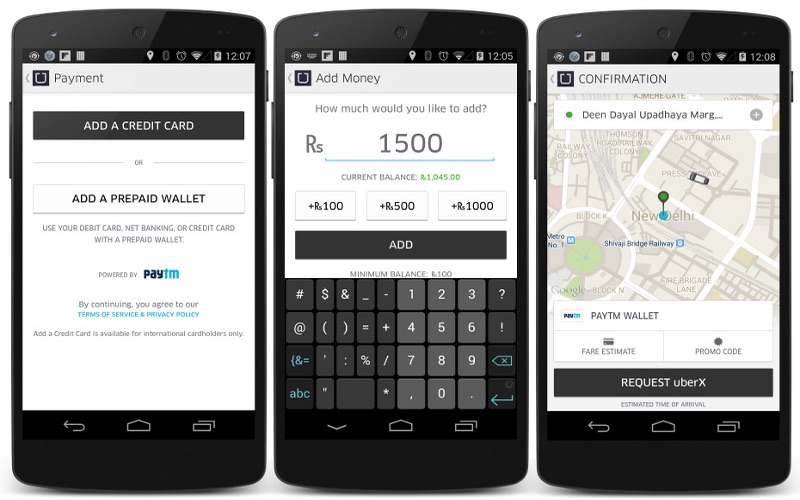
Step 6: Fill out the necessary fields
Please fill out the form to the best of your ability.
When you’re ready, connect your chosen payment method.
Step 7: Finalize your payment information
All of your present and future Uber payments will be displayed here. This area is also where you may modify your existing payment methods or add brand-new ones.
Now, in no time at all, you’ll be able to enjoy your Uber ride!
Conclusion
Keeping your Uber account secure is crucial. Important information about using your Uber Wallet and getting in touch with Uber while you’re not using the app is provided above.
The issue might be related to your device or the app itself, so try checking in from a different browser or device, or it could be related to a problem with the payment method itself.
Be aware that if you only have one non-cash payment option set up on your account, you will need to delete and re-add it in order to use a different payment method.
In case these explanations aren’t enough to fix the issue with your Uber account, we’ve included additional troubleshooting actions to try.
Read More:
Why is my uber eats promo code not working
[Solved] Why is my Hulu Uber eats pass not working
Why is my Uber eats Gift Card Not working
[Fixed] Uber eats won’t let me place order

An aspiring psychologist, Bhavya is in love with technology, sports, and social media. Writing is her passion and solving people’s queries through her guides on AndroidNature is her hobby!


