
Are you wondering why is your Samsung Smart View no sound on TV?
Worry not we got you covered.
The experience of watching television without sound can be highly aggravating, particularly if it arises at an inopportune moment for you. Even with the best televisions, it is not uncommon to encounter problems with sound.
It could be anything as innocuous as forgetting to turn on the TV’s volume, or it could be something as serious as a faulty component on the inside of the TV.
Despite Samsung electronics’ well-earned reputation for producing high-quality and dependable TVs, these products are not immune to malfunctions and other issues. Audio difficulties are consistently cited as one of the most frequent complaints regarding Samsung televisions.
When they experience a loss of TV audio, the majority of TV owners will freak out and run to the nearest repair shop. Unfortunately, this may also be a costly and time-consuming endeavor.
We have, fortunately, put together a straightforward tutorial that will help owners of televisions understand how to repair a Samsung Smart View that has no sound.
Why is my Samsung Smart View no sound on the TV
Short Answer: Your Samsung Smart View TV doesn’t have sound because the sound is turned off, the firmware is out of date, the hardware is broken, or other devices are connected.
There may have been a hardware failure or there may have been some sort of bug that caused the issue. Let’s backtrack and figure out what went wrong before we start trying to fix the issue.
Reason 1 – The sound is deafened
If there is no noise coming from your Samsung television, you have most certainly muted it or dropped the volume to an unacceptably low level. If your sound settings are incorrect, you may also have the same issue.
Reason 2 – Mechanical issues
In addition to this, any kind of mechanical damage to the Samsung TV, such as impact marks, dents, or cracks, can be harmful. At the same time, bugs can interfere with their normal operation and cause the screen to go black.
Reason 3 – Outdated firmware
Bug assaults are made simpler by obsolete Samsung televisions. This might result in incompatibility difficulties, and in certain situations, you may experience no sound if you run firmware that Samsung is no longer able to support.
Reason 4 – Hardware problems
In addition to software issues, hardware issues such as malfunctioning HDMI cable ports and cables might put you in danger. The same thing can happen if you connect the television to the wrong device.
Reason 5 – Other devices are linked
If you put headphones into your television, the television will not create any audible sound since the audio will be sent to the equipment by the device. The same thing could occur if there is a wire or trash stuck inside the headset port.
Fix: Samsung Smart View no sound on TV
It’s not nearly as difficult to restore audio as it is to restore a TV’s picture. When the sound on your TV stops working, all you have to do is follow these steps
Method 1 – Power cycle Samsung TV
The first thing that ought to be attempted is a regular, time-honored power cycle. You need to unplug your Samsung TV from the wall after it has been turned off. Wait one minute to allow any residual charge in the capacitors or memory to dissipate before continuing. After that, reconnect the television and power it back up.
Turning the television off and then back on again typically solves problems that are just transitory or transient and are otherwise difficult to diagnose. This is true for many different kinds of hardware.
Method 2 – Make sure Samsung TV is not muted
If you own a Samsung Smart View and the sound isn’t working, the most likely explanation is that you have your television set to mute. There have been times when I needed to mute my Samsung TV, and one of those times was when I was in the middle of a phone call.
Before moving on to other techniques of troubleshooting, I strongly suggest that you first check to see if the volume on your TV is turned down.
The volume levels are yet another essential parameter of your Samsung TV that requires your attention and scrutiny.
Method 3 – Perform a Sound Diagnostic Test
Conducting a sound diagnostic test is another method for ensuring that all of the components of your TV are working properly.
Simply following the instructions outlined below will allow you to run a diagnostic test.
- Step 1– Navigate your Samsung TV to the ‘Settings’ menu.
- Step 2- Simply select the ‘Support’ option from the menu.
- Step 3- Choose the ‘Self-Diagnosis’ option.
- Step 4– To begin the sound test, click the ‘Start’ button.
- Step 5– Your Samsung TV’s built-in speakers will have their functionality evaluated, and the TV itself will be checked to ensure that it is in good condition.
Method 4 – Reset Sound
On the other hand, if the diagnostic test reveals that there are issues with the speakers, you may easily remedy the problem by resetting the sound settings.
Following the steps below will allow you to reset the sound on your Samsung TV.
- Step 1- Choose ‘Settings’ from the menu.
- Step 2- Select the ‘Sound’ option from the menu.
- Step 3- Proceed to ‘Expert Settings’ by navigating the menu.
- Step 4- Select ‘Reset Sound’ from the menu.
Your TV components that are connected to the speakers and audio processors that are included in your Samsung TV will be reset as a result of doing this.
Method 5 – Check the signal strength
If the strength of your TV signal is inadequate because of the weather, you may also experience problems with the audio.
By following these instructions, you will be able to determine the signal strength that is being received by your Samsung TV.
- Step 1- Navigate your Samsung TV to the ‘Settings’ menu.
- Step 2– Simply select the ‘Support’ option from the menu.
- Step 3- Choose the ‘Self-Diagnosis’ option.
- Step 4- Simply select the ‘Signal Information’ option.
To obtain the optimal signal for clear audio to be heard on your Samsung TV, you need to make sure that the Signal Noise Ratio (SNR) is more than 20 db.
Method 6 – Change the TV region
If you have just relocated to a different region from your home nation, there is a good probability that the video format used in your home country is different from the format used in the region in which you are currently living.
For example, the video format used in the United States is called NTSC, while the majority of regions in Asia and the Pacific use PAL, and the two formats are not compatible with one another.
A mismatch between the video format and the audio format can cause your Samsung TV to play the video but not the audio if the audio is included alongside the video.
Changing the location settings on your Samsung TV can be done in the following manner.
- Step 1– Navigate to the Smart Hub.
- Step 2– To use your remote properly, you need to start by pressing the fast forward button, then the 2, 8, and 9 buttons, and finally the rewind button.
- Step 3– Select the country that you are now in from the list of countries that is being shown on the screen television.
- Step 4- After that, before continuing to change the location settings, you will first need to accept the terms and conditions.
Method 7 – Update Samsung TV
There is a good chance that your Samsung TV is using an older version of its operating system, which is another typical cause of audio problems.
Your sound issues can be fixed with your smart TV by installing a straightforward software update. Both online and offline software updates are available for your television set.
Here are the steps you need to do in order to update the software on your Samsung TV if it is connected to the internet.
- Step 1– On the TV remote, press the ‘Home’ button and then select the ‘Settings’ option.
- Step 2– Go to the ‘Cloud icon’, then click on the ‘Support’ page when you get there.
- Step 3– Choose the ‘Software update’ option.
- Step 4- To begin the process of updating to the newest version, click the ‘Update Now’ button.
- Step 5- Following the completion of the installation, your TV will automatically restart itself.
Even if your Samsung TV is not connected to the internet, you can still keep the software up to date by utilizing a flash drive. There is no need to worry about this.
You can do an offline update of the program by following the procedures below.
- Step 1– You can get the most recent version of the software from Samsung’s website, where you can also save it to your flash drive.
- Step 2- After that, select the program that you downloaded onto the flash drive, then insert it into the USB port of your Samsung TV to begin the installation process.
- Step 3– Following the successful installation of the most recent software, the sound on your TV should function as it did before.
Method 8 – Turn off the soundbar
There can be an overwhelming number of remote controls. If you own a Samsung TV and soundbar, you may use the same remote to operate both devices. If your soundbar is connected to your Samsung TV via an optical cable or HDMI via ARC, you can use the TV’s remote to adjust the volume and mute the soundbar.
However, several Samsung Smart View users have reported that turning off the soundbar allowed media sound to play over the TV while turning on the soundbar disabled the audio.
Method 9 – Set Wi-fi to 2.4 GHz
It is possible to achieve the coverage you need in a smaller home or apartment using the 5 GHz band, which also offers the best network performance.
Additionally, this band will help prevent interference from neighboring networks, which will allow for even faster download speeds.
You can cover more ground with the 2.4 GHz band, making it ideal for individuals with a larger home. Nonetheless, be prepared to suffer slow network speeds.
However, If you have old speakers and tv they are only compatible with the 2.4 GHz network and will not connect or function while using the 5 GHz network. When compared to the 5 GHz frequency band, the 2.4 GHz band’s range is superior despite its lower data-carrying capacity.
Method 10 – Install the SamrtThings app
Samsung’s SmartThings app serves as a hub for managing all of your connected home gadgets. Those who don’t own a Samsung device can still use it because it’s available for download on both Android and iOS.
Installing the SmartThings app and setting up your SmartThings Hub prepares you to take command of your entire home’s connected devices. Launch the app, then tap the + sign in the top right to add a new gadget.
Samsung Smart View is also operable. All that is required of you is to accept the SmartThings app’s terms and conditions. Then the drop-down menu will provide audio options.
Method 11 – Get a surround bar
There are a number of different devices that can improve the audio quality of a television, in contrast to the relatively difficult task of improving the video quality of a television. The surround bar is one of these components.
It is possible to improve the quality of the sound produced by television by adding a surround bar. It is a very long bar that comes equipped with speakers and has the capability of being connected to a television.
When compared to typical home theater systems, these devices are far simpler to pair, take less space and are easier to operate. Your smart view on the television will operate wonderfully if you link your phone via Bluetooth to the surround bar.
Method 12 – Volume up the media bar
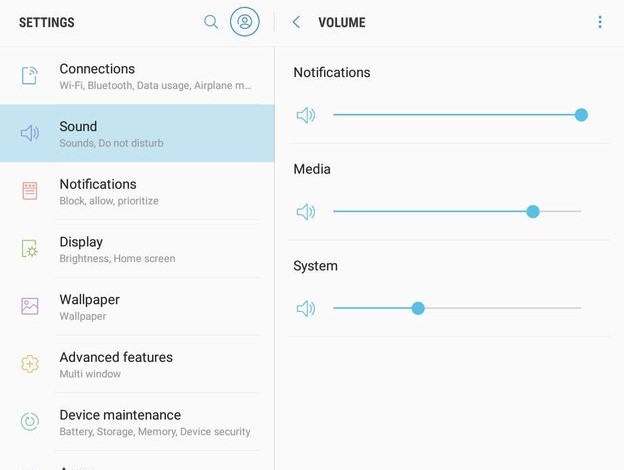
Nothing is more distracting than having to watch TV with no sound. For this problem to be resolved Verify the volume level of the playing media. The media volume may have been turned down or off, so try turning that up if you still can’t hear anything.
- Step 1– Go to the Settings page.
- Step 2– Go to Sound and vibration
- Step 3– Go to volume.
- Step 4– Turn the volume on the media bar up to its maximum setting while your device is linked to your TV via smart view.
Method 13 – Reset Samsung TV to factory settings.
You can do a factory reset on your Samsung TV if none of the troubleshooting techniques described above help you fix the problem.
Your TV’s settings can be returned to their original configuration if you do a factory reset.
If you follow the procedures below, you should be able to reset your Samsung TV.
- Step 1– To enter your home screen, press the Home button on your TV remote.
- Step 2- Choose the ‘Support’ option.
- Step 3– Choose ‘Self-Diagnosis’ from the menu under the ‘Support’ tab.
- Step 4– Click the ‘Reset’ button.
You will need to let the TV a few seconds to finish the process of powering back on and booting up after it has been reset. After your TV has finished booting up, check to see if the audio problem is still there.
SEE ALSO:
Fix: Samsung Smart View Not Connecting To The TV
7 Fixes : Samsung TV Remote Not Working Blinking Red Light
Remove Samsung TV Icons Stuck On Screen (6 Ways)
Final Words
If your Samsung TV’s audio still won’t function after you’ve tried everything in this guide to fix it, you may need to contact Samsung directly. We recommend contacting Samsung’s customer service department if you’re searching for a quick solution. You can reach them via phone, online chat, or email with any questions or concerns.

Technical writer and avid fan of cutting-edge gadgetry, Abhishek has authored works on the subject of Android & iOS. He’s a talented writer who can make almost any topic interesting while helping his viewers with tech-related guides is his passion. In his spare time, he goes camping and hiking adventures.


