
I recently upgraded to a Hopper 3 for my Dish Network, and everything works much better than on my Hopper 1. But, the Hopper 3 external hard drive keeps disappearing from the DVR menu when I try to access it.
It works most of the time, but it occasionally doesn’t show up.
I know the hard drive is working properly since it connects to other devices and the power light turns on when I plug it into the Hopper.
Eventually, after trying a bunch of different troubleshooting methods, I was able to solve the problem.
And here’s how you can too.
Why Does Hopper 3 External Hard Drive Keep Disappearing From DVR Menu
Short Answer: The external hard drive disappears from the DVR menu on Hopper 3 because of damaged cables, a damaged hard drive, hard drive power supply issues, software glitches, or a damaged Hopper 3.
While damaged cables can be replaced easily, if there are issues with the ports, it’s going to be a problem.
Corrupted data on a hard drive can also cause issues with it working on your Hopper 3.
Even if the DVR recordings you saved aren’t corrupted, other corrupted files can affect the way the hard drive functions.
But we’re here to solve the problem, so let’s get into it.
Fix: Hopper 3 External Hard Drive Keeps Disappearing From DVR Menu
Let’s start with the easier fixes and move on to more advanced troubleshooting.
Method 1-Check Your Cables And Connection Ports
Cables do everything, from powering your devices to connecting them with other devices.
But if your cables are damaged, you can expect a bunch of issues from your devices. Check the USB cable you use to connect the hard drive to your Hopper 3.
If the cable or connector is damaged, it’s probably the cause of the problem.
While external damage doesn’t necessarily prevent cables from working, it might have some damage internally.
Try using the cable on another device to confirm it isn’t working. If you’re replacing the cable, not every USB cable will work with your hard drive.
Since it needs to transfer data, make sure your replacement cable is capable of data transfers at the speeds your hard drive can output.
Slower speed cables will work, but you’ll experience issues like frame skipping and recordings getting stuck during playback.
This is especially true for HD content. Additionally, check the connection ports on both the hard drive and Hopper to make sure it isn’t damaged.
If the USB ports on either device have bent pins when you look at them, it’s not going to work properly.
And, as mentioned earlier, if the port is damaged, you’ll have to get the device repaired.
Method 2- Make Sure Your Hard Drive Is Working Properly
If your hard drive is very old or was dropped at some point, the internals might have gotten damaged.
Hard drives use mechanical moving parts, and while they are packed pretty tight and are quite robust, physical damage can break the insides.
You can open your hard drive to confirm if the parts inside work properly but don’t do this if you aren’t familiar with it.
Instead, I’d suggest taking it to your local PC or hardware store and asking the technician to verify if there’s any damage. Internal damage on a hard drive can be fixed depending on the severity of the issue.
But if it’s too far gone, you’ll have to replace the hard drive.
The good news, however, is that you can recover the data from your damaged hard drive and copy it to your new one.
This is provided none of the data was corrupted.
Method 3- Check The Hard Drive Power Supply
Large-capacity hard drives (> 8TB) and some older hard drives have external power supplies.
This is because they’re too old for the USB standard to support power delivery.
If it’s a large-capacity unit, it needs the additional power to run it. So, if the power supply is damaged, then your hard drive won’t turn on.
Just like the USB cables, make sure there isn’t any damage to the cables or the power supply port.
Also, check if the wall outlet is working properly. If the power cable is damaged, you’ll need to get a replacement.
In some cases, the other devices you have at home might use a similar power cable, so try it out to confirm that the older cable is damaged.
Otherwise, you’ll have to visit your local hardware store and have them check it out for you.
Damage to the power supply port can also be fixed at a PC or hardware store. But keep in mind that these types of damages are not covered under your warranty.
Which means you’ll have to pay for it. But, it’s not an expensive fix, so it shouldn’t break the bank.
Method 4- Software Glitches On The Hopper 3
If your hard drive works completely fine, then it might be an issue with the software on your Hopper 3.
In most cases, it’s usually because you haven’t updated the Hopper to its latest firmware.
Follow these steps to update your Hopper.
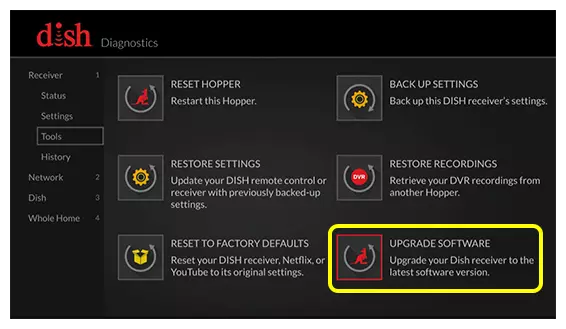
- Step 1- Press the ‘Menu’ button twice to open up the ‘Dish Diagnostics’ menu. For VIP remotes, press the ‘Home’ button thrice.
- Step 2- Select ‘Receiver’ and then open the ‘Tools’ sub-menu.
- Step 3- Click on ‘Upgrade Software’.
Your Hopper will automatically start downloading the latest firmware and install it once it’s ready.
Method 5- Reach Out To The Appropriate Support Team
If you can’t get your hard drive to work at all, reach out to your hard drive manufacturer’s support team to get them to fix it for you.
However, if you’ve determined it’s an issue with the Hopper, contact Dish Support.
See Also:
Final Words
External hard drives are a great way to make sure you have enough space to record and save DVR recordings.
However, in the event issues crop up with it disappearing from the DVR menu or it doesn’t connect at all, these steps can help sort out the issue.

As a seasoned DIY tinkerer, Arvind found the simplest way to help anyone troubleshoot or set up tech without feeling overwhelmed by it. He’s an advocate for smart home technology and in his free time makes music. He’s also an avid gamer, mostly obsessed with single-player titles.

