My Acer monitor has worked flawlessly for as long as I can remember.
But, a few weeks back, I moved houses and once I plugged my monitor in, it would turn on, but it wasn’t detecting my HDMI devices.
I couldn’t figure out what exactly was going on, because I’d never had this issue.
The worst part was because my work laptop’s display didn’t work, my Acer monitor was my only backup.
Thankfully, Reddit and the Acer community forums were extremely useful resources that helped me figure out what was wrong.
And since my monitor’s working again, here’s how you can get yours working too.
Why Is My Acer Monitor Not Detecting HDMI
Short Answer: Your Acer monitor isn’t detecting a HDMI connection due to faulty HDMI cable or port. It could also be due to input device issues, driver issues, faulty graphics card, or hardware problems.
Since there are quite a few reasons why Acer monitors don’t detect HDMI, I’ll be covering all the reasons in this extensive guide.
There are simple fixes that can solve the issue, but in some instances, you might need to rely on advanced troubleshooting.
However, if you’re not comfortable working on your system by yourself, try the simple fixes and then look for professional help.
Additionally, depending on the severity of the issue, it might take some time to fix.
So make sure you have time on hand to troubleshoot your Acer monitor.
But, with all that said, let’s jump right in.
Fix: Acer Monitor Not Detecting HDMI
We’ll start out simple and work our way up from there.
Method 1- Power Cycle Your Acer Monitor
The quickest fix to try and get your Acer monitor working again is to power cycle it. If you have any devices or a PC connected to the monitor, disconnect them now.
Proceed to turn off your monitor and unplug the power cord from the monitor and the power outlet.
If your monitor doesn’t have a detachable power cord, unplugging from the wall outlet will do. Now you’ll need to hold down the power button on your monitor for about 30 seconds.
This drains any residual power from the transistors that might be preventing your monitor from turning on.
Once you’ve power cycled it, connect the power cable and turn it on.
Connect one device to the HDMI port and confirm that it shows an output. If it does, you can connect any other devices you have to the other ports on the monitor.
Otherwise, you’ll need to try one of the other methods.
Method 2- Check Your HDMI Cables For Damage
The next thing to check if power cycling didn’t work is to check your HDMI cables.
While HDMI cables don’t get damaged easily, they can be damaged by rough use.
For example if your cable is placed underneath other devices or if it’s stretched out to its limit for prolonged periods, they can damage the internals.
So, if the cables are internally damaged, you’ll need to get replacements. Also, check the connectors on the HDMI cable to ensure the pins aren’t bent, or broken.
Additionally, if the connectors are dirty, you can try cleaning them out and checking to see if it works.
If not, you’ll have to replace them.
However, before that, I’d suggest using another cable to confirm the same. Use a cable from another device such as a gaming console or DVD player and see if the monitor shows an output.
If it works, you only need to get a replacement HDMI cable.
However, if it doesn’t, you’re going to need to check the HDMI ports on your monitor.
Method 3- Ensure Your HDMI Ports On Your Monitor Aren’t Damaged
If it’s not the HDMI cable, then it’s either the ports on the monitor or the input device.
Let’s first take a look at the monitor. Inspect the HDMI port or ports on your monitor to ensure it isn’t damaged.
You’re looking for similar damage as mentioned in the previous section.
Essentially, if the HDMI port’s pins are bent or broken, it won’t work properly. If this is the case with your monitor, you have two options.
Either use an alternate port on your monitor such as DisplayPort if your input device supports it, or get it repaired.
To get it repaired, you can either reach out to Acer support or an authorized service center.
Method 4- Check The HDMI Ports On Your Input Devices
Just like the ports on your monitor, now you’ll have to check the ones on your input device. If you’re using a gaming console, DVR, or any such HDMI devices, make sure their port is working properly.
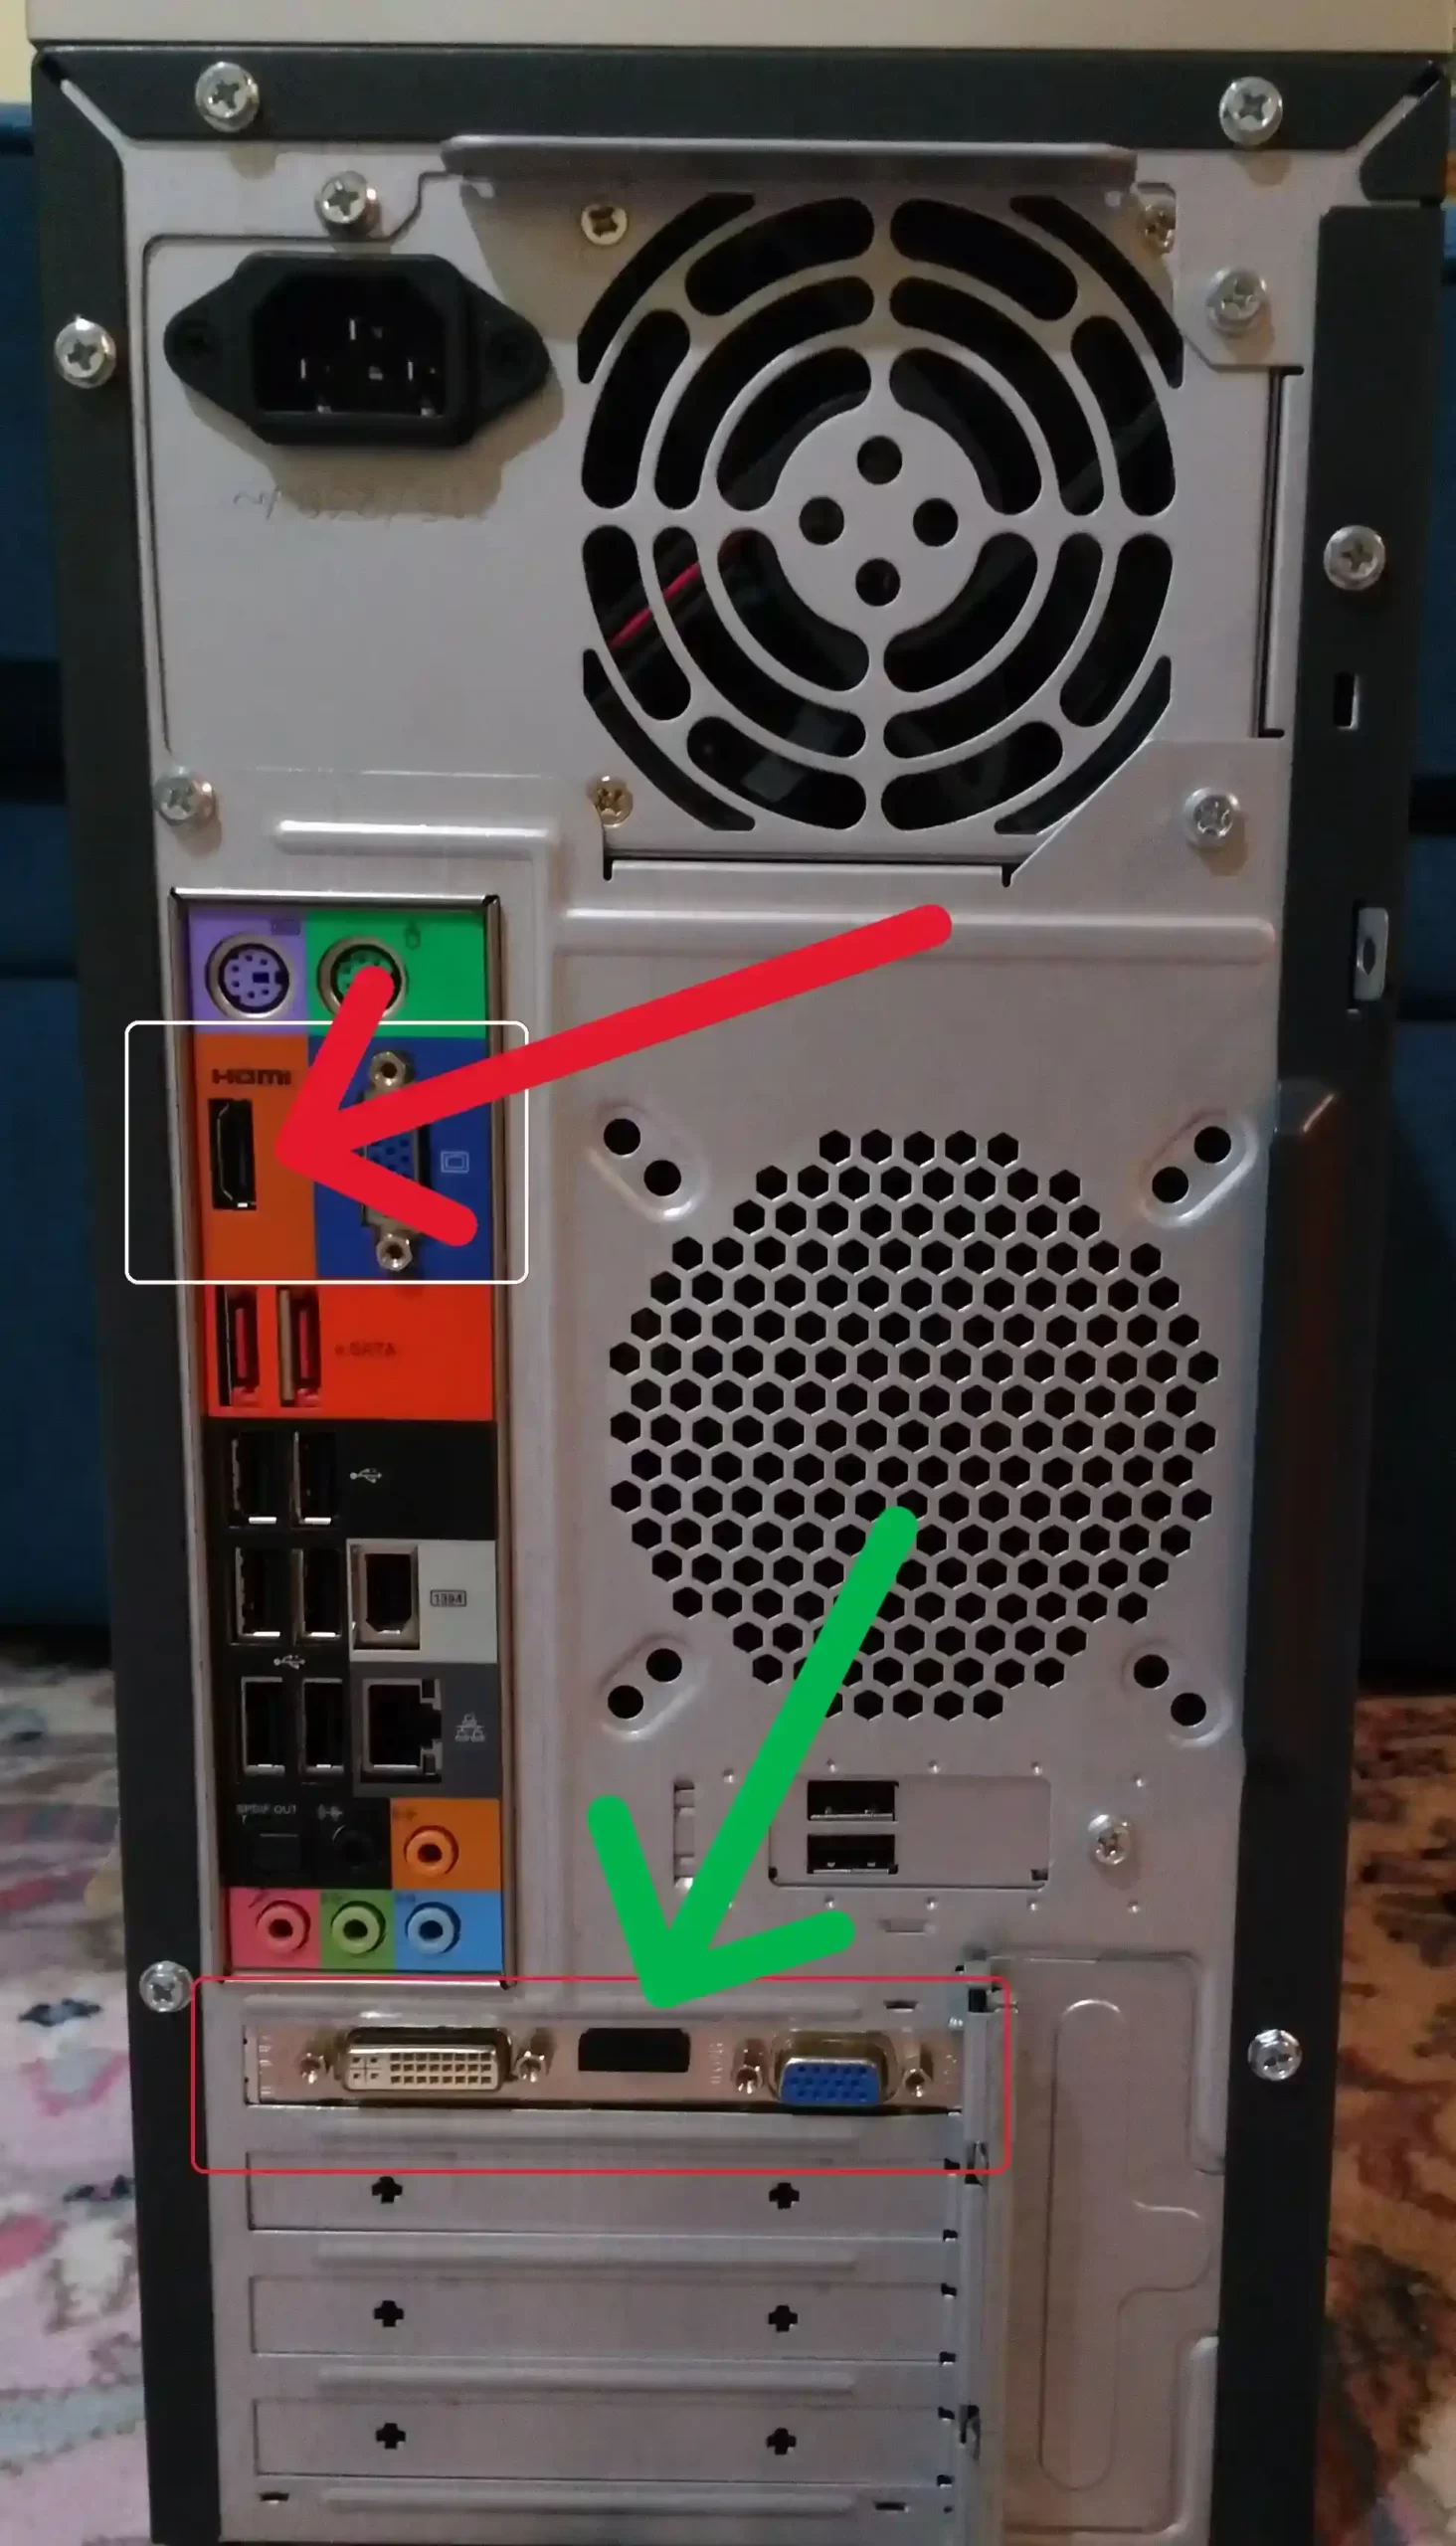
PC users can check the image below to confirm if the HDMI port on the graphics card is damaged.
The ‘Red Arrow‘ is the port on your motherboard, while the ‘Green Arrow‘ is the port on your graphics card.
Inspect the port for damage, and try using another HDMI cable to connect to your monitor.
If it’s damaged, then it goes without saying that you’ll have to get it fixed. However, if it’s not damaged and you still don’t get an output, it could be internal damage.
In such situations, it’s best to claim your warranty to get your device repaired.
But, if you don’t have a warranty, then you’ll have to repair it at an authorized dealer or send it in to the manufacturer.
Method 5- Update Your PC Graphics Card
If none of your physical components are damaged, then you might be facing issues due to software.
So, if you’re using a PC, then you may need to update your graphics card drivers if you haven’t done so. This is only applicable for users with dedicated graphics cards such as Nvidia or AMD.
If your system uses Intel or AMD’s integrated graphics, you can jump to method 7.
But for now, let’s update your graphics card. Irrespective of whether you’re on Team Green (Nvidia) or Team Red (AMD), you have two options to update your drivers.
Either use their proprietary software to download the drivers or manually download and install them.
Both methods are relatively simple, but if you want an automated solution and don’t mind downloading software, using the proprietary method is better.
But, before you jump in, use the image below to connect your display directly to your PC motherboard instead of the graphics card. Use Nvidia GeForce Experience or AMD Software depending on your graphics card.
If you haven’t already installed them, you can use the provided link.
The app should automatically figure out what graphics card is on your PC and download the latest drivers.
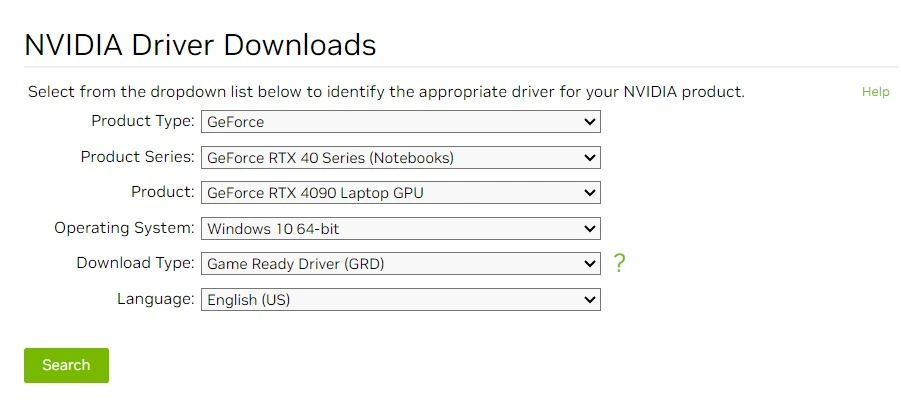
To manually download the drivers, go to Nvidia or AMD’s website.
Use the drop-down menus on the site to select your graphics card model and hit ‘Search’.
Select and download the installer for the latest drivers. You can save this file anywhere, but I’d recommend saving it to C drive on your PC.
Run the installer and select ‘Recommended’ when prompted for the installation method.
Wait for a while and you’ll be prompted once it’s installed.
Method 6- Update Your Gaming Console, DVR, Streaming Device, Or Media Player
If you use your monitor for your entertainment devices such as gaming consoles, streaming devices, or DVRs, then you might need to update them.
The only issue here is that they aren’t being detected by your Acer monitor.
So, the only workaround is to use another monitor or display. I’d suggest using your TV if you have one, or head over to a friend’s place and use theirs.
It’s highly unlikely that your device won’t work on all monitors.
Because, if that’s the case, then it’s definitely hardware-related as I covered earlier in the article. Once you’ve got your device plugged into a secondary monitor or TV, go to ‘Settings’ > ‘About Device’ > ‘Update’.
It might be labeled differently on your device, but it should be similar.
If you have difficulty finding the ‘Update’ section, refer to your device’s user manual or type in your device’s name followed by ‘User Manual’ on Google.
Once the device is updated, you should be able to connect your device to your monitor and get an output without issues.
Method 7- Update Your Acer Monitor’s Drivers
The last device to update if everything else is on their latest versions is your monitor.
But, you’re probably going to have the same issue since you can’t use your Acer monitor. So, use the same method as above and use a TV or another monitor.
Connect both monitors to your PC.
You can connect your Acer monitor to the graphics card and the secondary monitor or TV to your motherboard.
Once you’ve booted into Windows, follow the steps below.
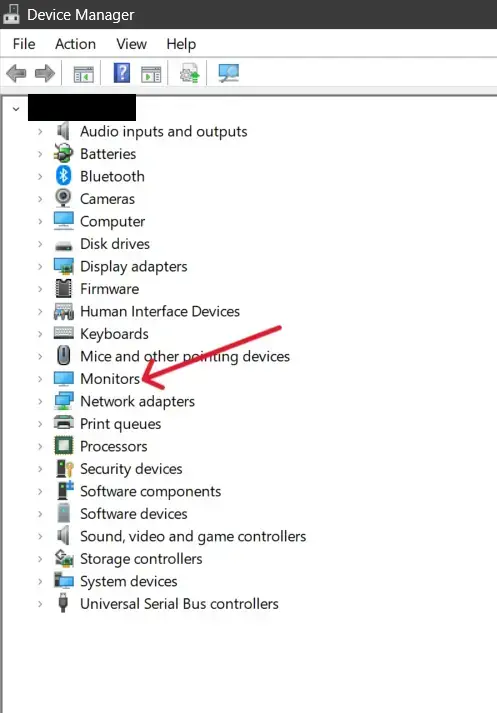
- Step 1- Right-click on the ‘Start’ button and select device managers.
- Step 2- From the list that populates, select ‘Monitors’ and you’ll see a list of them pop-up including your Acer monitor.
- Step 3- Right-click on your monitor and select ‘Update Driver’.
A window will open and ask you what you want to do.
Select the option to ‘Search automatically for drivers’ and your system will search online for the latest drivers.
When you’re prompted to install them, go ahead and do so.
Once they’re installed, you’ll need to restart your PC and your monitor should detect an HDMI input now.
Method 8- Reset Your PC BIOS (Advanced)
The last two methods are advanced troubleshooting methods. Try these methods only if the others don’t work, and only attempt these if you’re comfortable working on your PC’s BIOS.
If you don’t know what a BIOS is, I’d recommend getting professional help from Acer’s support team.
But, if you feel comfortable, then go ahead and follow the steps below.
You’ll need a monitor or TV that shows an output to reset your BIOS.
- Step 1- Turn off your PC completely.
- Step 2- Turn it back on and keep hitting F2 or End repeatedly to enter the BIOS. Check your user manual for your PC or motherboard, as it can be a different button.
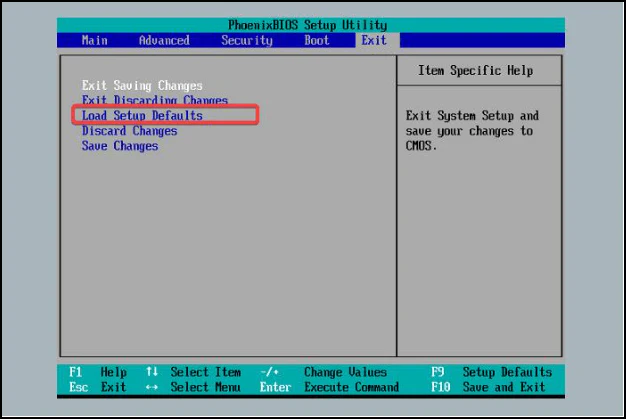
- Step 3- In the BIOS screen, go to the ‘Exit’ section and look for the option ‘Load system defaults’ or something similar.
- Step 4- Hit ‘Enter’ on this option and then click on ‘Save Changes’.
Once the changes are saved, your PC should restart and the BIOS should be successfully reset.
It could take a little longer for your PC to boot up, but once it does, your monitor should work normally.
Method 9- Reset Your PC CMOS Battery (Advanced)
If for some reason you can’t access the BIOS on your PC, then you’ll have to reset the CMOS battery.
This also resets the BIOS, but it’s not recommended to reset the CMOS battery unless required. For this method, there are two options.
One is to use the CMOS reset button on your motherboard if it has one, or you’ll have to remove the battery and reconnect it to the motherboard.
Start by placing your PC sideways and opening the side panel.
Look inside at the motherboard and you should see a small button that says ‘CMOS Reset Button’.
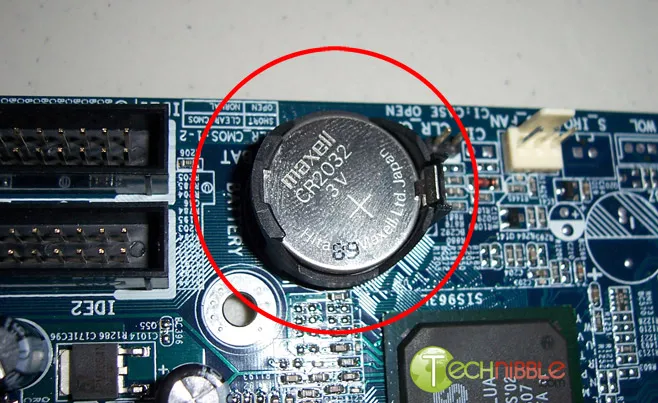
Hold down on this button for about a minute. Some motherboards will give you an audible beep once it’s reset. If you don’t have a reset switch, look for a small circular battery.
It looks like the batteries from an old watch or calculator.
This battery usually powers a small chip that stores system information and other important data for your PC to function properly.
Unplug any connectors attached to the battery and carefully remove it.
Wait for about five minutes and then reconnect the battery. Reboot your system and once it boots up completely, your Acer monitor should start showing an output via HDMI.
Method 10- Reach Out To Acer Support
If none of the methods helped solve the issue with your Acer monitor, you’ll have to contact support.
There might be something extremely wrong with your monitor that either needs to be replaced or repaired.
As long as it’s under warranty, you should be fine. If not, it’s most likely going to come out of your pocket for repairs.
See Also:
Final Words
Acer has excellent monitors for casual, gaming, and professional uses.
And they’re pretty competitively priced with decent after-sales support.
But, if you don’t want to go through the hassle of talking to multiple support staff to solve the problem. this guide has everything covered.

As a seasoned DIY tinkerer, Arvind found the simplest way to help anyone troubleshoot or set up tech without feeling overwhelmed by it. He’s an advocate for smart home technology and in his free time makes music. He’s also an avid gamer, mostly obsessed with single-player titles.


