

Adding ribbon to a Christmas tree can make even a simple collection of ornaments look more intentional. Ribbon fills open spaces, carries your color palette from top to bottom, and adds movement that ordinary round ornaments cannot create on their own.
The trick is not to wrap the tree tightly like a package. For a fuller, professionally decorated look, use manageable pieces of ribbon and tuck them into the branches to create soft loops or waves.
This guide explains how to add ribbon to a Christmas tree step by step, including what ribbon works best, how much to use, where to start, how to create natural-looking loops, and how to combine several ribbons without making the tree look too busy.
As an Amazon Associate, I earn from qualifying purchases. This article contains affiliate links, which may earn us a commission at no extra cost to you.
Quick Answer: How Do You Put Ribbon on a Christmas Tree?
For an easy professional-looking result:
- Fluff the tree completely.
- Choose wired ribbon around 2 to 4 inches wide.
- Cut the ribbon into manageable lengths instead of using one entire roll.
- Tuck one end deep into the branches.
- Bring the ribbon outward to create a loose, rounded loop.
- Tuck the middle back into the tree.
- Create another loop and secure the other end.
- Repeat around the tree in slightly different directions.
- Add a second ribbon if desired.
- Finish with large ornaments, picks, and smaller decorations to disguise the tucked areas.
What Type of Ribbon Works Best on a Christmas Tree?
Wired ribbon is usually the easiest choice because the edges help each loop keep its shape.
Soft satin ribbon can look beautiful, but it tends to collapse more easily and may require shorter loops or extra securing inside the tree.
| Ribbon Type | Best For | Difficulty |
|---|---|---|
| Wired mesh ribbon | Full loops and beginners | Easy |
| Wired velvet ribbon | Elegant Christmas trees | Easy to medium |
| Wired plaid ribbon | Traditional and farmhouse trees | Easy |
| Satin ribbon | Soft polished trees | Medium |
| Very narrow ribbon | Accent layers and bows | Medium |
For most full-size trees, ribbon around 2 to 4 inches wide is easier to shape and visually strong enough to compete with larger ornaments.
Amazon Find: Wired Christmas Ribbon
Wired ribbon is easier to curve, fluff, and reshape after it has been tucked into the Christmas tree.
How to Add Ribbon to a Christmas Tree Step by Step
Step 1. Fluff the Christmas Tree First
Before adding ribbon, fully shape the Christmas tree.
Pull artificial branches apart and point some slightly upward, outward, and sideways instead of leaving every branch facing the same direction.
Do not ignore the branches deeper inside the tree. Those interior branches are useful later because they can hold ribbon ends and help hide the places where the ribbon is secured.
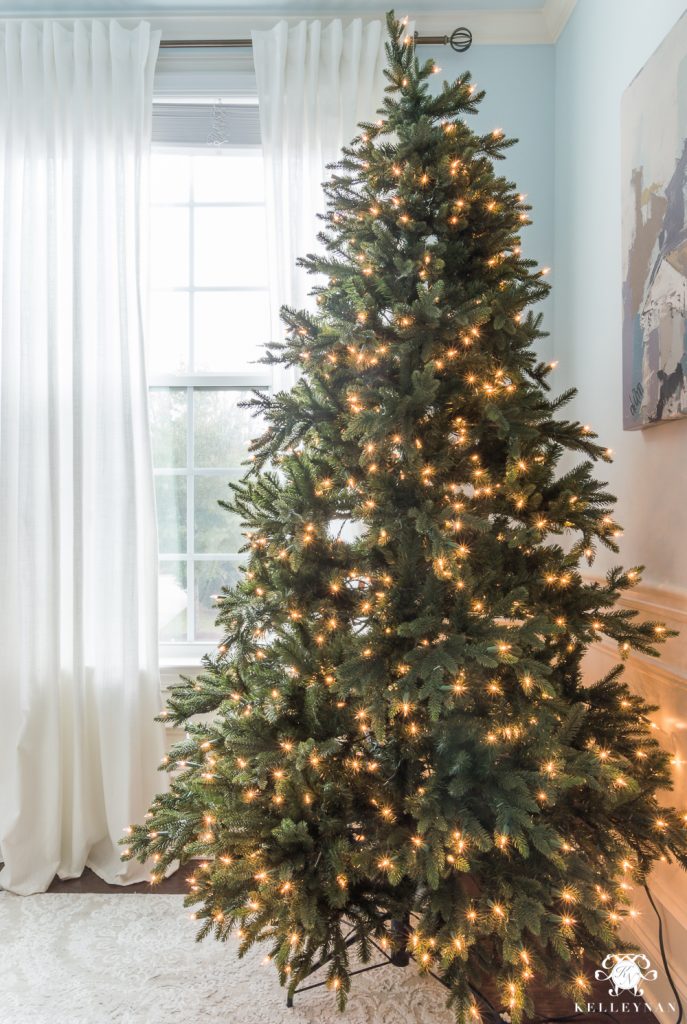
Why this matters: adding ribbon before fluffing often leaves obvious gaps that become difficult to correct later.
If you are using a real Christmas tree, simply adjust the branches where possible and identify any natural gaps you may want the ribbon to fill.
Step 2. Choose Your Main Ribbon
If you plan to use several ribbons, choose the one you want to notice most and add it first.
A wide solid, mesh, velvet, or simple plaid ribbon makes a good base because it can create larger loops throughout the tree.
More detailed patterned ribbon can be added later in smaller amounts.
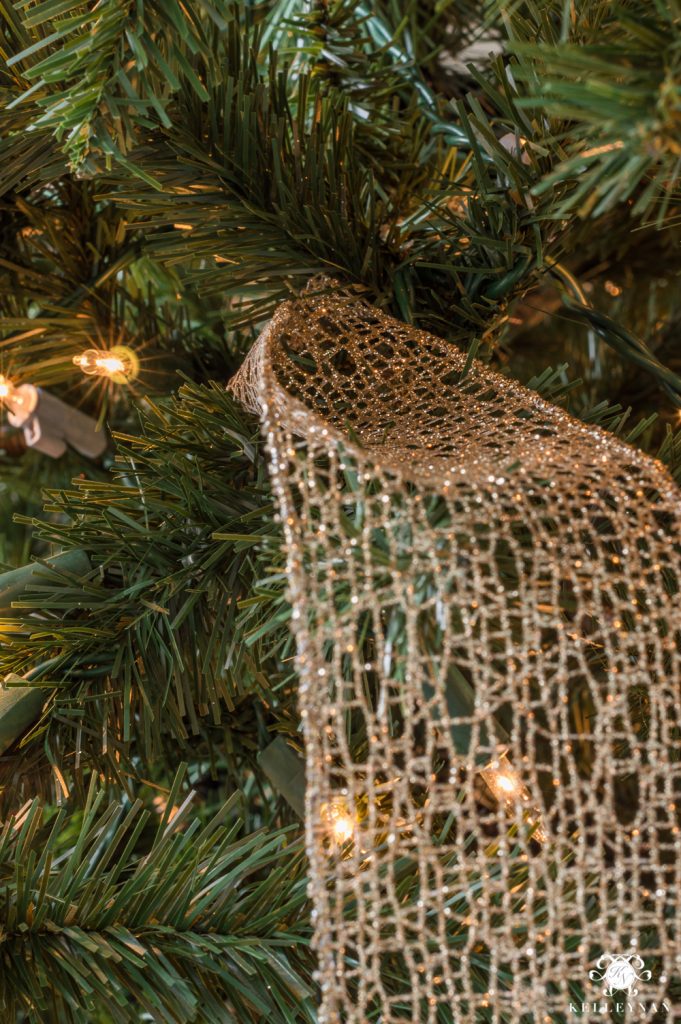
Easy color rule: start with one main ribbon that matches your largest ornaments, then choose one accent ribbon that introduces pattern or texture.
Step 3. Cut Ribbon Into Manageable Strips
Instead of taking the entire spool and winding it continuously around the tree, cut smaller sections.
For a medium-width wired ribbon, pieces around 3 feet long are a useful starting point. You can make them shorter or longer depending on the tree and the size of your loops.
Each strip can usually create about two soft ribbon tufts.
For very wide or difficult ribbon, shorter pieces may be easier to control.
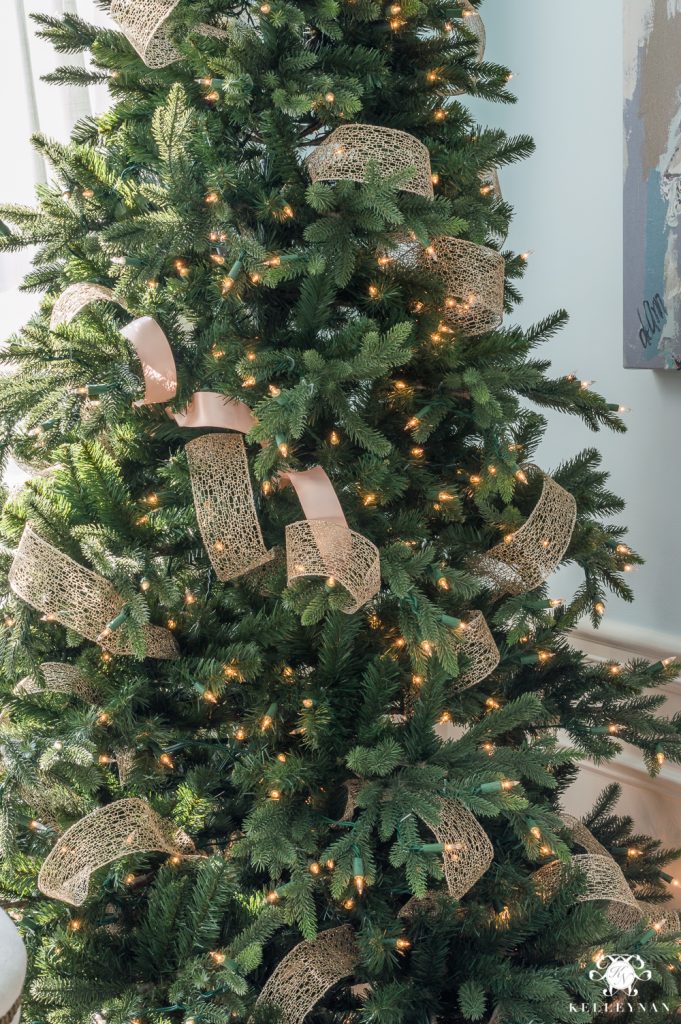
Important: do not cut the whole spool before testing one piece. Try your first strip on the tree and adjust the length if needed.
Step 4. Tuck the First End Deep Into the Tree
Start around the middle section of the tree rather than automatically beginning at the very top.
Pinch the ribbon end together and push it several inches into the branches.
If your ribbon has a mesh-like texture, the needles may hold it naturally. Smooth ribbon may need a branch gently bent around the end to keep it secure.
Try not to leave the attachment point sitting directly on the outside surface of the tree.
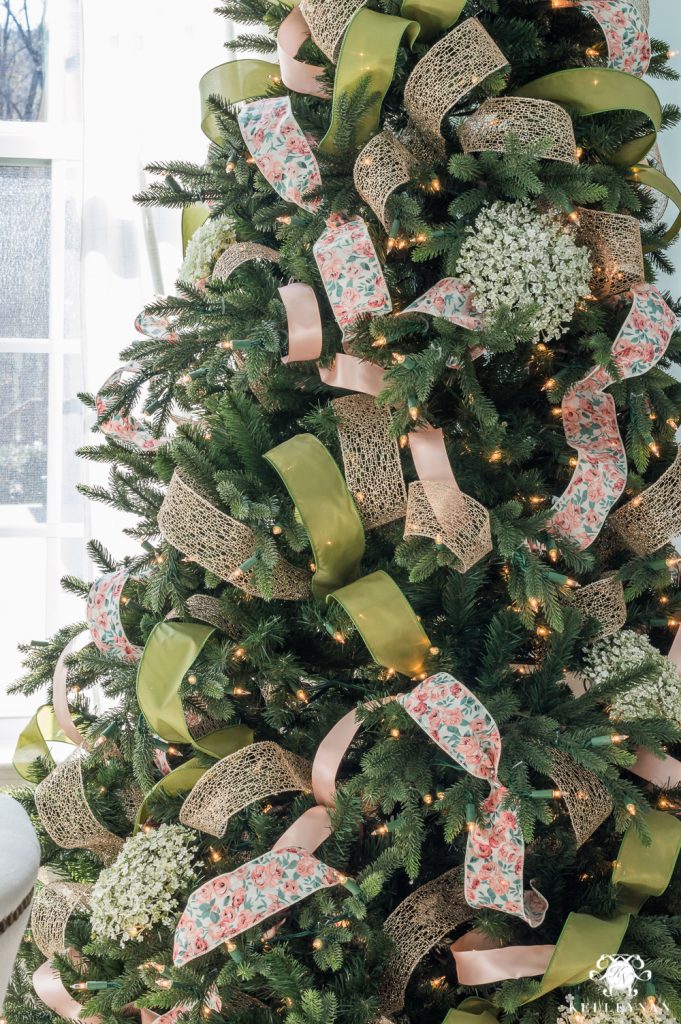
Styling goal: the ribbon should appear to emerge naturally from inside the branches.
Step 5. Create Your First Loose Ribbon Loop
Bring the ribbon outward from the first tucked point and allow it to billow over the branches.
Do not pull it tightly against the tree.
A good loop should look rounded and soft, almost as though the ribbon is resting on top of the branch rather than being stretched across it.
Push the center gently upward while shaping the loop. This gives the ribbon more fullness and avoids visible wrinkles.
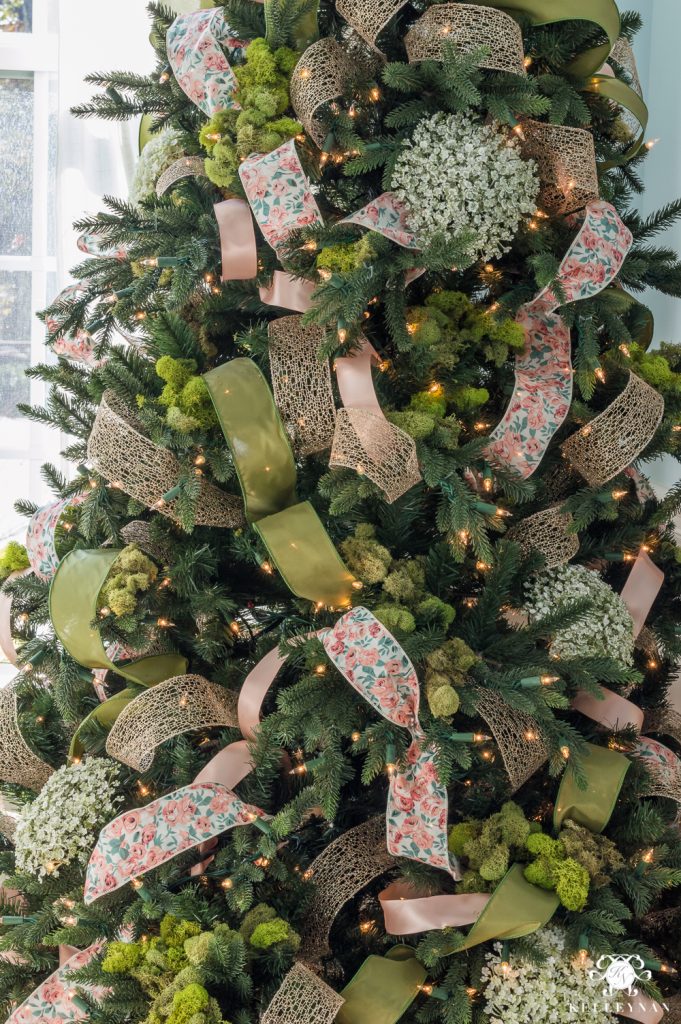
Common mistake: pulling downward on the ribbon often creates a flat, tight loop that looks wrapped rather than tucked.
Step 6. Tuck the Middle Back Into the Branches
After creating the first loop, push the ribbon back into the tree and secure the middle section.
The tucked section can sit slightly lower or diagonally from the first attachment point.
You do not need to make every loop perfectly straight.
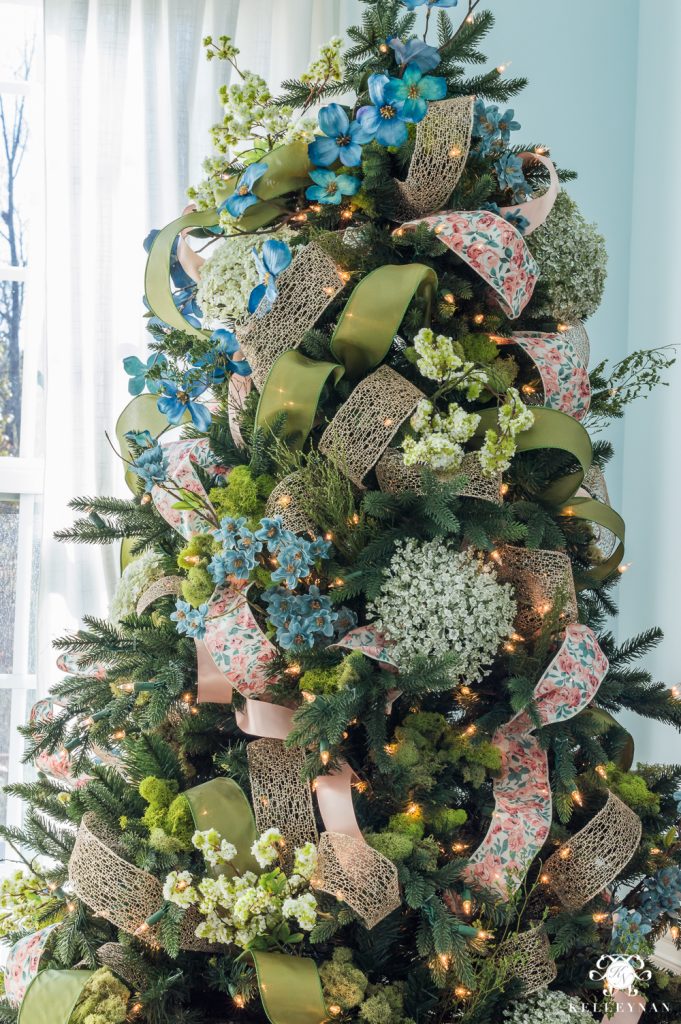
In fact, slightly diagonal placement usually looks more natural because your eye moves around the tree rather than following rigid horizontal lines.
Step 7. Create the Second Loop
Bring the remaining ribbon back outward and form another rounded loop.
Try to make it approximately the same visual size as the first without worrying about perfect measurements.
Tuck the final tail deep inside the tree.
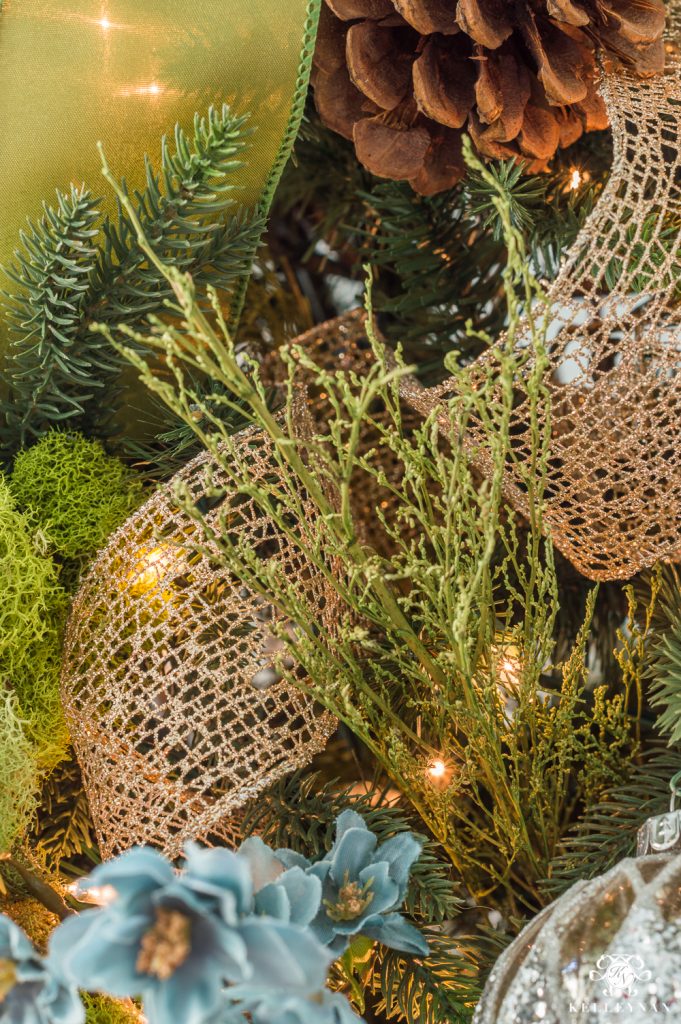
You have now created two loose ribbon tufts using one short piece instead of wrapping several feet around the entire tree.
Step 8. Repeat Around the Tree in Different Directions
Move to another section of the tree and repeat the same technique.
Do not place every ribbon piece at exactly the same angle. Let some travel diagonally left and others diagonally right.
A little variation creates a more natural flow.
Step back every few pieces and look for areas that need more color or volume.

Save ribbon: if the back of the tree sits against a wall, you can concentrate most of the ribbon on the visible front and sides.
Step 9. Do Not Forget the Top of the Tree
The upper section often receives less ribbon because the branches are smaller, but leaving it empty can make the tree feel bottom-heavy.
Use shorter ribbon pieces and smaller loops near the top.
You can also angle the ribbon upward toward the topper to visually connect the main tree with whatever you place above it.
Step 10. Add a Second Ribbon
Once the main ribbon feels evenly distributed, add a second style through some of the empty spaces.
This ribbon can be slightly narrower, more colorful, or more heavily patterned.
Use the same tuck-and-loop method, but you usually need less of the accent ribbon than the base ribbon.
Simple combination: wide solid velvet plus narrower plaid works well for traditional Christmas decor.
Amazon Find: Plaid Christmas Ribbon
Plaid ribbon works well as an accent layer over solid velvet, mesh, burlap, or metallic Christmas ribbon.
Step 11. Layer Two Ribbons Together
Another option is to place two ribbons directly on top of each other and treat them as one strip.
For example, layer a narrow patterned ribbon over a wider solid ribbon, then tuck and loop both through the tree together.
Once they are positioned, gently pull the top ribbon slightly to one side so some of the lower ribbon remains visible.
This technique creates more detail without adding another completely separate layer around the tree.
Step 12. Add Your Biggest Tree Decorations
Once the ribbon foundation is finished, move on to the largest ornaments, florals, picks, or decorative stems.
Large pieces are useful for filling gaps and visually connecting the different ribbon sections.
Push substantial ornaments slightly deeper into the tree rather than hanging every piece only from the branch tips.
You can cluster similar ornaments in groups or distribute statement pieces around the tree.
Step 13. Add the Remaining Ornaments
After the larger decorations are positioned, add your regular ornaments throughout the tree.
Mix different sizes rather than reserving every large ornament for the bottom.
Hang heavier pieces from sturdy interior branches and lighter ornaments farther toward the outer tips.
Your ornaments will also begin hiding the spots where the ribbon disappears into the branches.
For a cleaner tree style, these white modern Christmas decor ideas show how ribbon and ornaments can work with a restrained palette.
Step 14. Use Picks and Pinecones to Hide Ribbon Tucks
Do not worry if some of the ribbon attachment points are visible at first.
Small berry stems, pinecones, floral picks, greenery, and ornaments can cover those areas once the tree is almost finished.
This is one reason it helps to add ribbon early rather than trying to weave it between finished ornaments.
Easy trick: place a pinecone or medium-size ornament directly over an awkward ribbon tuck instead of completely repositioning the ribbon.
Step 15. Finish With the Tree Topper
Your topper can be traditional, such as a star or angel, or made from several decorative picks that extend downward into the tree.
If your ribbon travels upward, let some of the top pieces visually connect with the topper.
For a dramatic tree, use long berry, floral, or metallic stems around the top and gradually reduce them as they travel downward.
For a simpler tree, one bow or star may be enough.
Step 16. Step Back and Adjust the Ribbon
Do not judge the ribbon only while standing directly beside the tree.
Step back across the room and look for empty areas, sections where loops are too tight, or places where the same ribbon pattern appears too heavily.
You can pull individual loops outward, push others deeper, or rotate them slightly without removing the entire strip.
Final test: your eye should move naturally around the tree rather than noticing one continuous spiral of ribbon.
How Many Types of Ribbon Should You Use?
You can decorate beautifully with only one ribbon.
Two ribbons usually add enough contrast for most trees, while three or four can create a fuller designer-style tree.
- 1 ribbon: simple and cohesive.
- 2 ribbons: easy way to add texture and pattern.
- 3 ribbons: fuller, layered designer look.
- 4 ribbons: works best on large or heavily decorated trees.
If you are combining several styles, make the busiest patterned ribbon the smallest accent rather than using equal amounts of everything.
Christmas Tree Ribbon Combinations That Work
- Traditional: red velvet + tartan plaid.
- Farmhouse: burlap + black-and-white check.
- Elegant: champagne mesh + cream velvet.
- Modern: ivory linen-style ribbon + muted gold.
- Moody: burgundy velvet + forest-green satin.
- Winter: white mesh + silver velvet.
- Ralph Lauren inspired: Blackwatch tartan + burgundy velvet.
- Candy Land: red-and-white stripe + pink velvet.
For a more polished modern tree, you can also pull ideas from these modern chic Christmas decor ideas.
Should Ribbon Go on the Tree Before or After Ornaments?
For the tucked-loop method, adding ribbon before most ornaments is usually easier.
This gives you access to the inside branches and lets you move freely around the tree without knocking decorations off.
After the ribbon is positioned, large ornaments, flowers, branches, pinecones, and smaller decorations can cover the attachment points.
If you are only adding a few ribbon bows to an already decorated tree, those can be added at the end.
Common Christmas Tree Ribbon Mistakes
- Wrapping one tight spiral around the whole tree: this can make the tree look banded rather than naturally layered.
- Pulling loops too tightly: ribbon looks softer when it billows away from the branches.
- Using ribbon with no structure: very soft ribbon may collapse unless the loops are small.
- Starting with ornaments first: it becomes harder to access the inner branches.
- Cutting every ribbon piece before testing: you may discover the pieces are too long or too short for your tree.
- Making every loop identical: slight variation usually looks more natural.
- Putting all ribbon in the same direction: alternate angles so the tree does not look like one continuous spiral.
- Using too many competing patterns: make one ribbon dominant and use busy designs as accents.
- Ignoring the top of the tree: smaller loops are still needed to keep the tree visually balanced.
- Trying to hide every tuck immediately: ornaments and picks added later will naturally disguise many of them.
Frequently Asked Questions
What width ribbon is best for a Christmas tree?
Ribbon around 2 to 4 inches wide works well for many full-size Christmas trees. Wider wired ribbon creates larger loops, while narrower ribbon is useful for secondary layers and small accents.
Do you put ribbon on a Christmas tree first?
For the tucked-loop method, add ribbon after the tree has been fluffed but before most ornaments. This gives you better access to interior branches and lets later decorations hide the ribbon attachment points.
How do you keep ribbon from falling off a Christmas tree?
Use wired ribbon and tuck the pinched ends deep into supportive branches. On an artificial tree, an interior wire branch can sometimes be gently positioned around the ribbon to hold it securely.
How do you make Christmas tree ribbon look professional?
Use short ribbon sections, create soft loops instead of tight wraps, vary the direction, tuck the ends deep into the tree, and layer ornaments and picks over the attachment areas.
Can you use two ribbons on a Christmas tree?
Yes. One ribbon can act as the main base and another can provide pattern or contrast. You can apply them separately or layer two ribbons together and tuck them into the tree as one piece.
Can you add ribbon to an already decorated Christmas tree?
You can, especially if you are adding bows or a few accent pieces. For a full tucked-ribbon design, however, working before most ornaments are installed is generally easier.
How do you make ribbon loops look fuller?
Use wired ribbon, avoid pulling it tightly, push the center of the loop slightly upward while shaping it, and allow the ribbon to rest over the outer branches before tucking it back inside.
Recommended Finds for Adding Ribbon to a Christmas Tree
You do not need every ribbon style below. Choose one main ribbon and add a second only if it helps your chosen Christmas color palette.
- Wide wired Christmas ribbon — the easiest starting point for full tucked loops.
- Velvet wired ribbon — useful for elegant, traditional, and moody trees.
- Plaid wired ribbon — ideal for traditional, farmhouse, and heritage-style trees.
- Christmas mesh ribbon — holds larger loops well and can help fill gaps in thinner trees.
- Champagne gold ribbon — useful for neutral and elegant Christmas palettes.
- Blackwatch tartan ribbon — works especially well with burgundy, brass, navy, and forest green.
- Floral wire — useful when a ribbon or decorative pick needs additional securing.
Final Thoughts
Learning how to add ribbon to a Christmas tree becomes much easier once you stop thinking of the ribbon as one long piece that needs to wrap around the entire tree.
Instead, work with shorter sections. Tuck one end deep into the branches, create a soft rounded loop, tuck the ribbon back into the tree, and repeat. Vary the direction as you move around the branches so the finished ribbon feels loose and natural.
Once the main ribbon is in place, add an accent ribbon if you want more color or texture, then use ornaments, floral picks, pinecones, and larger decorations to hide the tucked areas.
The finished tree does not need perfectly equal loops. A little variation is what helps the ribbon look as though it is naturally flowing through the branches rather than simply wrapped around them.

Ankit is an engineer by profession and blogger by passion. He is passionate to do all the stuff such as designing the website, doing the SEO, researching for the content, writing tech blog posts and more.