If you don’t know why QuickBooks’s multi-user mode isn’t working, you’ve come to the right place.
QuickBooks is a popular accounting program that helps businesses keep track of their money, monitor their expenditures, and create reports, among other functions.
QuickBooks’ multi-user mode is a powerful tool that enables many users to share the same company file and work on it at the same time. On rare occasions, however, customers may discover that QuickBooks’ multi-user feature is faulty. This article will discuss the most prevalent causes of this problem and offer advice for resolving it.
Why is my QuickBooks multi-user mode not working
Short answer: Your QuickBooks multi-user mode isn’t working because QuickBooks isn’t installed on the server, the hosting settings aren’t set up right, the server isn’t set up as a QuickBooks Database Server, there’s a security problem, the permissions on the Windows file aren’t set up right, the company file can’t be accessed by QuickBooks, or a.ND file has become corrupted.
QuickBooks is a popular piece of accounting software that may streamline the process of managing a company’s finances. It can be utilized by companies of varying sizes. The multi-user mode, which enables numerous users to view and work on the same corporate file concurrently, is one of the most well-liked features that this software offers.
Several potential causes might result in QuickBooks remaining in its single-user mode or preventing users from moving to its multi-user mode. The following are some of the most often occurring causes:
- There is a possibility that QuickBooks is not installed on the server.
- It’s possible that the hosting settings are not configured correctly.
- Not functioning properly or correctly set up as QuickBooks Database Server Manager.
- Conflicts caused by the firewall or the security software
- The permissions on the Windows file were not configured appropriately.
- Your QuickBooks company file can’t be accessed by the QuickBooks Database Server Manager.
- Your database contains a.ND file that has been corrupted and has to be repaired.
Fix: QuickBooks multi-user mode not working / Stuck in single-user mode
This QuickBooks desktop multi-user mode problem appears when a user tries to open a corporate file stored on a different computer. When this happens, the message “QuickBooks multi-user mode not working /Stuck in single user mode” appears on the screen.
Method 1 – Use the QuickBooks Database Server Manager.
- Step 1- The very first thing you need to do is locate the QuickBooks Database Server Manager application on the desktop of your computer and launch it.
- Step 2- The next step is to open the Start menu and type Database into the box that appears.
- Step 3- Following that, select the Browse option from the drop-down menu, and if you are unable to find the necessary folder among the corporate files, conduct a search for it there.
- Step 4- To finish, select Ok from the drop-down menu, then select Scan from the menu that appears.
If you follow the instructions described above carefully and in the correct order, you will have no trouble repairing the permissions on the firewall. Proceed even if it did not help repair the issue even after trying it.
Method 2 – Renaming the *.TLG and the *.ND Files
.ND and.TLG is the QuickBooks network data and exchange log files that help QuickBooks connect to and open the business file. The inability to access the QuickBooks company file due to damage in one of these files can be remedied by renaming the problematic file(s) so that QuickBooks can create clean copies.
The procedures for renaming TLG and.nd files are as follows:
- Step 1- Launch your company’s QuickBooks Desktop file. Press the F2 key when viewing the homepage.
- Step 2- The window for Product Details loads. The Company File may be found under the drop-down menu labeled “File Information.” You can find it.TLG and.QBW.ND files in the same folder.
- Step 3- You may rename the aforementioned files by right-clicking on them in the aforementioned location.
Method 3 – Configure Windows Firewall
Incorrectly setting up the Windows Firewall, for example, can prevent the computer from doing anything at all. To make Windows Firewall compatible with QuickBooks’ multi-user mode, please follow the steps outlined below.
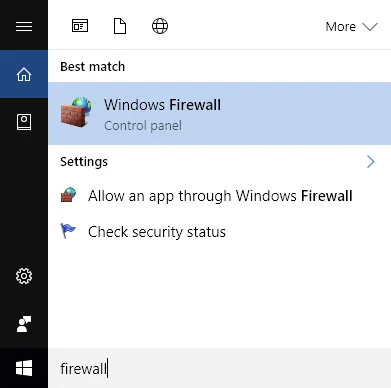
- Step 1- Use the Windows Start menu to access the Settings menu.
- Step 2– Find Windows Firewall among the results and press Enter.
- Step 3– Select the Windows Firewall option and then click Allow an app through.
- Step 4- Select Public list for QuickBooks, and then press Change Settings.
- Step 5- To make the application accessible to the public, click OK.
Method 4 – Configure Default Setting
- Step 1- To access your files in QuickBooks, open the program.
- Step 2– Now choose the Utilities menu.
- Step 3– Choose to Allow multiple users to access the site at once.
- Step 4– You may integrate the corporate file with as many users as you like.
- Step 5- If multi-user mode is already turned on, and you are prompted to turn it off, click the Cancel button.
- Step 6- Different users require unique login credentials, which may be created during the setup process.
Method 5 – Install and run the QuickBooks File Doctor tool
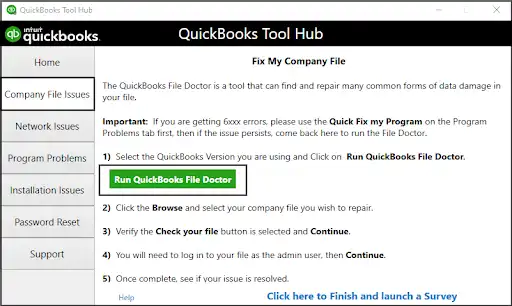
- Step 1- The first step is to have the QuickBooks tool hub installed on your computer.
- Step 2– Choose the symbol to access the tool hub.
- Step 3- QuickBooks has a built-in file doctor tool you may use if you go to the Company file problems tab.
- Step 4- The file doctor utility is also available for download.
Use this tool to see if your machine meets the system requirements for running QuickBooks in multi-user mode. Check to see whether the issue persists after running the QuickBooks file doctor.
Method 6 – Ping Server From Workstation
- Step 1– Launch the server’s Start menu first.
- Step 2– Get the Network and sharing center by typing network.
- Step 3- Switch on network discovery and file/printer sharing by selecting the Change advanced sharing option.
- Step 4- Find out the server’s name.
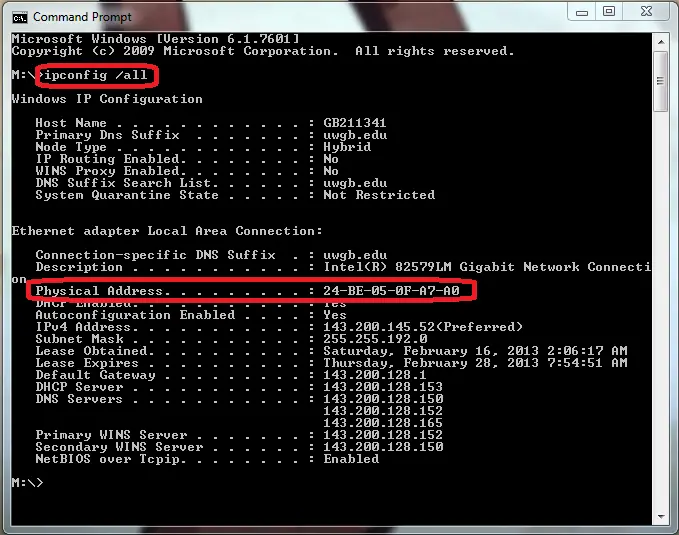
- Step 5- In the run window, type CMD.
- Step 6- You need to type Ipconfig/all into the CMD window and then hit the Enter key.
- Step 7- The Hostname will be followed by the Server name.
- Step 8- Take note of the Host’s name and head on over to the Workstations.
- Step 9- To proceed, click the Start button.
- Step 10- Launch the command prompt (run).
- Step 11- Choose the CMD tab, then enter Ping and press Enter.
- Step 12- Remove the brackets from the Server name and enter it in now.
Method 7 – Server To Windows Host File
Windows can more easily recognize and associate itself with the server PC housing the business file if the server’s unique characteristics are included in the Windows Host file. Open the Windows hosts file in Notepad on the computer where you’re experiencing the “Cannot change to multi-user mode” problem.
To update the Windows hosts file with server information, follow these steps:
- Step 1– C:WindowsSystem32DriversEtc is where you’ll find the host file.
- Step 2– Next, if prompted, launch Notepad in administrative mode.
- Step 3- Replace the final IP address with the server’s IP address.
- Step 4- Just hit Tab and enter the hostname.
- Step 5- To save your work, select Save from the File menu; then, to close the program, select Exit.
Method 8 – Set Up Hosting Correctly
When the hosting options are wrong, the multi-user mode may not function as intended, which can be frustrating for everyone involved. Any problems with the hosting environment or preferences are going to immediately lead to the multi-user mode not functioning properly. This is because the multi-user mode requires numerous workstations to access the corporate file from a single server.
Method 9 – Examine Your Server’s Services
In order for QuickBooks to function properly in multi-user mode, your Windows Computer relies on a number of background services. You may experience issues while attempting to run QuickBooks in multi-user mode if any of the aforementioned services stop functioning or is not configured to launch automatically when Windows boots.
Method 10 – Check Host Mode on All User Systems
- Step 1- Turn on the computer and navigate to the QuickBooks file menu.
- Step 2- Choose the Utilities menu.
- Step 3- In the event that Host multi-user access is included on the list, you need to switch to a different system.
- Step 4- If you see Disable hosting and Stop hosting multi-user access, then you can switch to QuickBooks’s single-user mode.
- Step 5- Once you know for sure that the Hosting mode is off on all client machines, you may test out the multi-user mode.
Method 11 – Create a new folder for your company file.
You may now modify the folder that contains your business file, and after that, check to see whether the problem still occurs. Keep up with the instructions.
- Step 1- To begin, you will need to make a folder on the host computer that may be shared with others.
- Step 2- When you have completed everything, you will need to change the access rights for the folder.
- Step 3– At this point, you will need to make a duplicate of the.qbw file, which you will then need to paste into the newly created folder.
- Step 4– When you are finished, you will need to do a second scan of the QuickBooks business file.
- Step 5– At the final step, open your file.
It’s possible that a problem with QuickBooks Multi-user mode preventing it from operating has halted your work. As a result, it is imperative that you correct it as soon as you see the issue in the system. We have shown a number of options from which you may select to get rid of the problem that occurs when QuickBooks is run in multi-user mode.
Final Words
If you follow the troubleshooting procedures that have been sketched up above, you should find it somewhat simpler to resolve the issue where the multi-user option of QuickBooks is not functioning properly.

Technical writer and avid fan of cutting-edge gadgetry, Abhishek has authored works on the subject of Android & iOS. He’s a talented writer who can make almost any topic interesting while helping his viewers with tech-related guides is his passion. In his spare time, he goes camping and hiking adventures.


