
Do you have Hitachi TV at your place?
Hitachi TVs are one of the widely used and feature-rich smart TVs. These have several functionalities including a quick connection to Wi-Fi for unlimited entertainment. However, many times users face the problem while trying to connect Hitachi TV to Wi-Fi.
The good news is that there is no need to worry as we’ve resolved this Hitachi TV problem for you. So today, let us go through the top reasons, the best way, and the easy fixes when you try to connect Hitachi TV to Wi-Fi.
Why won’t Hitachi TV connect to Wi-Fi?
Short Answer: Ideally, Hitachi TV should connect to Wi-Fi quickly. If there are any problems, it can be due to problems associated with Hitachi TV, Wi-Fi router, or internet connectivity issues. The good news is that a majority of these problems can be quickly resolved by connecting Hitachi TV to Wi-Fi.
How to connect Hitachi TV to Wi-Fi?
After understanding the different reasons for problems to connect Hitachi TV to Wi-Fi, below are the quick steps for the same:
- Step 1: Press the “Menu” button on Hitachi TV remote.
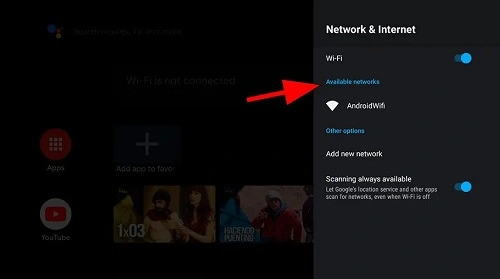
- Step 2: Now select the “Network and Internet Settings” option. A list of available wireless devices will appear on your screen.
- Step 3: Select your Wi-Fi device and then enter your password details. Make sure to enter the correct password.
- Step 4: Now press the internet icon button on your Hitachi TV remote. You have to approve the privacy policy to access the internet using this Wi-Fi.
- Step 5: Select the “I agree” option. Start using the internet on your Hitachi TV to access the smart portal features.
How to Fix Hitachi TV won’t connect to Wi-Fi
Connecting your Hitachi TV to Wi-Fi is not difficult at all, but what if it is not connecting to a Wi-Fi router?
There is no need to worry as our next section deals with the quick fixes to smoothly connect Hitachi TV to Wi-Fi. So, here you go:
Method 1: Checking the internet connection
Firstly, are you sure that your Wi-Fi is having proper internet access?
Hitachi TV may not connect to Wi-Fi if there is no internet access on the router. So, start your troubleshooting journey by checking the internet access of Wi-Fi.
You may contact your internet service provider (ISP) if there are any issues with internet access on the Wi-Fi router. Try to turn the Wi-Fi router off, wait for a few seconds, and then again turn it on. Check if the internet is connecting to Hitachi TV now.
Method 2: Restart Hitachi TV
There is no need to worry if you’re facing challenges to connect Hitachi TV to Wi-Fi as it can be due to temporary glitches in the TV.
So, the best solution is to restart your Hitachi TV in the following steps:
- Step 1: Turn off Hitachi TV.
- Step 2: Wait for a couple of minutes and then turn on Hitachi TV.
- Step 3: Check if your Hitachi TV is connecting to Wi-Fi now.
Method 3: Restart the Wi-Fi router
After restarting your Hitachi TV, why not give another chance to your Wi-Fi router?
Repeat the same restart process for your Wi-Fi router. All you need to do is turn off your Wi-Fi router, keep it off for a few seconds, and then turn it on. Check if Hitachi TV at your place is connecting to Wi-Fi.
A simple restart can resolve possible internet issues on Sharp TV. Learn more about Sharp TV won’t connect to Wi-Fi in detail.
Method 4: Reset the Wi-Fi router
Another method to resolve possible issues with your Wi-Fi router is to reset it. The quick steps to reset the Wi-Fi router while trying to connect Hitachi TV to Wi-Fi are:
- Step 1: Locate and press the “Reset” button on your Wi-Fi router for around five seconds.
- Step 2: Release the Reset button and wait as the Wi-Fi router will restart with the new settings.
- Step 3: Try to connect Hitachi TV with a Wi-Fi router now.
Method 5: Update the date and time settings of Hitachi TV
Many times the problem of no internet access on Hitachi TV is due to the wrong date and time settings on it. So, the steps to update the date and time settings of Hitachi TV include the following:
- Step 1: Locate and press the “Home” button on your Hitachi TV remote.
- Step 2: Select the “Settings” option, followed by the “System” option, and the “Time” option.
- Step 3: Select the time zone and then press “OK” to apply the changes. Check if the TV is connecting to Wi-Fi or not.
Method 6: Power cycle Hitachi TV
Do you know that some of the electricity remains in the internal circuit of Hitachi TV even when it is turned off?
The power cycle works in the right direction to remove such residue electricity causing possible issues when trying to connect Hitachi TV to Wi-Fi. It is easy to power cycle your Hitachi TV using the following steps:
- Step 1: Select the “Power” button on the remote of the Hitachi TV.
- Step 2: Disconnect the power supply to the Hitachi TV. Disconnect all power cables/ adapters, and then wait for at least five minutes.
- Step 3: Reconnect the power supply to Hitachi TV and turn it on. Check if it is getting connected to Wi-Fi easily now.
Got Old Sharp TV at your place? Go through the guide on how to connect old Sharp TV to Wi-Fi.
Method 7: Updating Hitachi TV software
Next, Hitachi TV may not connect properly to Wi-Fi if it has outdated software. So, the easy steps to update Hitachi TV software for connecting it to Wi-Fi are:
- Step 1: Select the “System Settings” option on Hitachi TV.
- Step 2: Go to the “System Update” option.
- Step 3: Finally, select the “Check now” option followed by “Update” if there is any pending update.
Method 8: Disable demo mode on Hitachi TV
Are you trying to connect Hitachi TV to Wi-Fi that you’ve purchased recently?
If yes, then chances are high that your TV set is still in demo mode only. It is easy to disable demo mode on Hitachi TV in the following quick ways:
- Step 1: Select the “Home” button on Hitachi TV remote and go to the “Settings” option.
- Step 2: Select the “Input” option, followed by the “Menu” option, and then select the “Setup” option.
- Step 3: Now select the “Auto-Setup” option, followed by the “E-Pop Demo” option, and turn it off.
- Step 4: Finally, exit the “Menu” option and reboot your TV. Check if it is getting connected to Wi-Fi now.
Method 9: Factory reset Hitachi TV
If nothing is working for the Wi-Fi connection on your Hitachi TV, it is time to restore it to the default factory settings. So, the quick but easy steps to connect Hitachi TV to Wi-Fi using factory reset are as follows:
- Step 1: Select the “Menu” button on Hitachi TV remote.
- Step 2: Locate and select the “Installation” option and select “OK.”
- Step 3: Now select the “Yes” option and then restart the TV. Check if it is getting connected to Wi-Fi properly now.
This fix works if your Hitachi TV creating problems in turning it on. Know more to fix Hitachi TV won’t turn on here.
Method 10: Contact Hitachi TV customer support
Moving towards the end, it is easy to reach the expert customer support team of Hitachi company for any issues with it.
So, all you need to do is reach Hitachi TV support and share your Wi-Fi connecting issues on the TV with them. The customer support team will guide you throughout the process or will schedule a visit if required.
SEE ALSO:
Concluding Thoughts
Hence, no more worries when you have problems connecting Hitachi TV to Wi-Fi. It can be due to internet issues, Hitachi TV issues, or Wi-Fi problems.
All you need to do is go through a step-by-step guide to connect Hitachi TV to Wi-Fi. Our well-researched list of the top fixes ensures that you can solve internet problems on Hitachi TV easily and quickly.
Do let us know what worked for you from our guide to using Wi-Fi on Hitachi TV in the comments section!
An active wordsmith delivering high-quality technical content on AndroidNature.com. She loves to keep herself updated with consistent reading. A strong believer of consistent learning, she loves to read about technology, news, and current affairs.


