
Acer, though well-known for making laptops, also makes amazing monitors.
They’re some of the best in class and are available for both the gaming and professional markets.
However, fantastic as they can be, these monitors have seen their fair share of problems.
A quick search shows you a variety of issues that users have seen with their monitors.
Many people have complained about their monitor suddenly not turning on as well as simply not getting an output.
Lucky for you, I’ve done the groundwork and figured out how to fix these problems given there isn’t critical damage to your monitor.
Let’s dive in.
What Do The Blue Light/Orange Light/No Light Mean On Acer Monitors
Short Answer: The blue light on Acer monitors denote the device is powered on and connected to an output device. The orange light means the monitor is powered on, but in sleep mode. If there’s no light, then the device is powered off completely.
Let’s take a look at each of these situations in a little more detail.
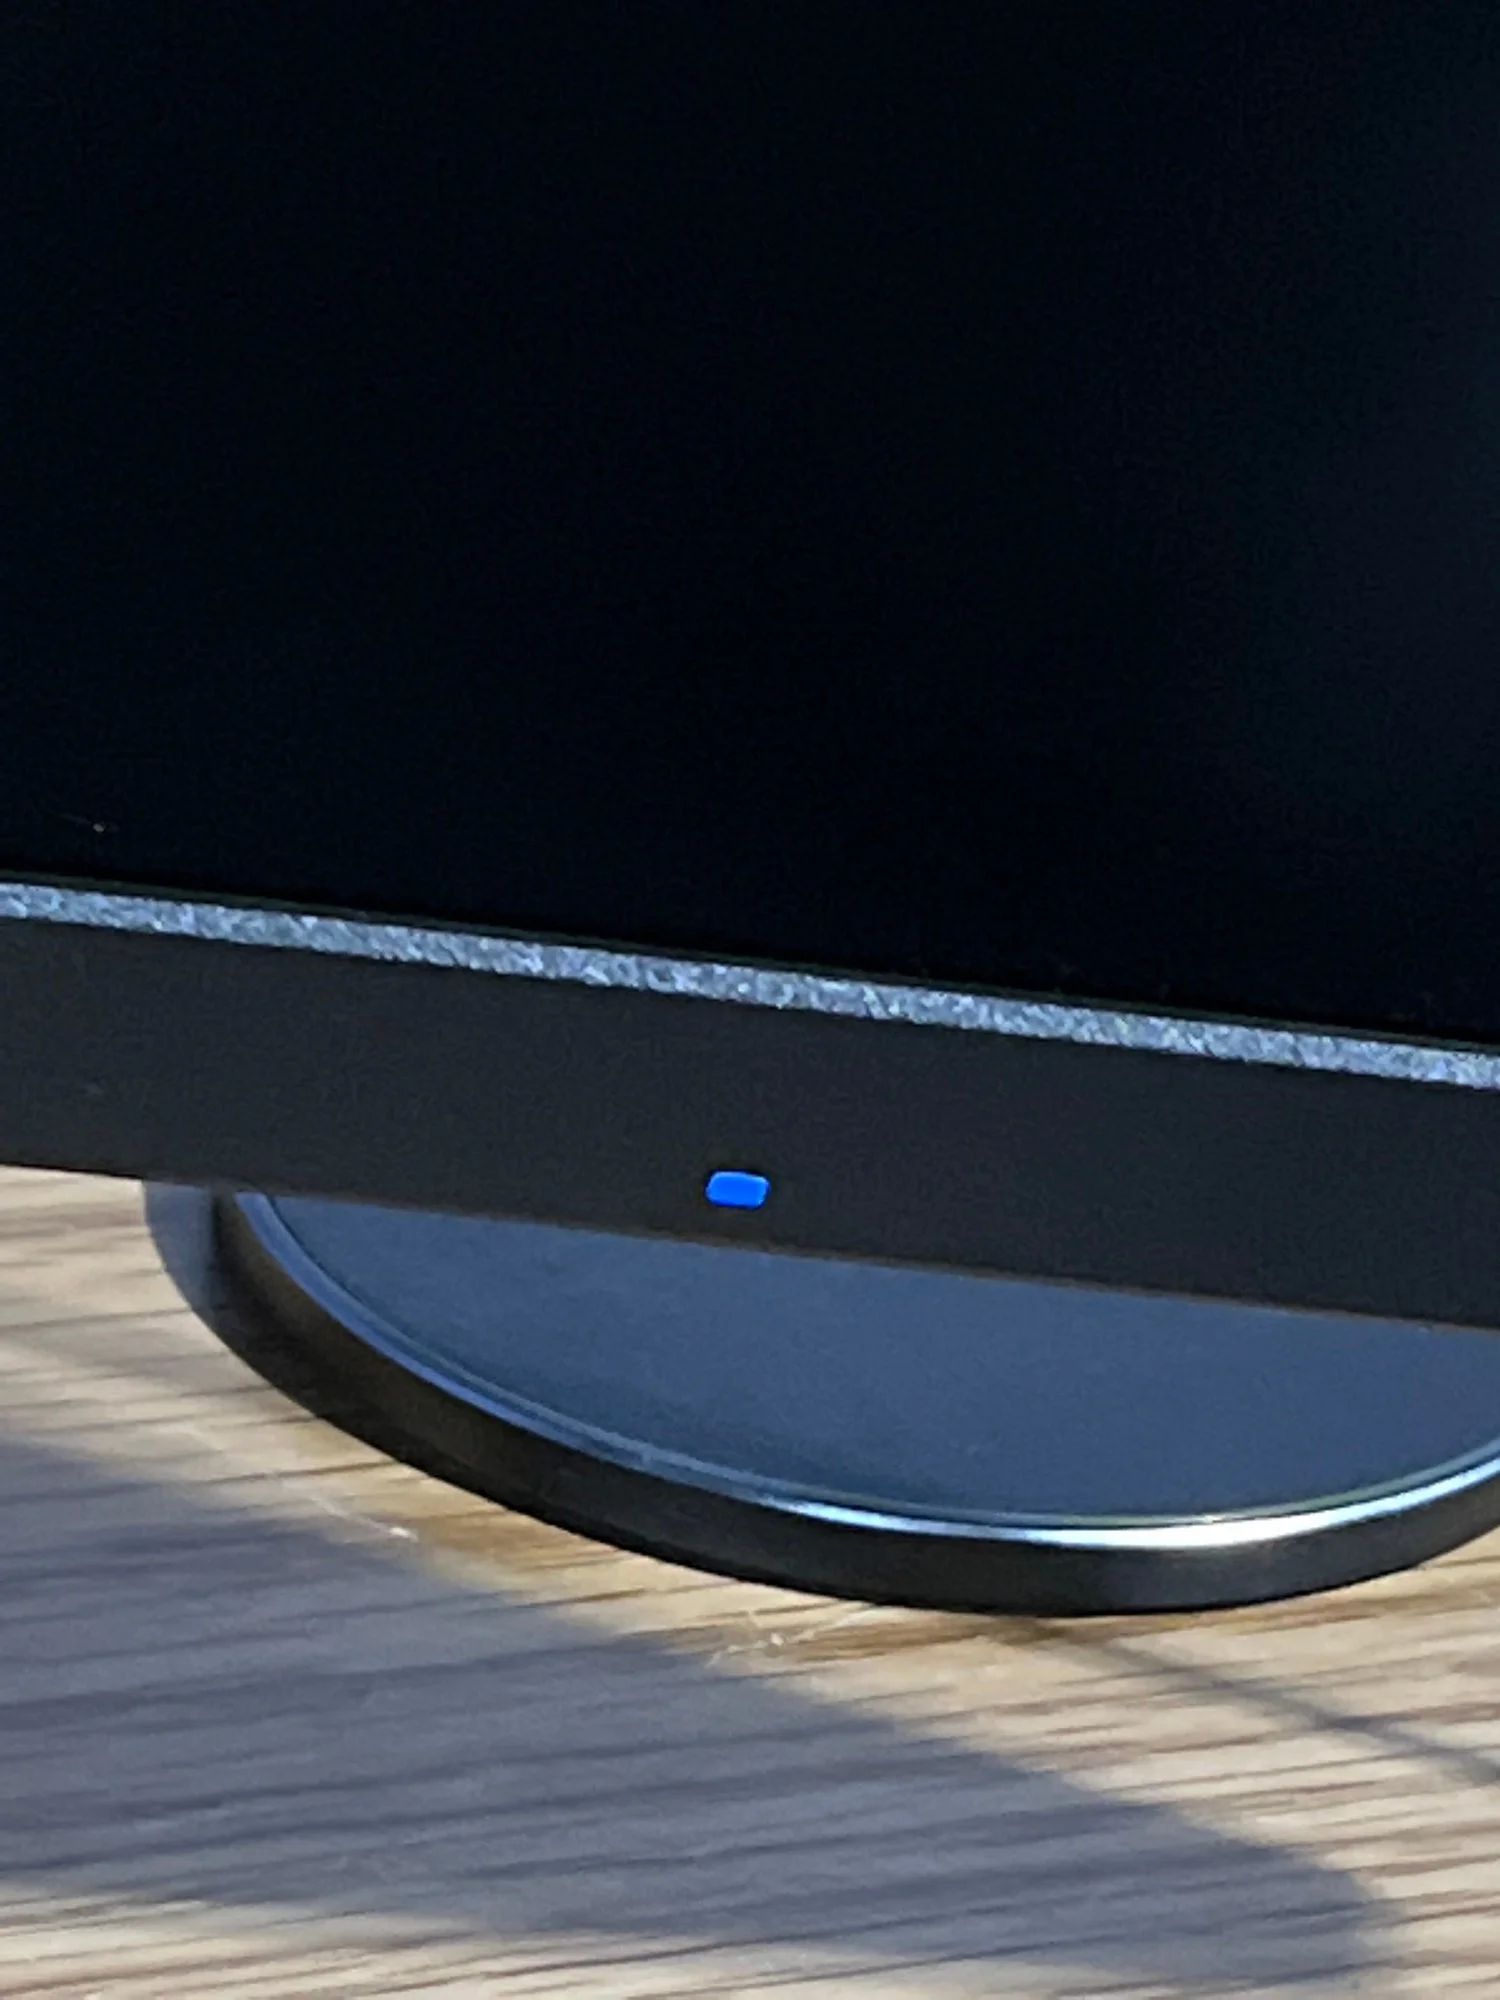
Blue Light
To shed some more light on the matter, the blue light means your monitor is functioning as it should.
It’s powered on and it detects that an output device such as a gaming console or PC is connected to it.
But if your monitor’s LED indicator is blue but you don’t see an output on the display, it could be an issue you need to look into.
This issue can be fixed relatively easily, even if you aren’t knowledgeable about device troubleshooting.
It could be as simple as damaged cables, or as advanced as needing to reset your PC BIOS.
I’ll get into more detail about the solutions once we’ve looked at the other lights on the monitor.
But you can skip ahead if you’ve confirmed this is your issue.
Orange Light
An orange light and no output means your monitor is powered on.
However, it isn’t detecting any devices connected to it, so it goes into standby or sleep mode.
This situation, similar to the blue light, can be caused by one of several factors.
The good news is the fixes for not getting a signal when your monitor has a blue light or orange light is relatively the same.
So if your issue is your monitor has an orange light but no output, jump ahead to the fixes.
No Light
If you don’t see a light on the LED indicator, it means the monitor is powered off and disconnected from the power supply.
While this is completely normal, if you don’t see a light even after connecting it to a power supply, it could mean trouble.
If you’re lucky, it might just be an issue with the power cable or the outlet you’re connected to.
Getting a new power cable or using a different outlet will fix it.
But, if it’s not your lucky day, you could be looking at damaged internal components or the internal power supply is busted.
There aren’t many viable ways to fix internal components, but if it’s not too bad, there still might be hope.
So, if this is the issue you’re facing, use one of the fixes below to get it sorted out.
Fixes For Acer Monitor Not Turning On Blue light/Orange Light/No Light
I’ll mention the light color in brackets next to the fixes.
You can use them to quickly jump between the solutions without reading the ones that don’t pertain to your problem.
Method 1- Power Cycle Your Monitor (Blue/Orange/No Light)
Good ol’ power cycling.
It’s been a staple of fixing electronics even before most of us were born, and it still is today.
Simply put, you just need to drain the residual power from the monitor’s capacitors as it’s preventing it from showing an output.
All you need to do is,
- Step 1- Turn off your monitor, disconnect any devices connected to it, and disconnect the power supply.
- Step 2- Hold the power button on the monitor for about a minute to drain the power from the capacitors.
- Step 3- Connect everything back to the monitor and turn on the power.
Once it boots up, your monitor should show an output and work normally.
If it didn’t work, you can try it again, but this time, hold down the power button for longer before powering the monitor back on.
Method 2- Replace The Power Cable (Blue/Orange/No Light)
In some cases, if your power cable or outlet is damaged, your monitor might be susceptible to power spikes.
If you have a similar power cable from another device, you can use it to confirm if this is the problem.
Another way to confirm if it’s the power cable is to take it to your local PC store and use one of their power cables.
Replacement power cables aren’t too hard to come by.
In fact, if you’re sure that’s the issue, I’d suggest reaching out to Acer for a replacement.
Method 3- Check Your HDMI/DisplayPort Cable For Damage (Blue/Orange)
Since we tend to connect the input/output cables and just forget about them, you might not have noticed your cable getting damaged over time.
Using an HDMI or DisplayPort cable for an extended period with twists and bends can lead to it getting damaged internally.
If you notice any acute bends on your cable, then it’s entirely possible the wiring inside is damaged.
However, if your cables weren’t bent, then check the end connectors to see if they’ve been damaged.
Broken, damaged, and missing pins will most definitely prevent you from using your monitor.
You can further confirm this by using a working HDMI or DisplayPort cable from another device.
If your monitor works with the alternate cable, you should start looking for replacements.
My recommendation would be the Power Bear 4K HDMI cable or the UGREEN DisplayPort 2.1 cable depending on your preference.
Method 4- Ensure The Ports On Your Monitor Work Properly (Blue/Orange)
If it’s not the cables, it might be the ports, is what I usually say.
Check the HDMI or DisplayPort on your monitor and look for damage.
Just like the end connectors on the cable, see if there are any broken or missing pins.
Use another port on the monitor to validate your suspicions.
It’s great that most modern monitors provide multiple input ports, so you can either send it in for repairs or simply use one of the other ports.
But, tough luck if your monitor only has a single input port.
You’ll have to take it to Acer or an authorized service center.
Here’s a tip, don’t be forceful when you’re trying to connect or disconnect HDMI or DisplayPort cables.
Both these ports are extremely robust, so if you do manage to damage them, it’s most likely due to harsh usage.
Method 5- Check Your PC/Input Device’s Ports (Blue/Orange)
If your Acer monitor’s ports are fine, then it could be an issue with your PC or device connected to your monitor.
For game consoles or other similar devices, disconnect the HDMI cable from the monitor and the device itself.
If you notice damage on the ports, you have no choice but to take it in for repairs.
Most home entertainment devices come with a single HDMI port.
So unless you have a device with multiple ports, you’re out of luck.
PCs on the other hand are a little different.
If you have a dedicated graphics card from Nvidia or AMD, you’ll most likely have more than one output port.
And, they generally support both DisplayPort and HDMI.
So, if you think the port is damaged or not working, just use one of the other ones.
Method 6- Ensure Your Graphics Card Drivers Are Recent Enough (Blue/Orange)
If all your hardware checks out damage-free, then it’s relatively simple to take care of software issues.
The first thing that could be causing you headaches with your monitor is graphics card (GPU) drivers.
But before you do this, you’ll have to get around one issue.
Your graphics card isn’t giving you an output.
Luckily, almost all modern CPUs come with integrated graphics which you can utilize by connecting your monitor directly to the motherboard.
Disconnect the monitor from the GPU and connect it to the motherboard using the image below as an example.
The Green Arrow is your GPU, and the Red Arrow is your motherboard.
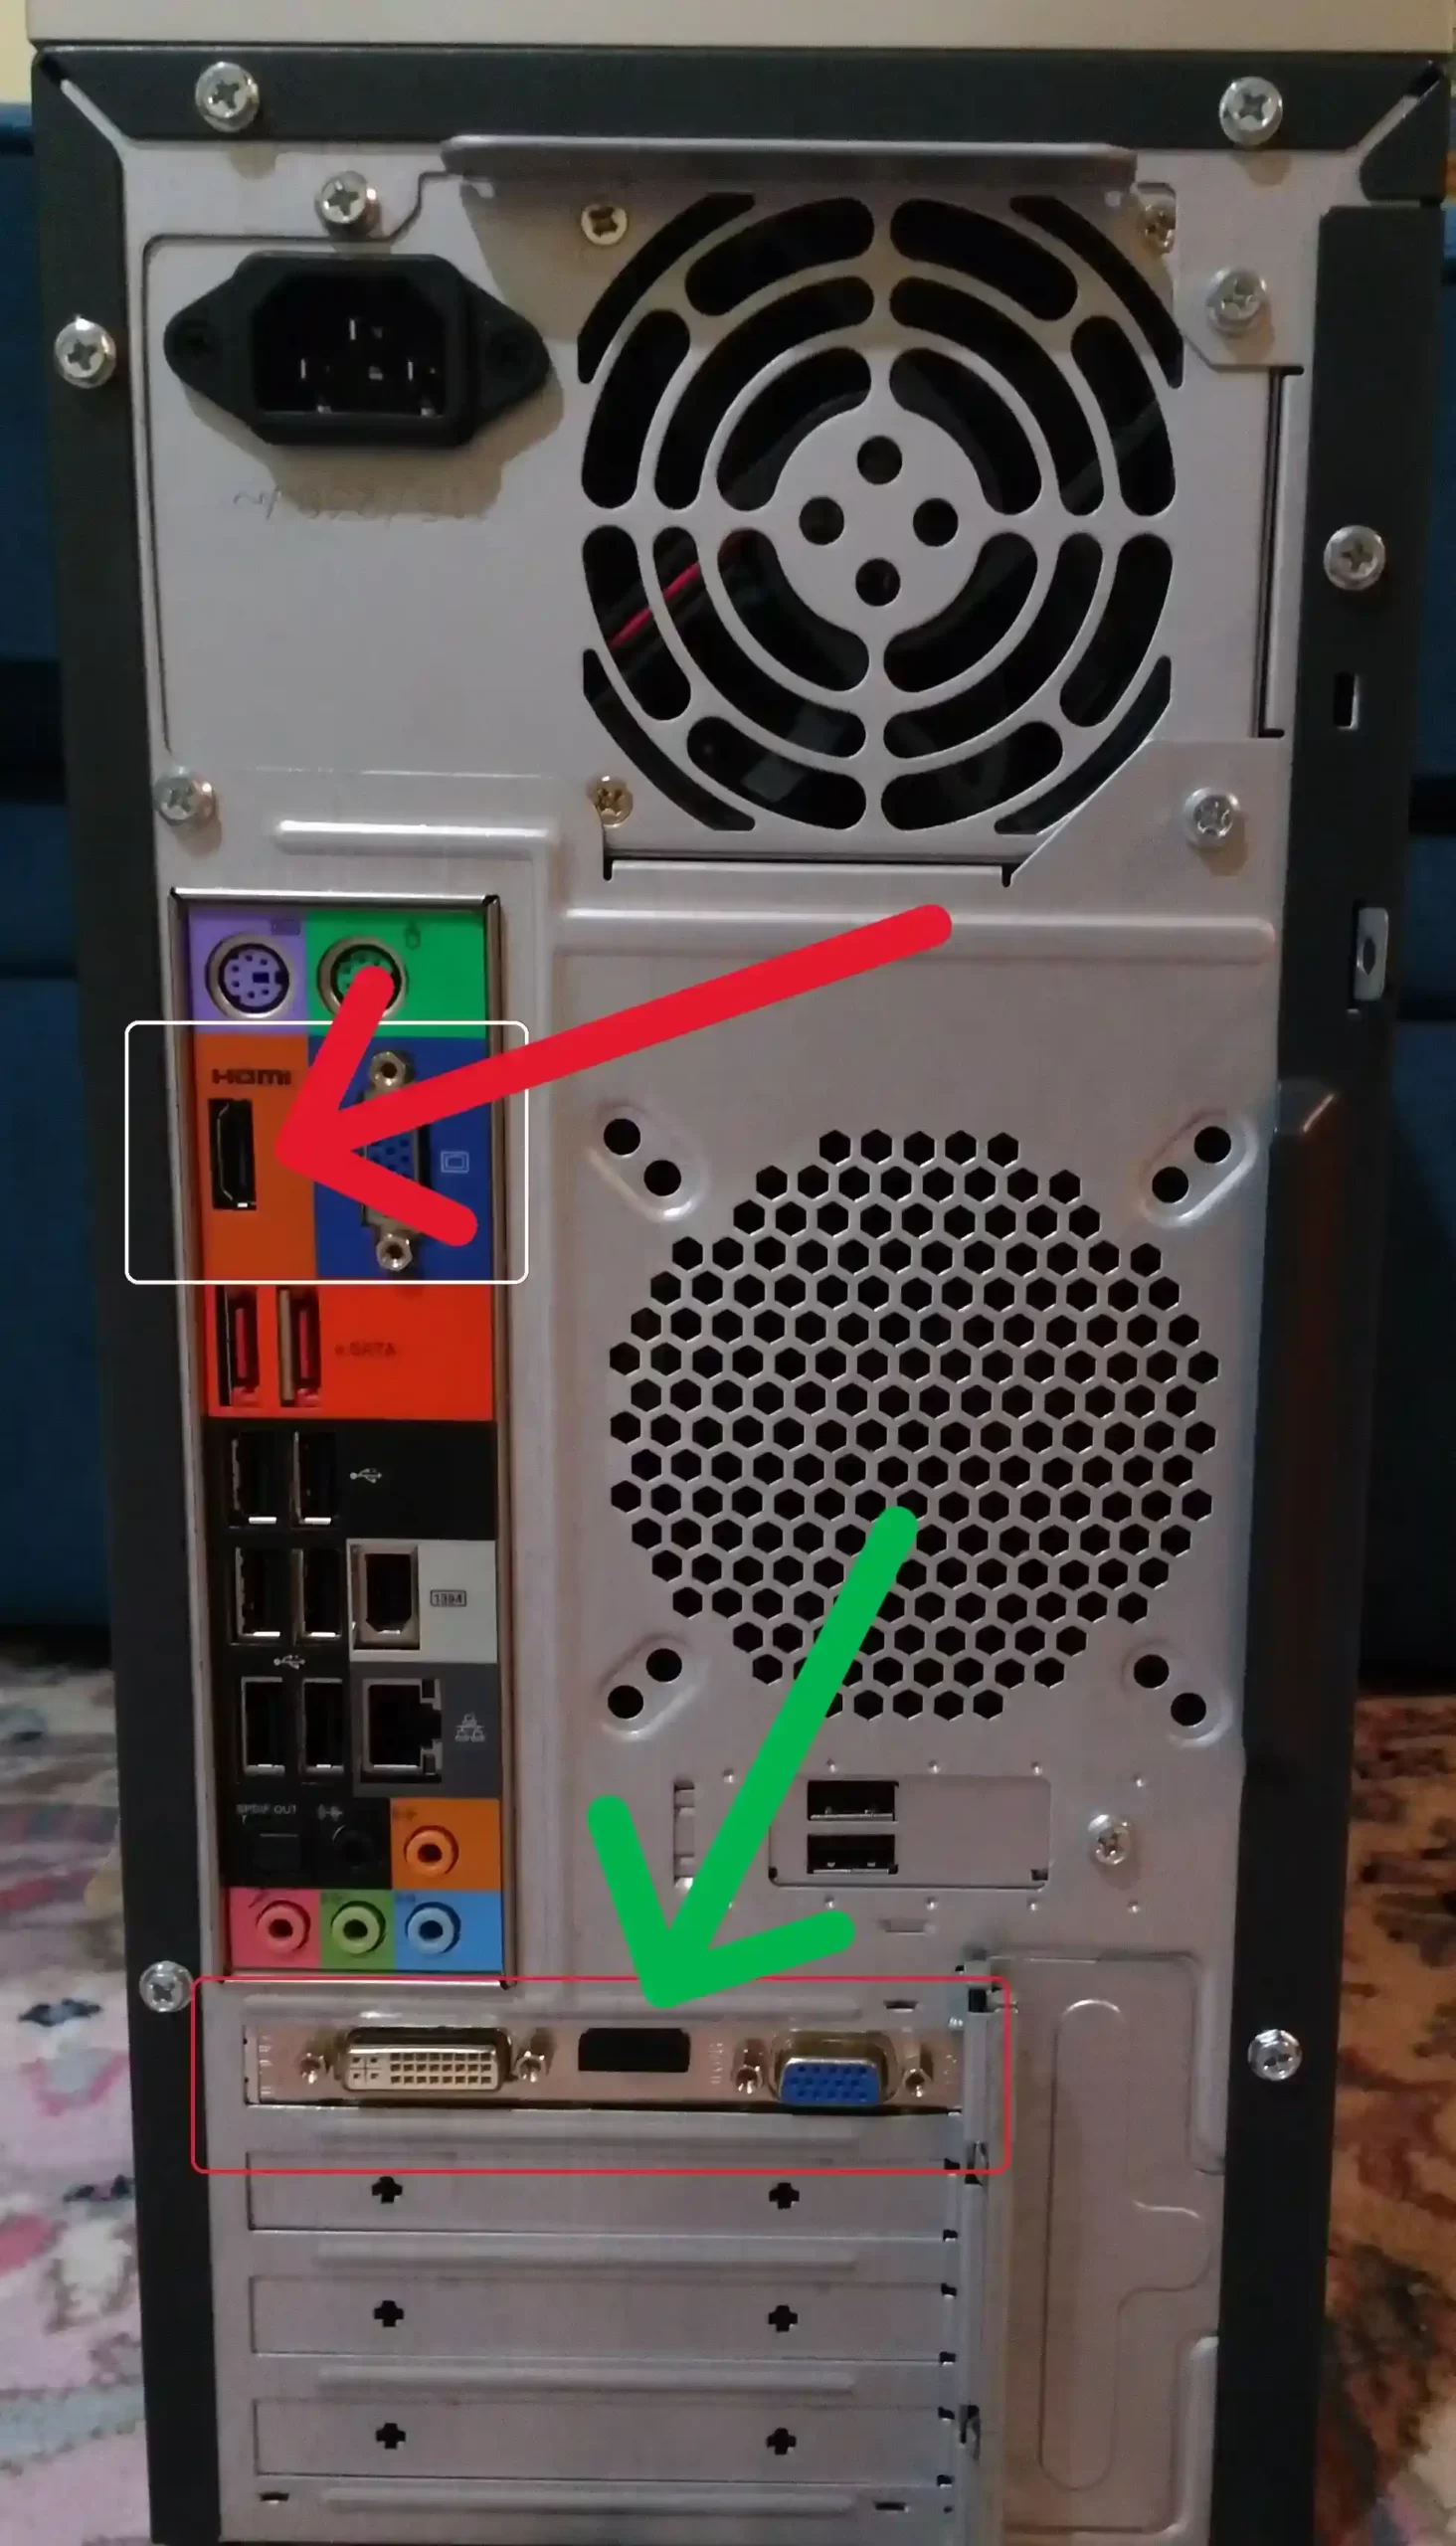
Now you can proceed to use your PC normally with the monitor.
Nvidia users can use Nvidia GeForce Experience to automatically download and install the latest available drivers for your GPU.
However, if you don’t have or want to install the app, you can manually download the drivers from their website.
Use the drop-down menus to select your graphics card model and driver type and you’ll be given a download link.

Similarly, AMD users can use AMD software installer for a hands-free support experience.
Otherwise, you can use the driver selector to manually download the drivers you need for your GPU from their website.

Once the drivers are installed, you can go ahead and disconnect from the motherboard and reconnect to the GPU.
Method 7- Ensure Your Monitor’s Drivers Are Updated (Blue/Orange)
Just like your graphics card, your monitor also needs to have the latest drivers installed to work properly.
The only issue with this fix is that you’ll need a second display.
You can either use a TV or borrow a monitor from a friend or from work.
Ensure both your Acer monitor and your second display are connected to your PC’s graphics card.
Boot up your system and follow the steps below.
- Step 1- From the desktop, right-click on ‘Start’ (Windows icon) and select ‘Device Manager’.
- Step 2- On the window that opens up, click on ‘Monitors’ and you should see both your Acer monitor as well as the second display.
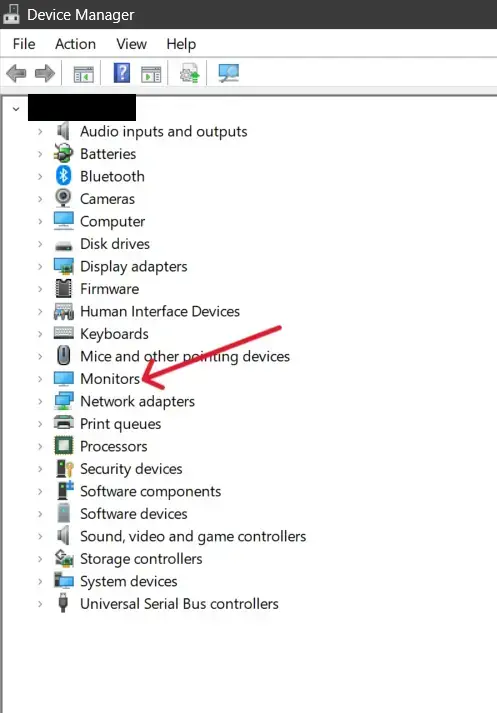
- Step 3- Right-click the Acer monitor and click on ‘Update Driver’.
- Step 4- Next, click on ‘Search automatically for drivers’.
Windows will find and install the latest available drivers for your monitor.
Once it’s installed, restart your PC and you should get an output on your Acer monitor.
Method 8- You’ll Need To Reset Your CMOS (Blue/Orange)
There are instances where the BIOS for your PC might be corrupted and causing issues with your monitor showing an output.
While the fix itself is relatively easy if you know how, it is a bit advanced if you’re not comfortable working on the internal components of your PC.
But, there is good news.
If you use a relatively new motherboard, chances are it has a physical CMOS reset switch.
The CMOS battery essentially holds information such as system boot order, data and time, and other important data for your PC to function properly.
It also contains data for your BIOS.
So, if you have a CMOS reset switch on your motherboard that’s all you need.
- Step 1- First, turn off your PC completely.
- Step 2- On the back of the PC, you should find the CMOS reset switch on the motherboard.
- Step 3- Hold down the switch for about a minute or so and then release it.
- Step 4- Reboot your system and your CMOS and BIOS should have been reset.
Once your system reboots, your monitor should show a display.
Now, if your PC doesn’t have a reset switch, you can still manually reset the CMOS battery.
- Step 1- Turn off your PC and lay it on its side.
- Step 2- Open the side panel so you can see the motherboard directly.
- Step 3- Find the circular battery that looks like the image below.
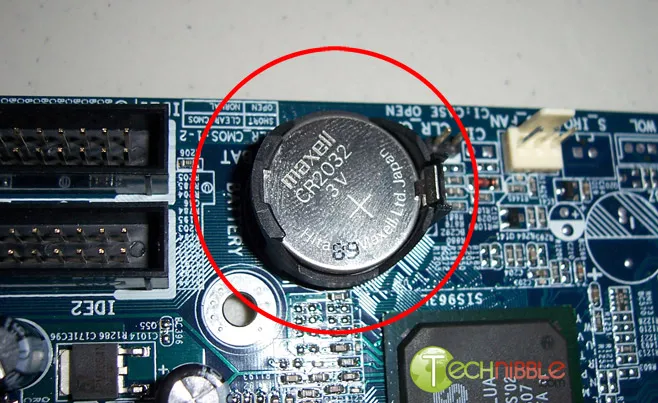
- Step 4- Unhook any fasteners holding the battery in place and then take it out.
- Step 5- Wait for three to five minutes and then connect the CMOS battery back to the motherboard.
This should have successfully reset the CMOS and BIOS on your system.
Method 9- Reach Out To Acer Support (Blue/Orange/No Light)
You’ll have to contact Acer’s support team if none of these fixes solve your problem.
There might be something else that requires professional tech support to sort out.
You can also reach out to any of Acer’s authorized repair centers if you don’t want to directly reach out to Acer.
See Also:
Final Words
If you’re ever in a situation where your Acer monitor refuses to turn on or show an output, I guarantee one of these fixes should solve the issue.
Whether you have an Acer gaming monitor or one of their professional studio monitors, you should be able to use them without any hitches.
So, try these fixes before handing in your monitor for repairs that you might have to pay for.

As a seasoned DIY tinkerer, Arvind found the simplest way to help anyone troubleshoot or set up tech without feeling overwhelmed by it. He’s an advocate for smart home technology and in his free time makes music. He’s also an avid gamer, mostly obsessed with single-player titles.


